|
|
Gunsumer Reports TM Providing Detailed Objective Reviews for Firearms and Firearm Accessories |
Smith & Wesson SW22 Victory Pistol Review
Part 4 - Disassembly & Internal Features
July 7, 2016
In this part of the review I'm going to show disassembly, discuss reassembly and show some of the internal features on the Smith & Wesson SW22 Victory pistol. Although I show disassembly and reassembly, you should always consider the manufacturer's Safety and Instruction Manual as the official source for any of this type of information. Their manual will go into much more detail on the safety aspects of your firearm, whereas I'm more focused on the details of the disassembly and reassembly tasks.
Disassembly
Step 1 - Unloading (Safety)
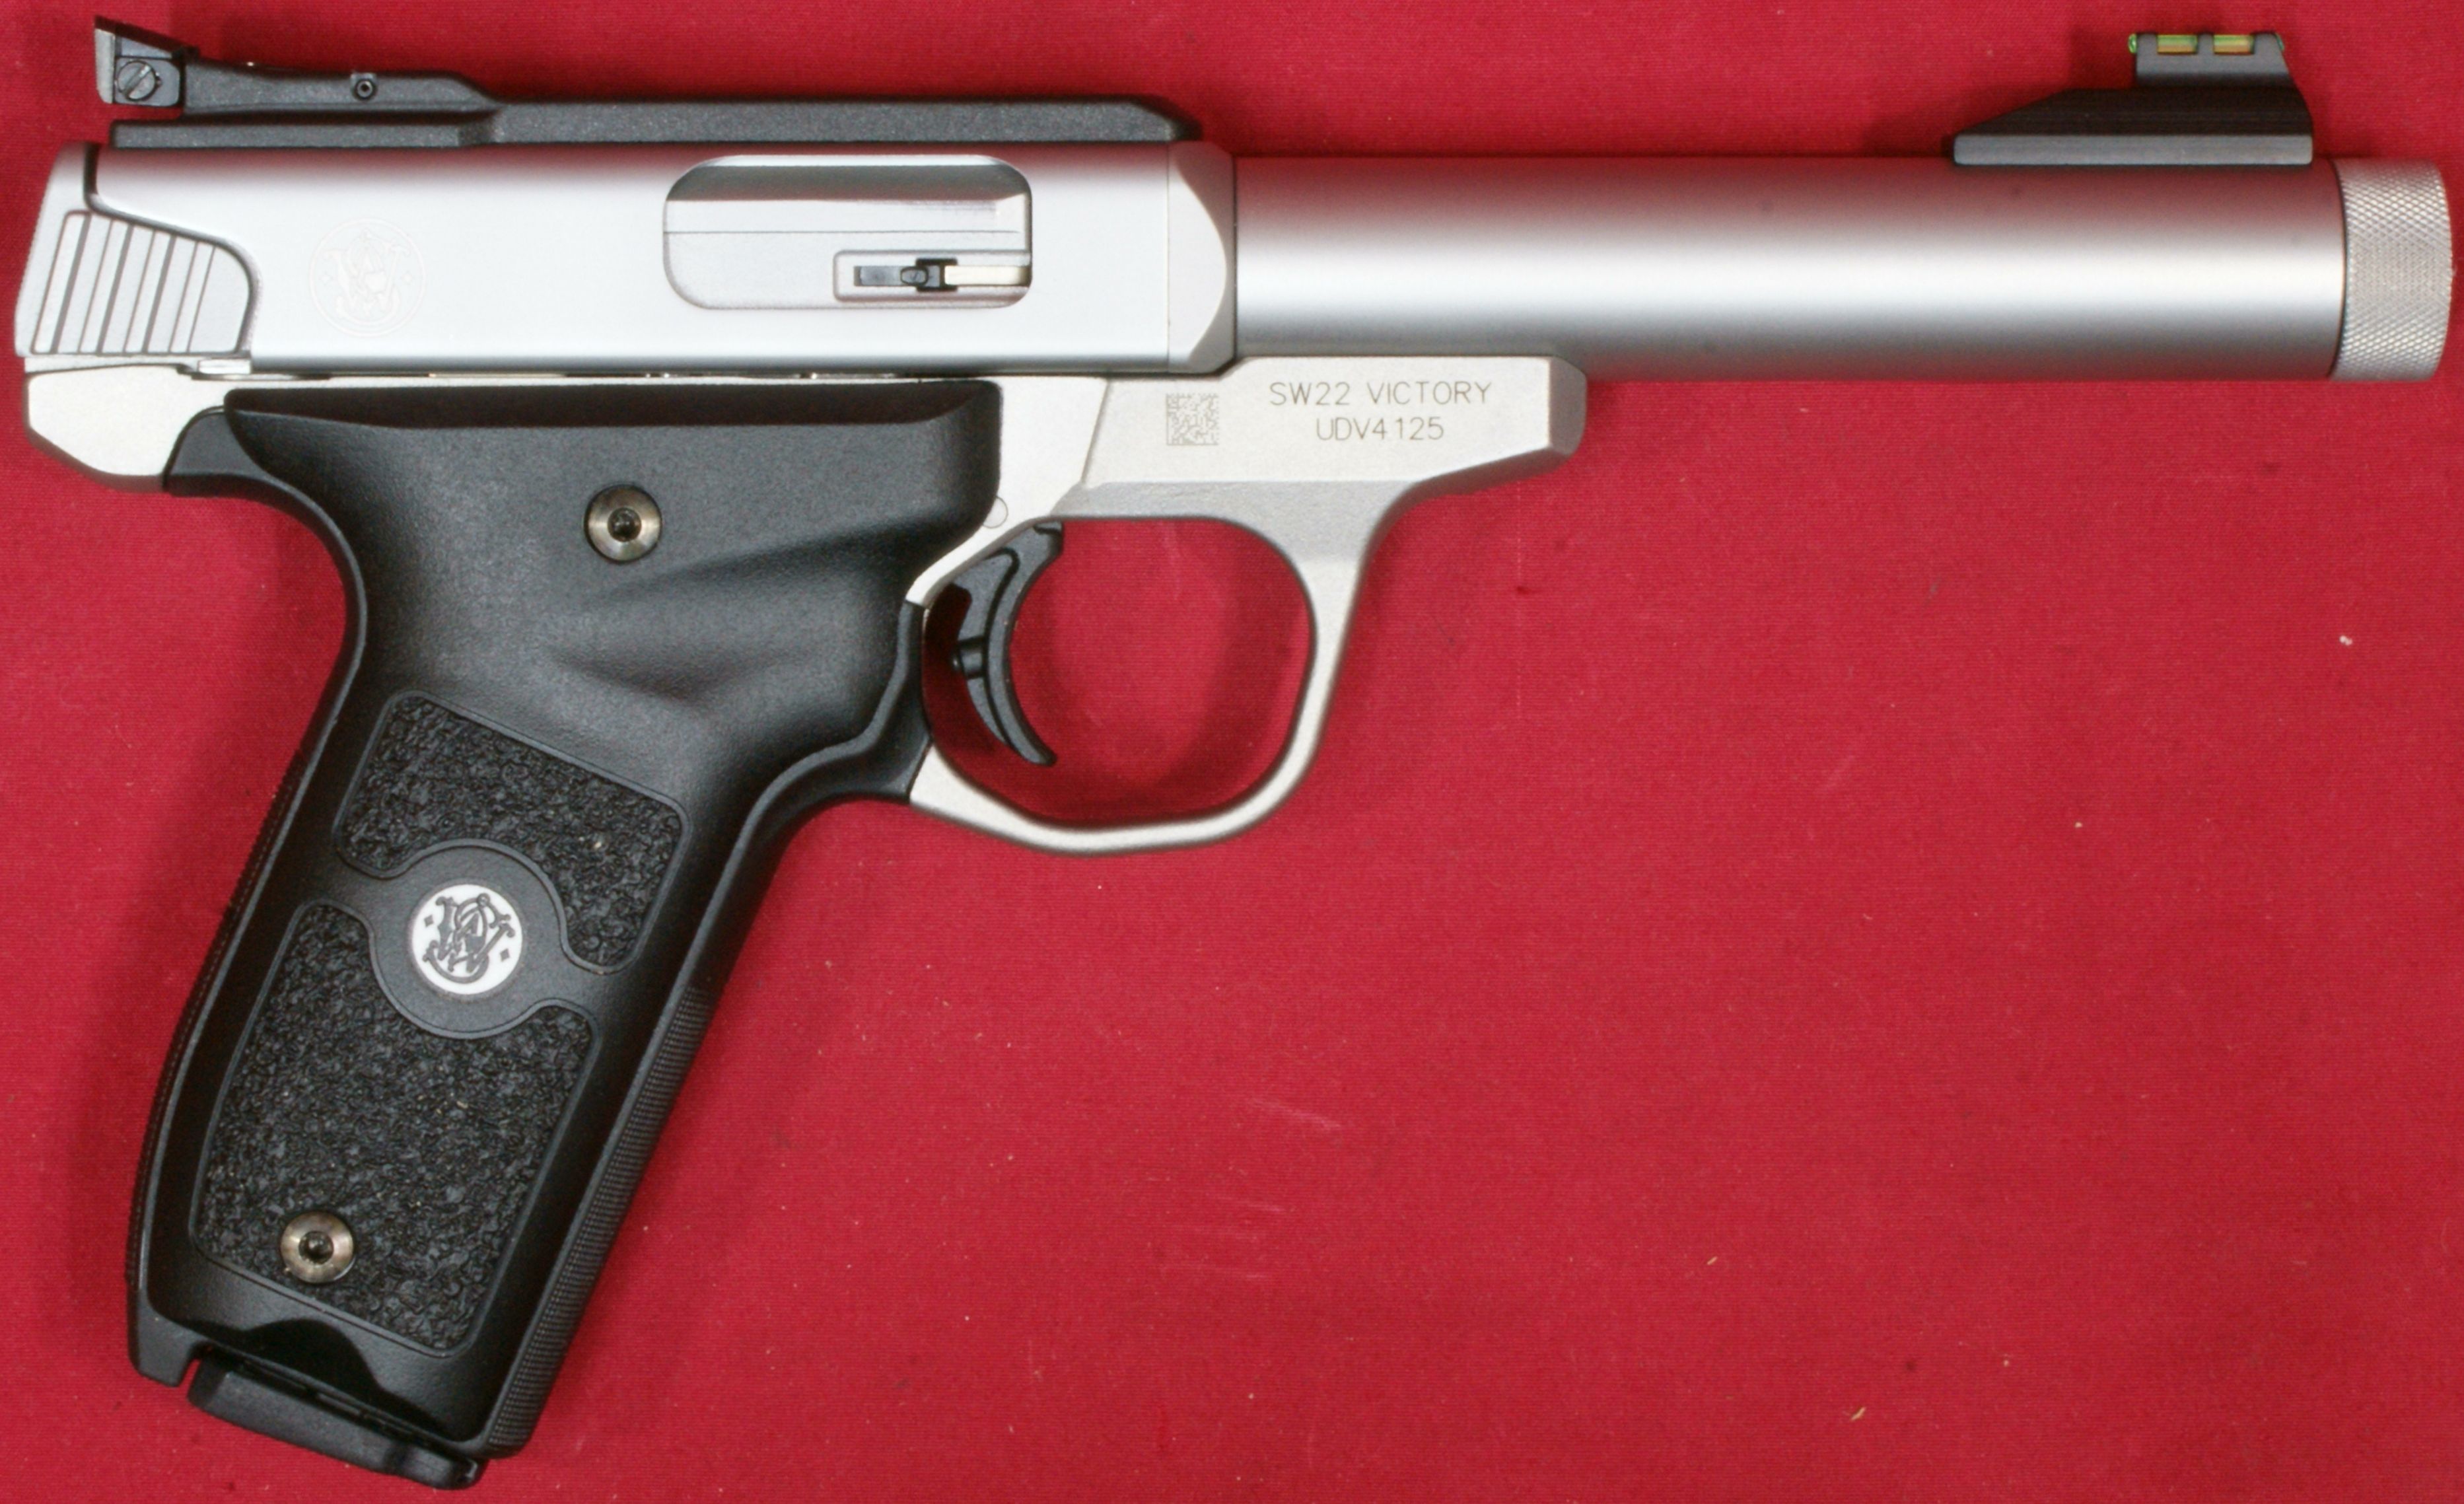
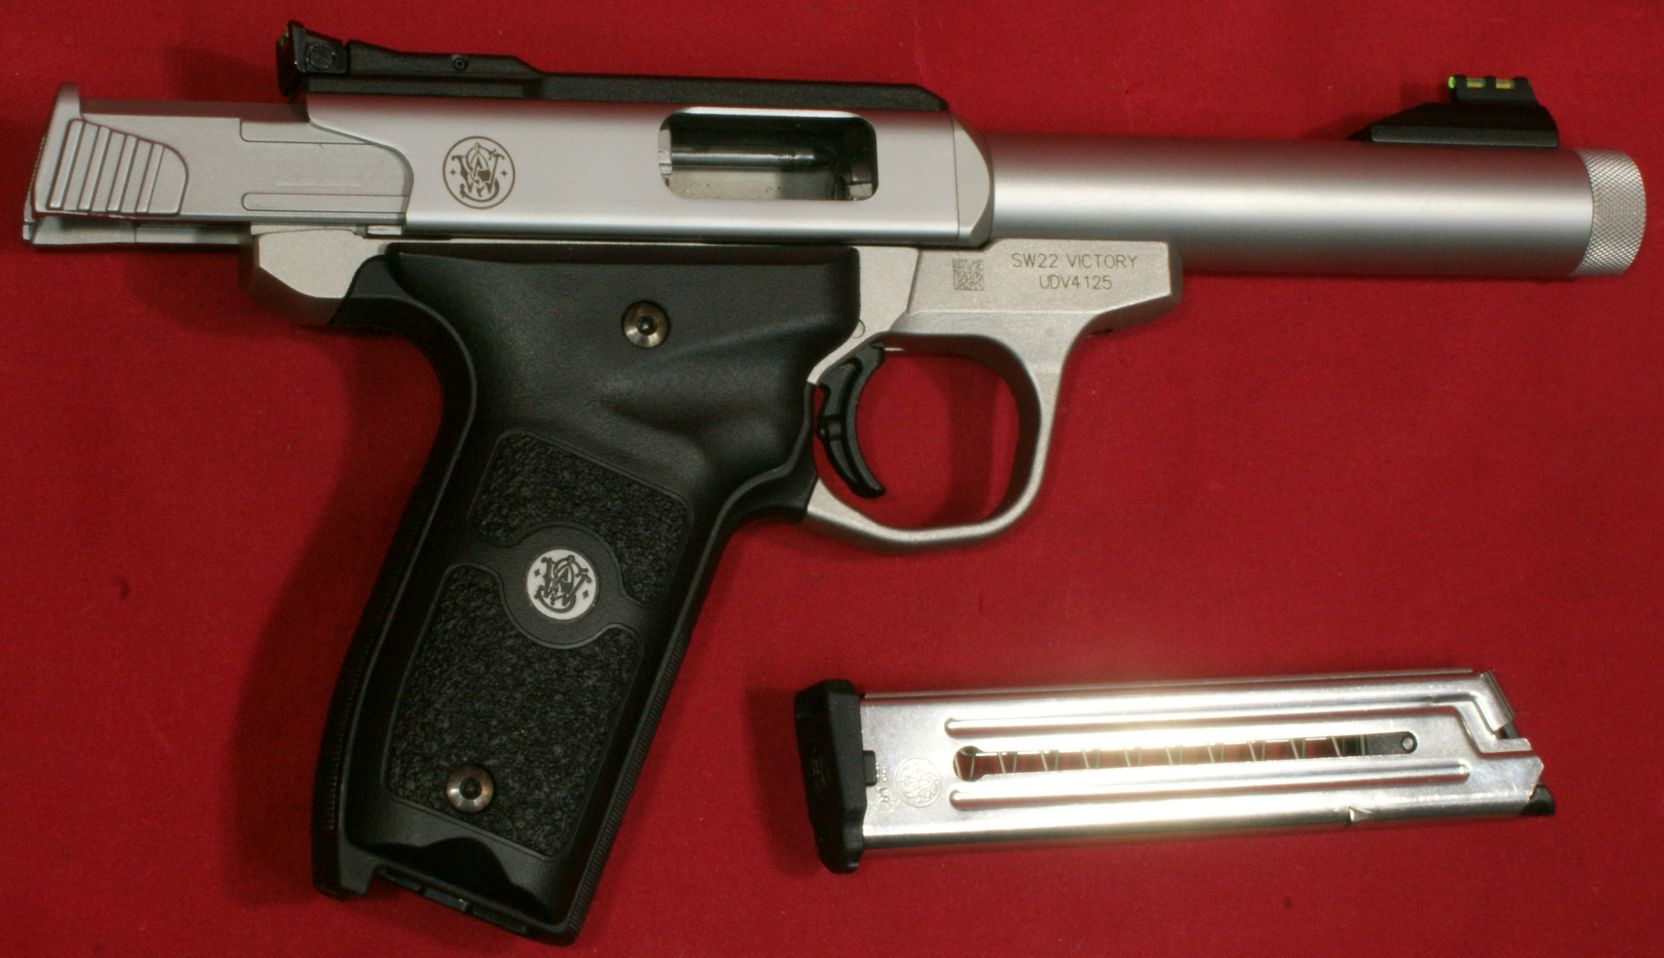
Before you disassemble any firearm, you should always make sure it is unloaded. Remove the magazine, lock the bolt open and then inspect the chamber to ensure their is no round in the chamber. Afterwards, you can close the bolt.
Figure 1
Step 2 - Remove Barrel/Receiver Assembly
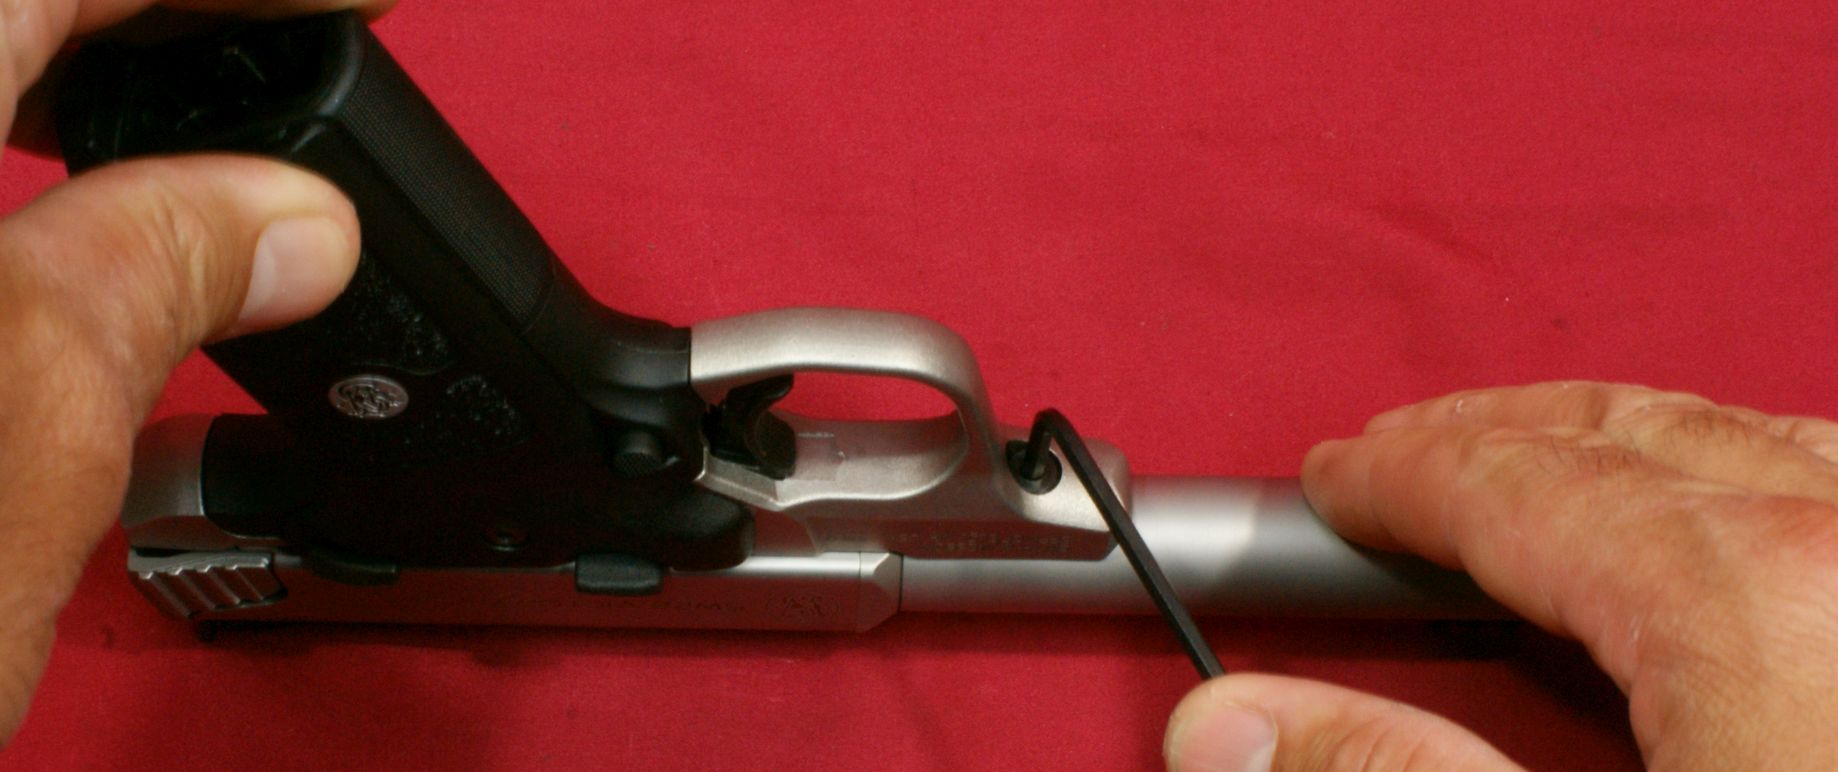
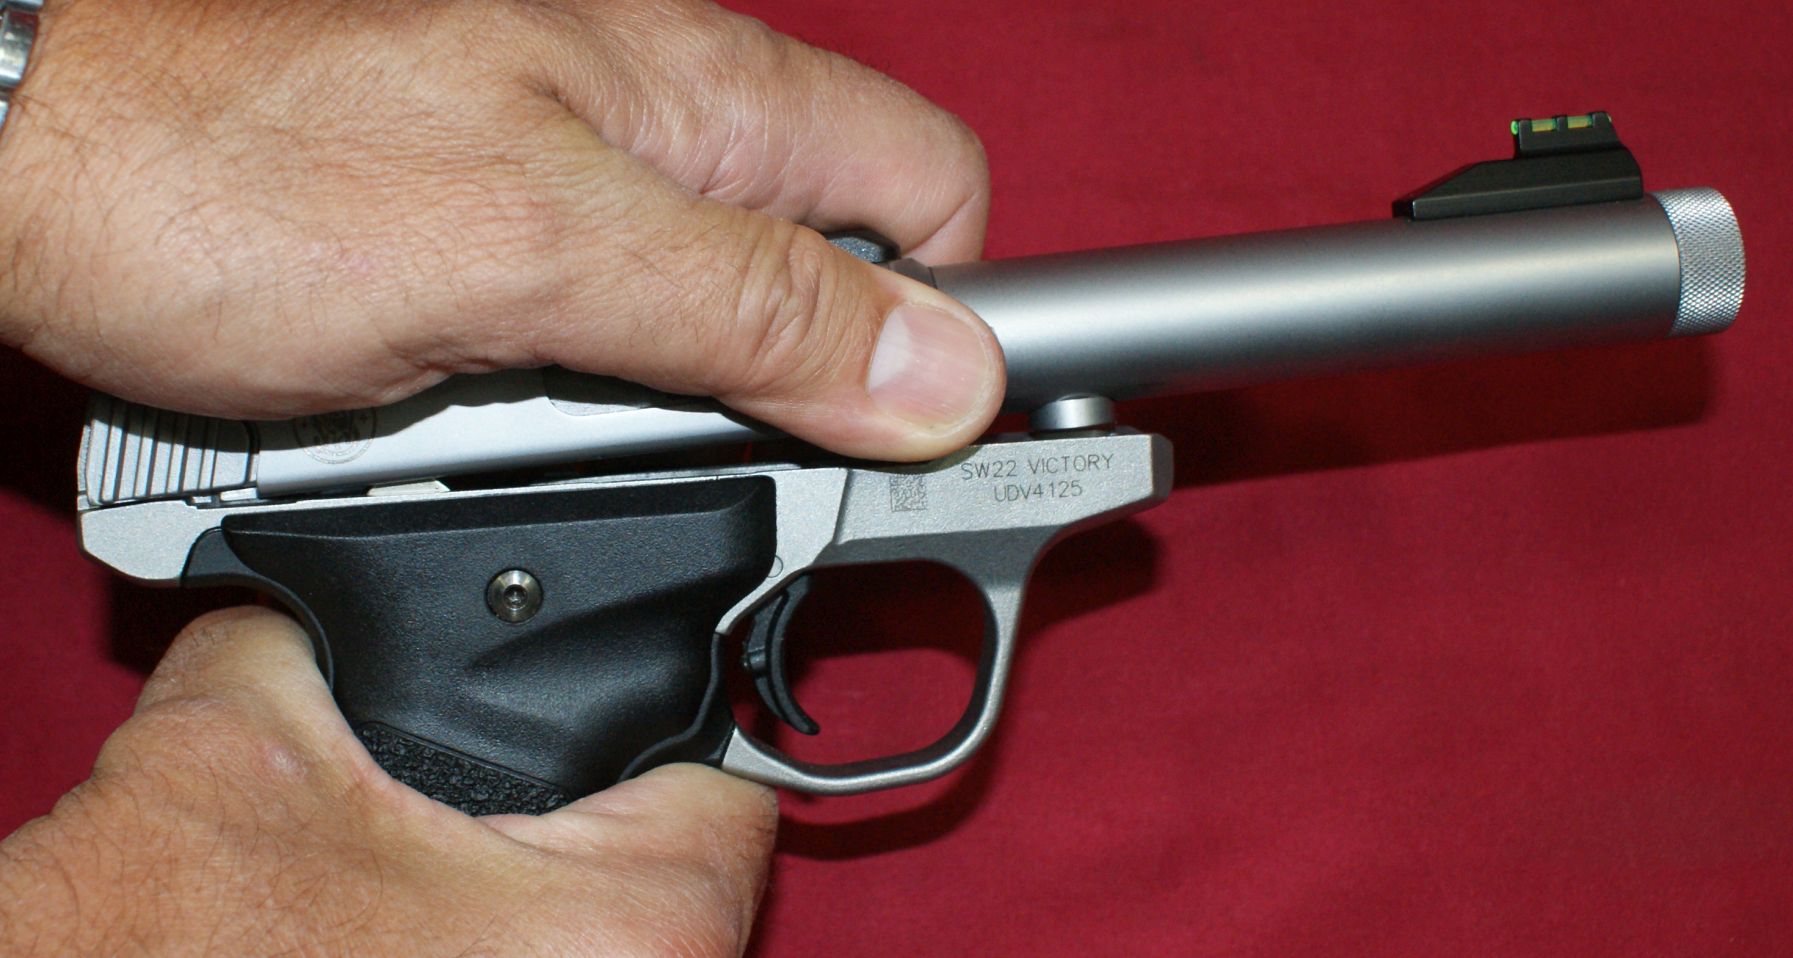
The beauty of disassembly for the SW22 is that it is extremely simple. The price paid for this simplicity is you need an Allen wrench. S&W provides a 1/8" Allen wrench just for this task. They also say removing the screw "may require significant pressure" and they were not joking. I thought I was going to break the wrench or strip the head of the screw because it took so much pressure for me to break the torque on this screw.
Figure 2
Once the torque broke, the screw was easily un-screwed and removed.
Figure 3
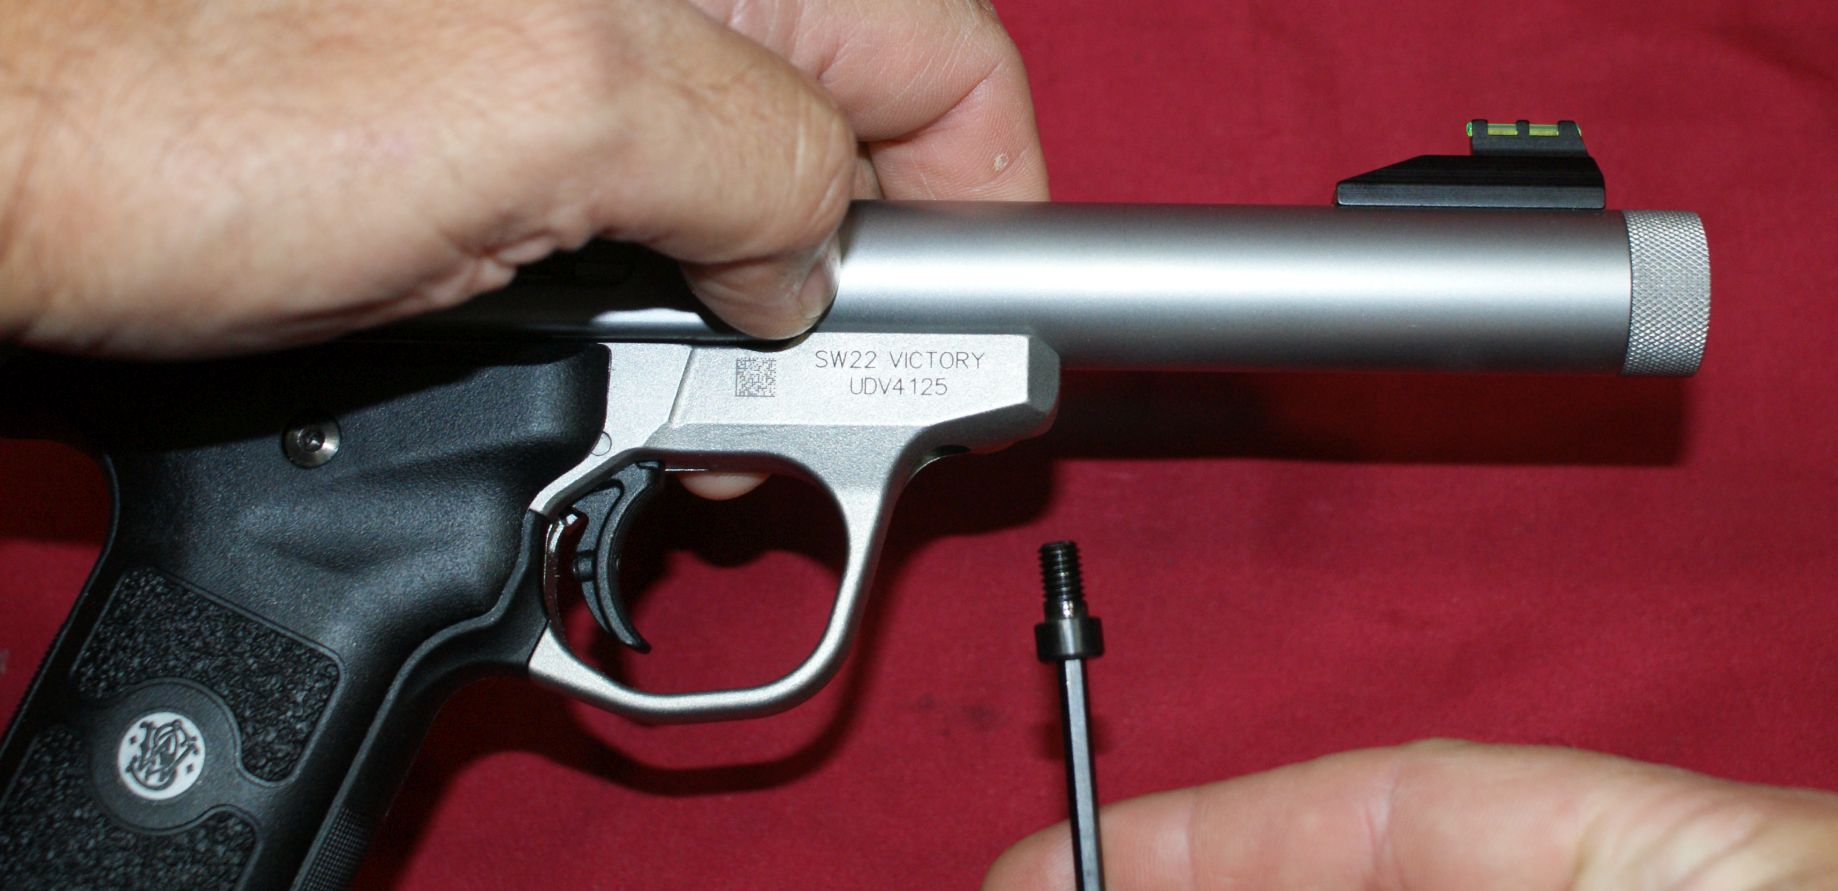
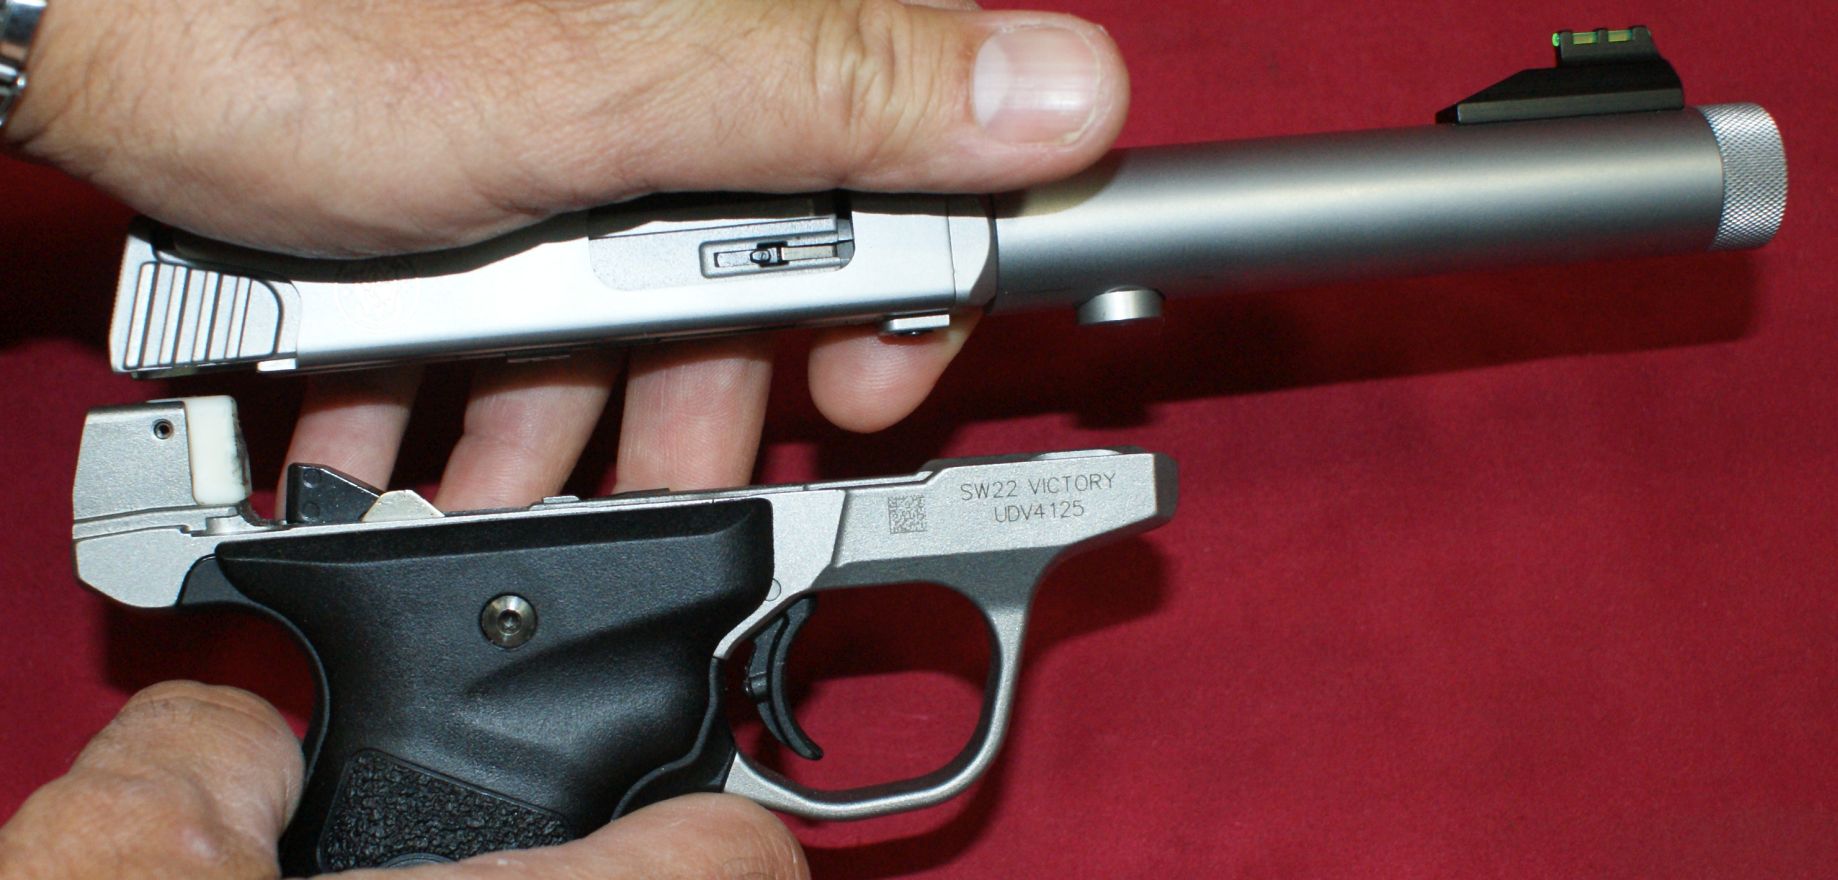
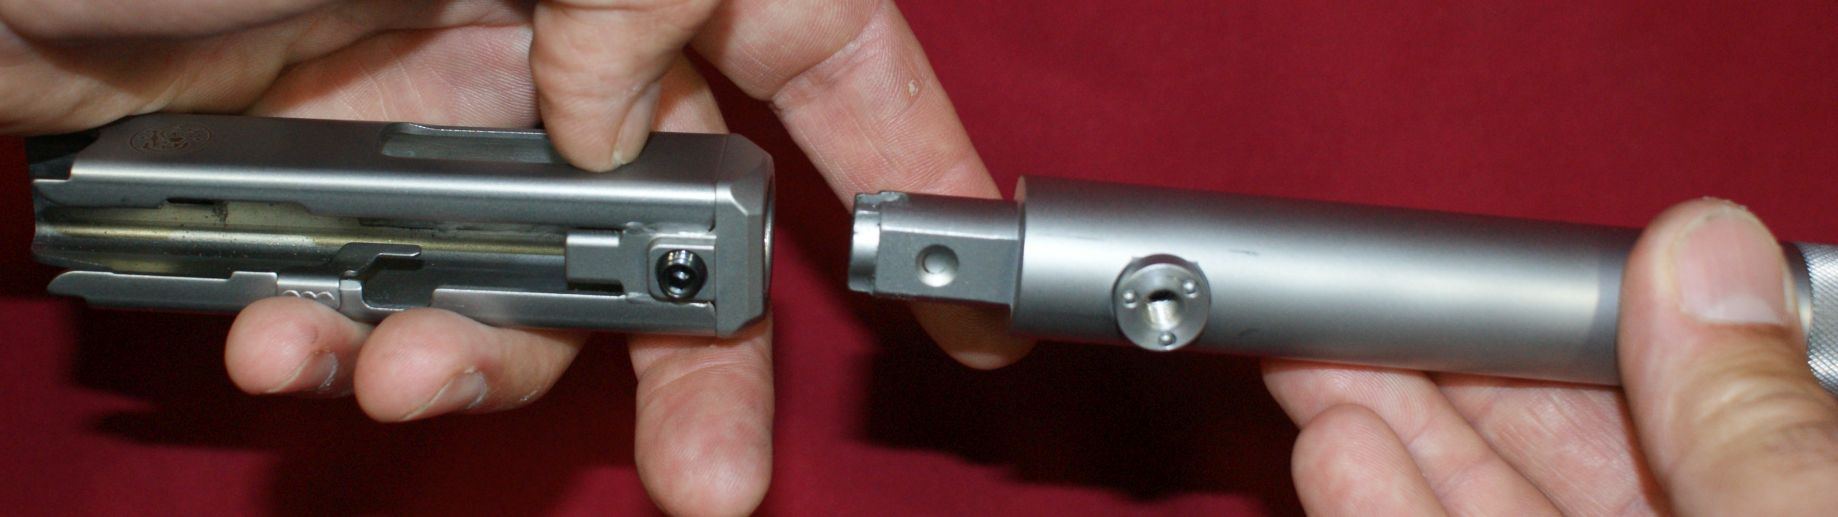
To remove the barrel/receiver assembly, you tip the muzzle end up slightly so the barrel lug comes out of the frame, then pull the assembly forward off the tabs at the rear. The tabs at the rear are circled below in yellow.
Figure 3
The barrel and receiver assembly then lifts off as one complete unit. Make sure the rear end of this assembly is pointed up so the bolt doesn't slide out the rear and hit the ground.
Figure 4
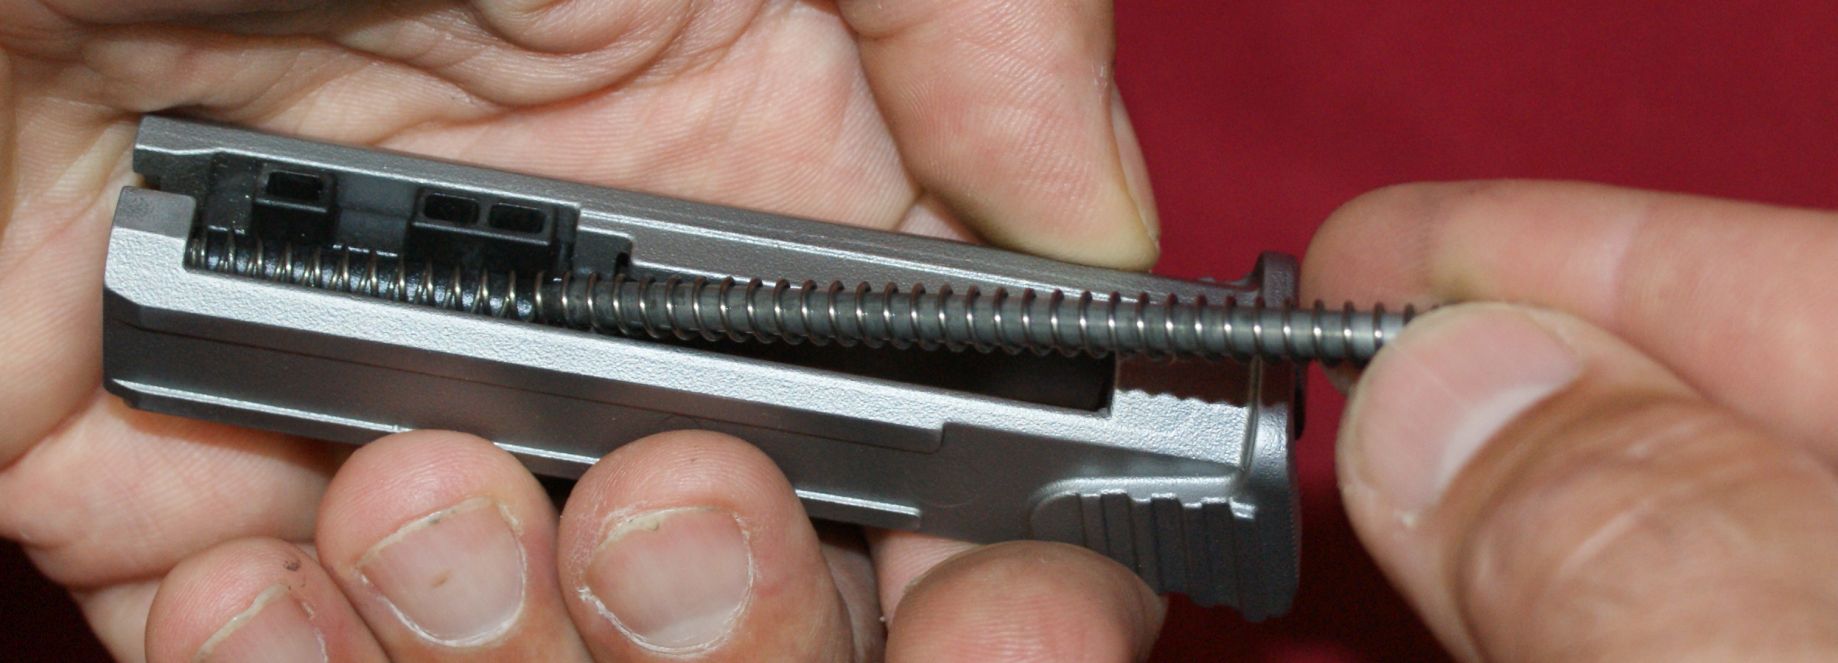
Step 3 - Remove Bolt
You can either tilt the assembly over so the rear is pointed down and the bolt will slide out (make sure you catch it), or you can pull the bolt from the assembly.
Figure 5
The key thing to note is that the recoil spring is compressed inside the bolt and if you put pressure in the wrong location when handling the bolt, you can shift the rear of the guide rod off the support area which will allow the guide rod and spring to shoot across the room.
Figure 6
Disassembly State for Normal Cleaning
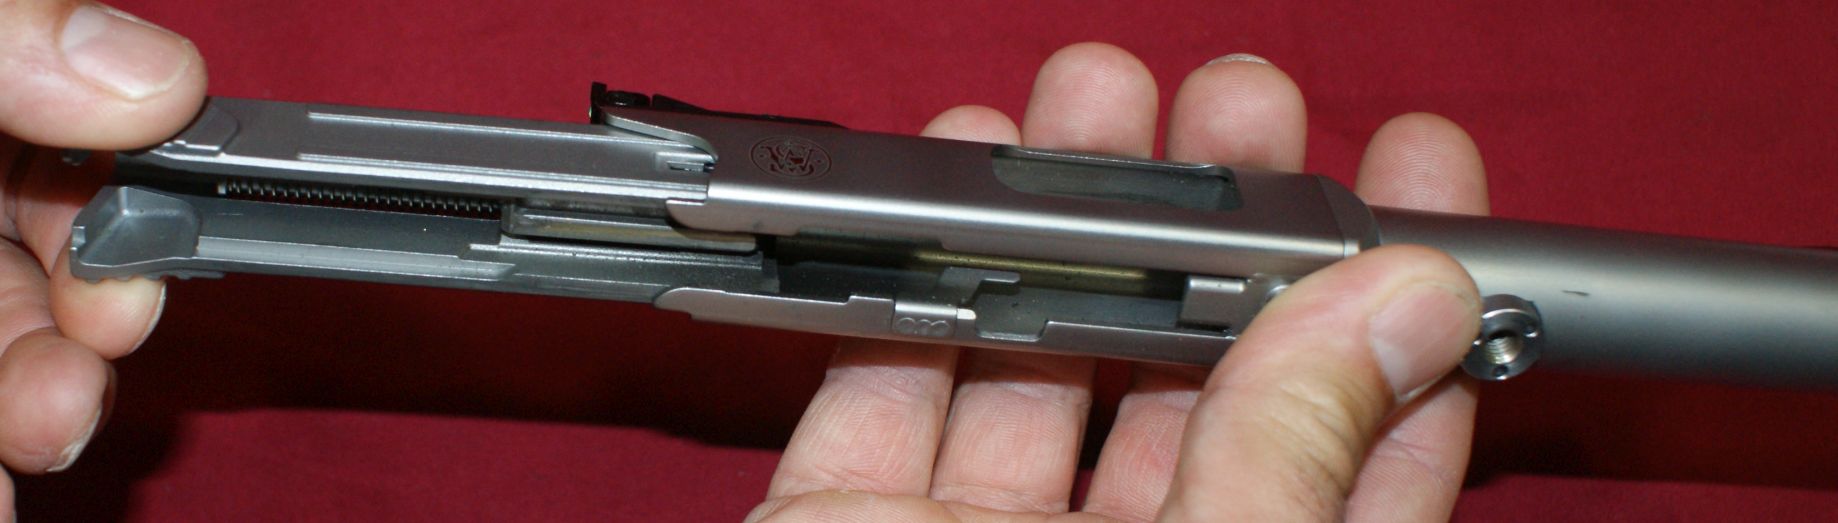
S&W states that removal of the recoil spring and guide rod is not required for normal cleaning and the photo below shows disassembly for typical cleanings. The steps for disassembly to this level were extremely easy and quick. Reassembly is basically the reverse of these steps shown and is also very simple. At this point I have disassembled and reassembled this pistol many times and I don't see any issue with even a first-time gun owner feeling comfortable with disassembly and reassembly of the S&W SW22 Victory Pistol.
Figure 7
Step 4 - Remove Recoil Spring and Guide Rod
In my opinion, removing the recoil spring and guide rod is too easy not to do it during cleaning. The whole key to removing and reinstalling these items is to ensure that they don't shoot across the room and get lost. Using the end of the Allen wrench used for takedown, press the end of the guide rod as shown below.
Figure 8
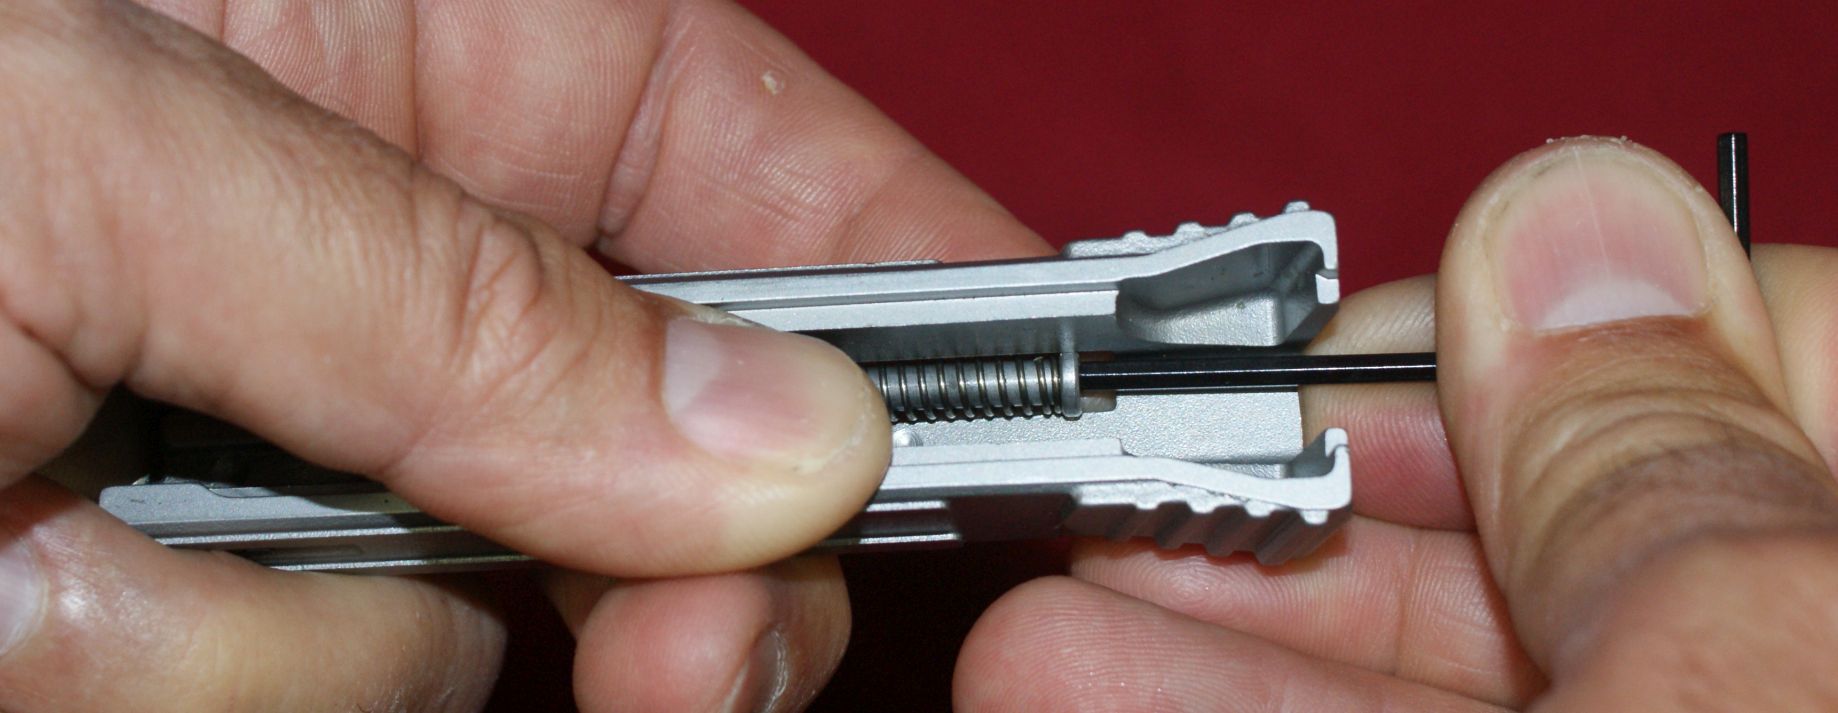
It is hard to show this next step in a photo, but with the guide rod depressed, shift the rod up and out of the seat and relieve the spring pressure gradually. It might seem a little awkward for the first time or two, but eventually it becomes natural to do these steps. The S&W manual actually shows taking the guide rod out on the other side, so make sure you try that technique also to see what seems simpler to do.
Figure 9
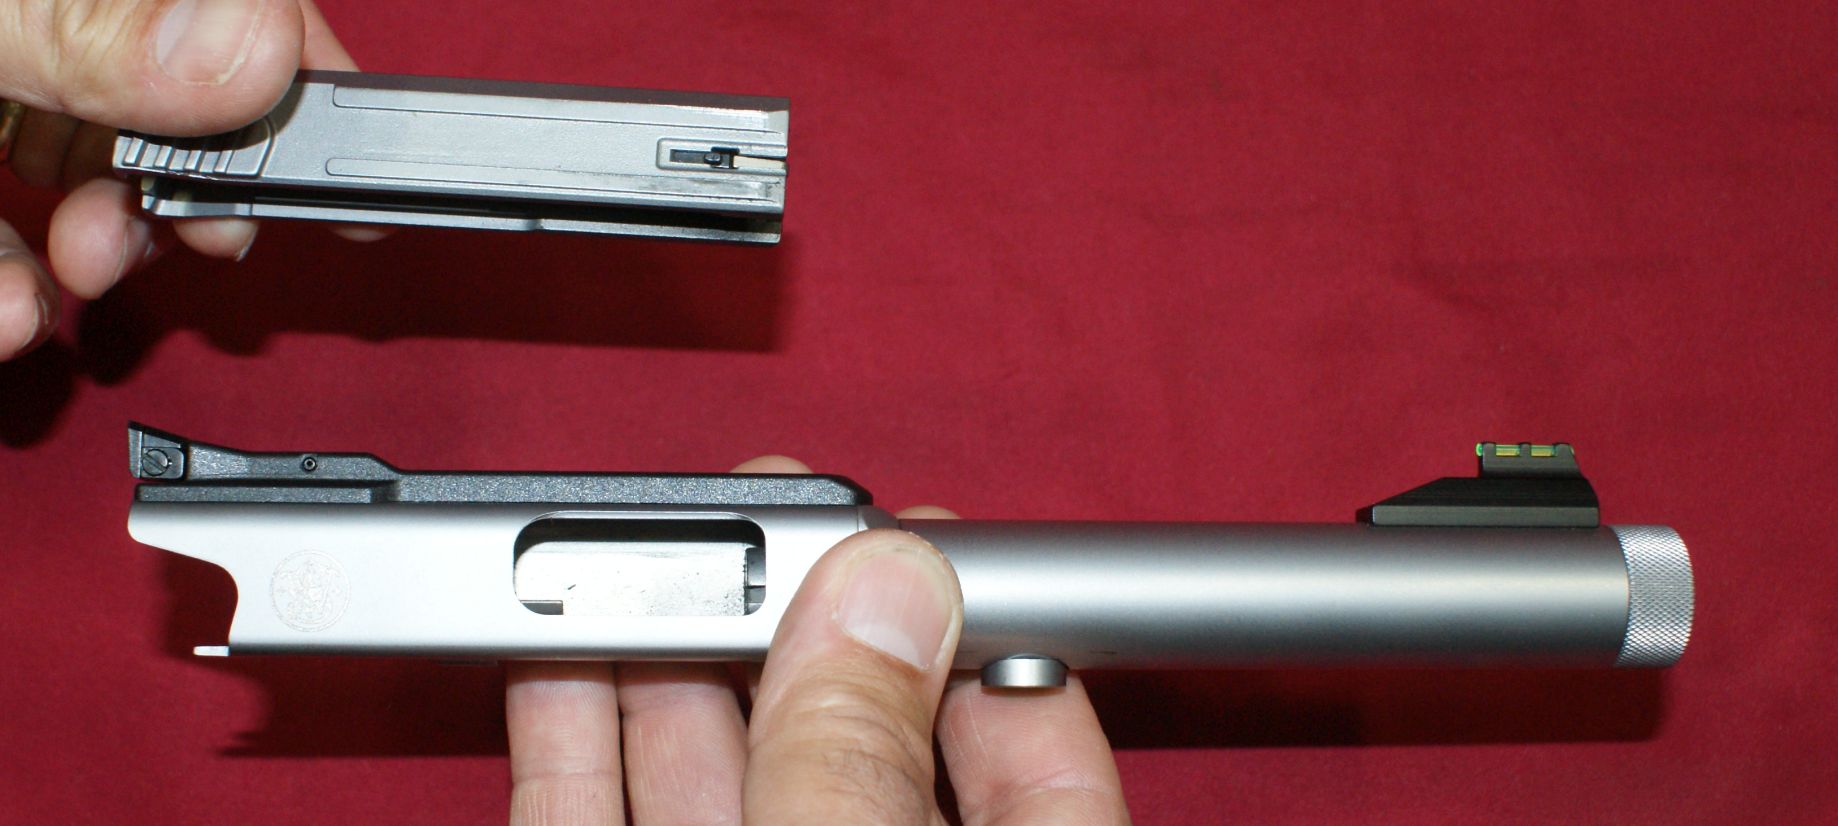
Step 5 - Remove Barrel
Barrel removal is very simple. Using the 1/8" Allen wrench provided by S&W, loosen the set screw one full turn.
Figure 10
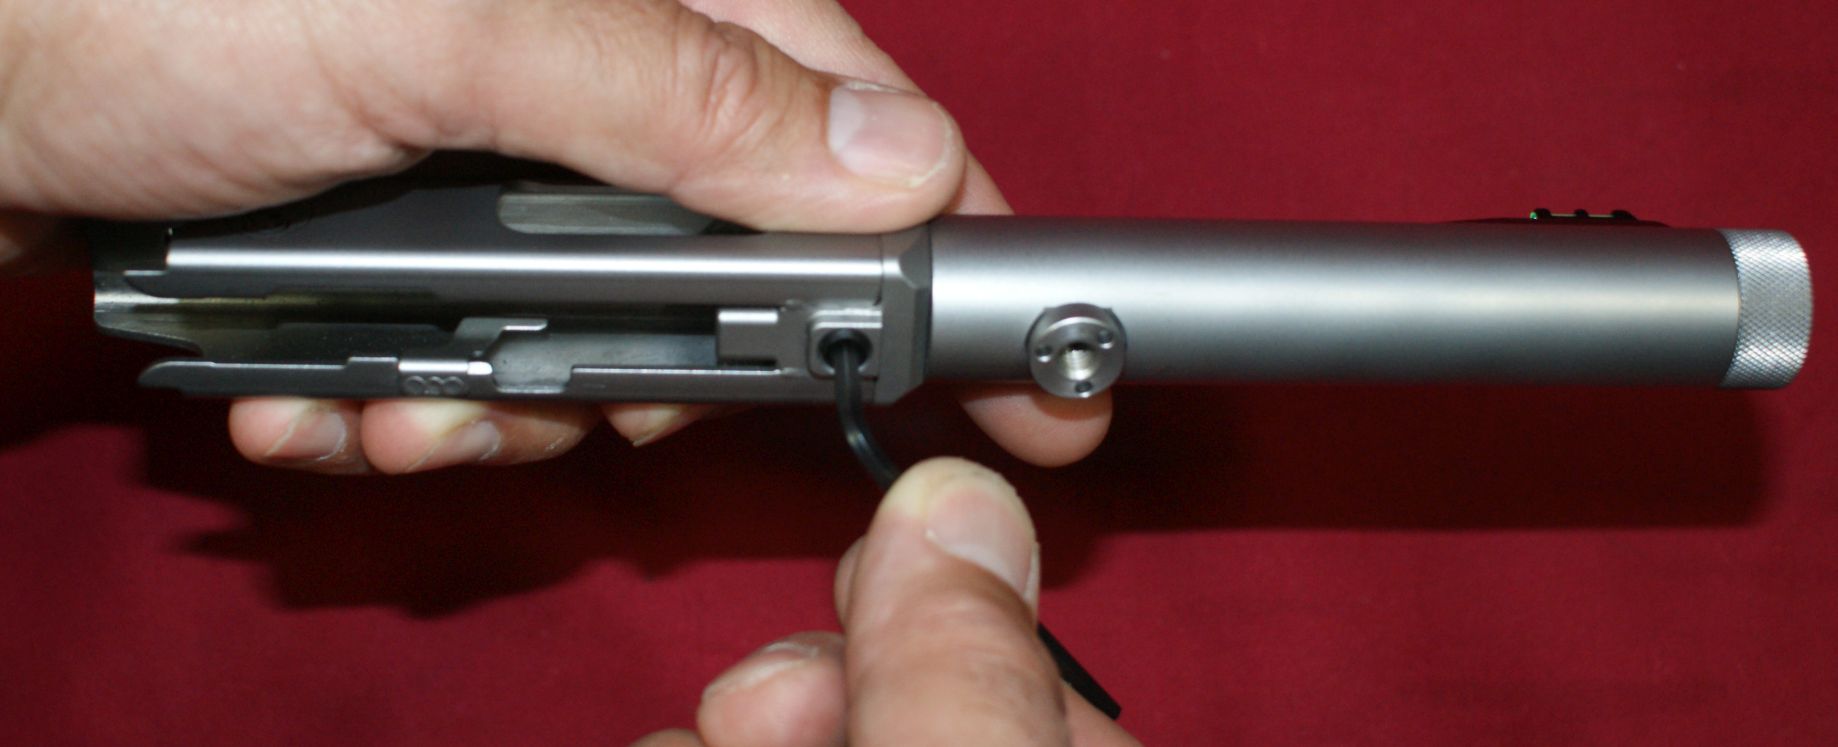
The barrel can then slide out of the receiver. For a new or relatively clean pistol, it shouldn't take any force to pull the barrel from the receiver. If you have an extremely dirty pistol, it might take more force to pull the barrel out of the receiver.
Figure 11
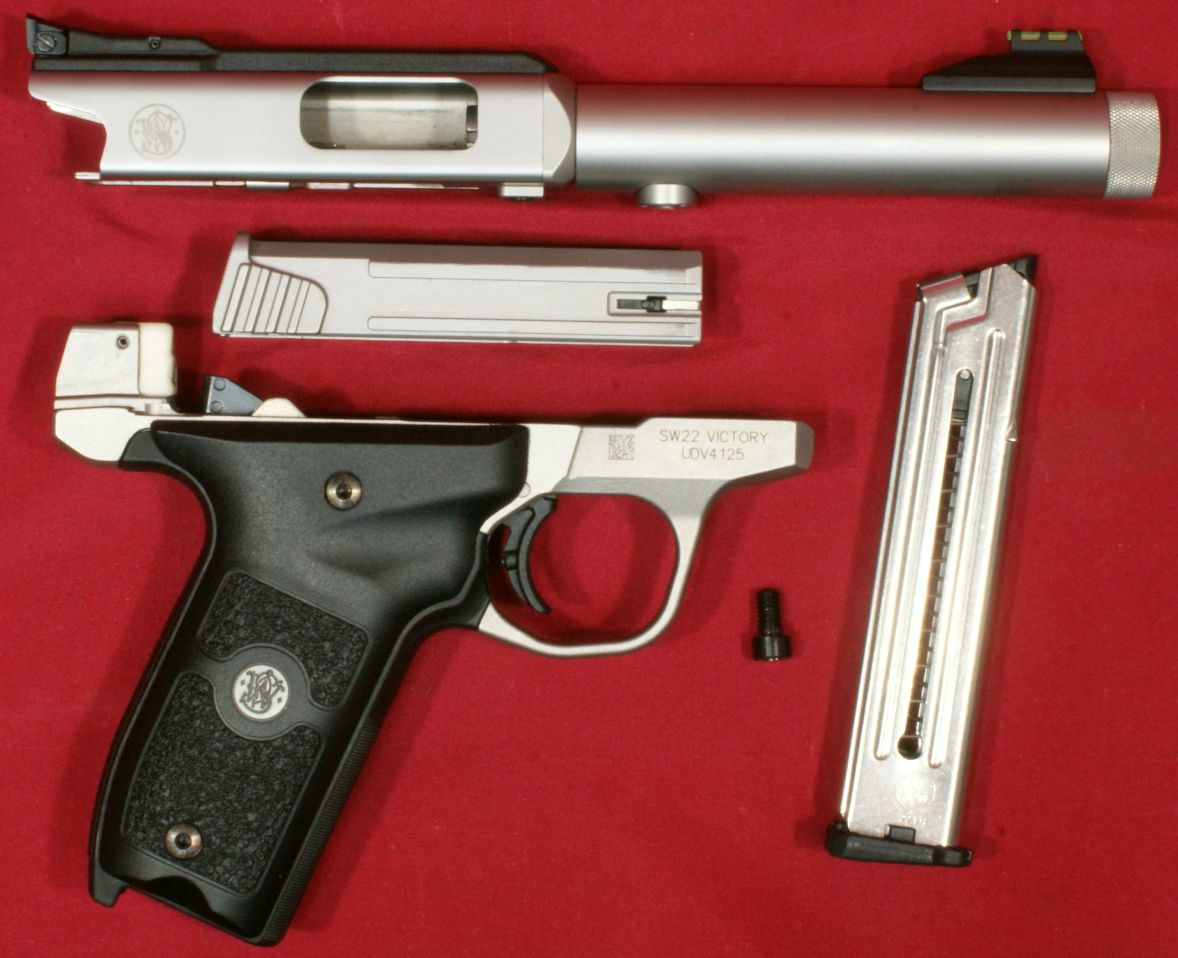
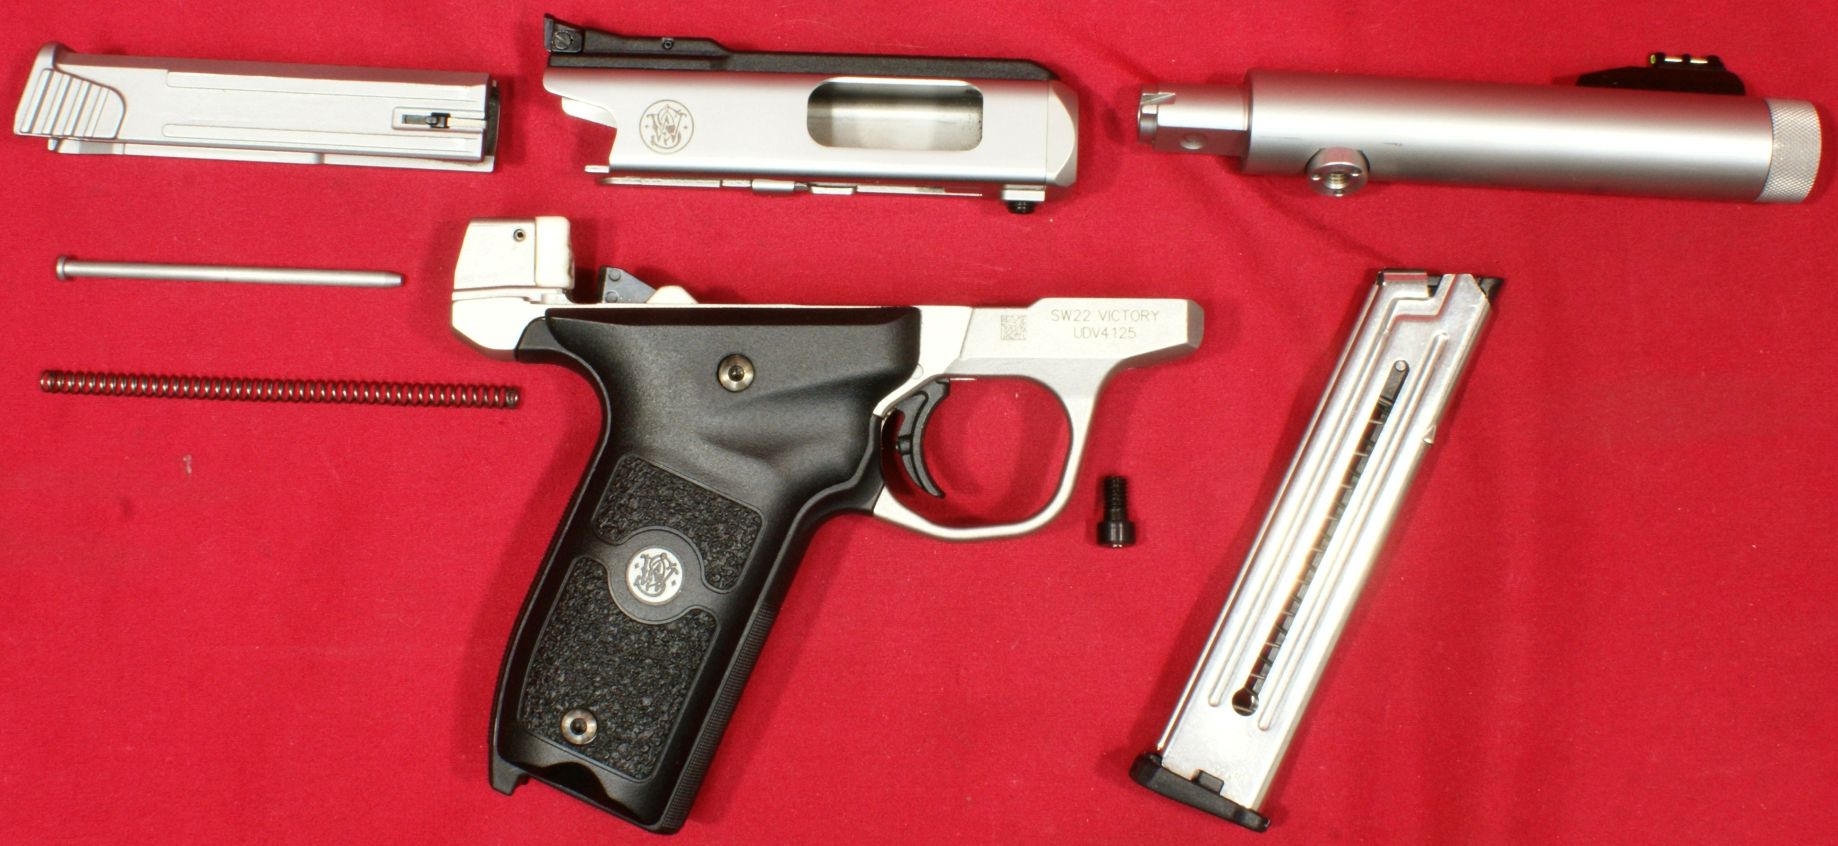
Full Disassembly for Cleaning
This next photo shows what I would consider to be fully disassembled for cleaning. All of the disassembly and reassembly instructions to do the tasks to get to this level are covered in the Safety & Instruction Manual for the SW22 Victory. You can see the S&W video for disassembly and reassembly at this link https://www.youtube.com/watch?v=bZiSQNbeWK4.
Figure 12
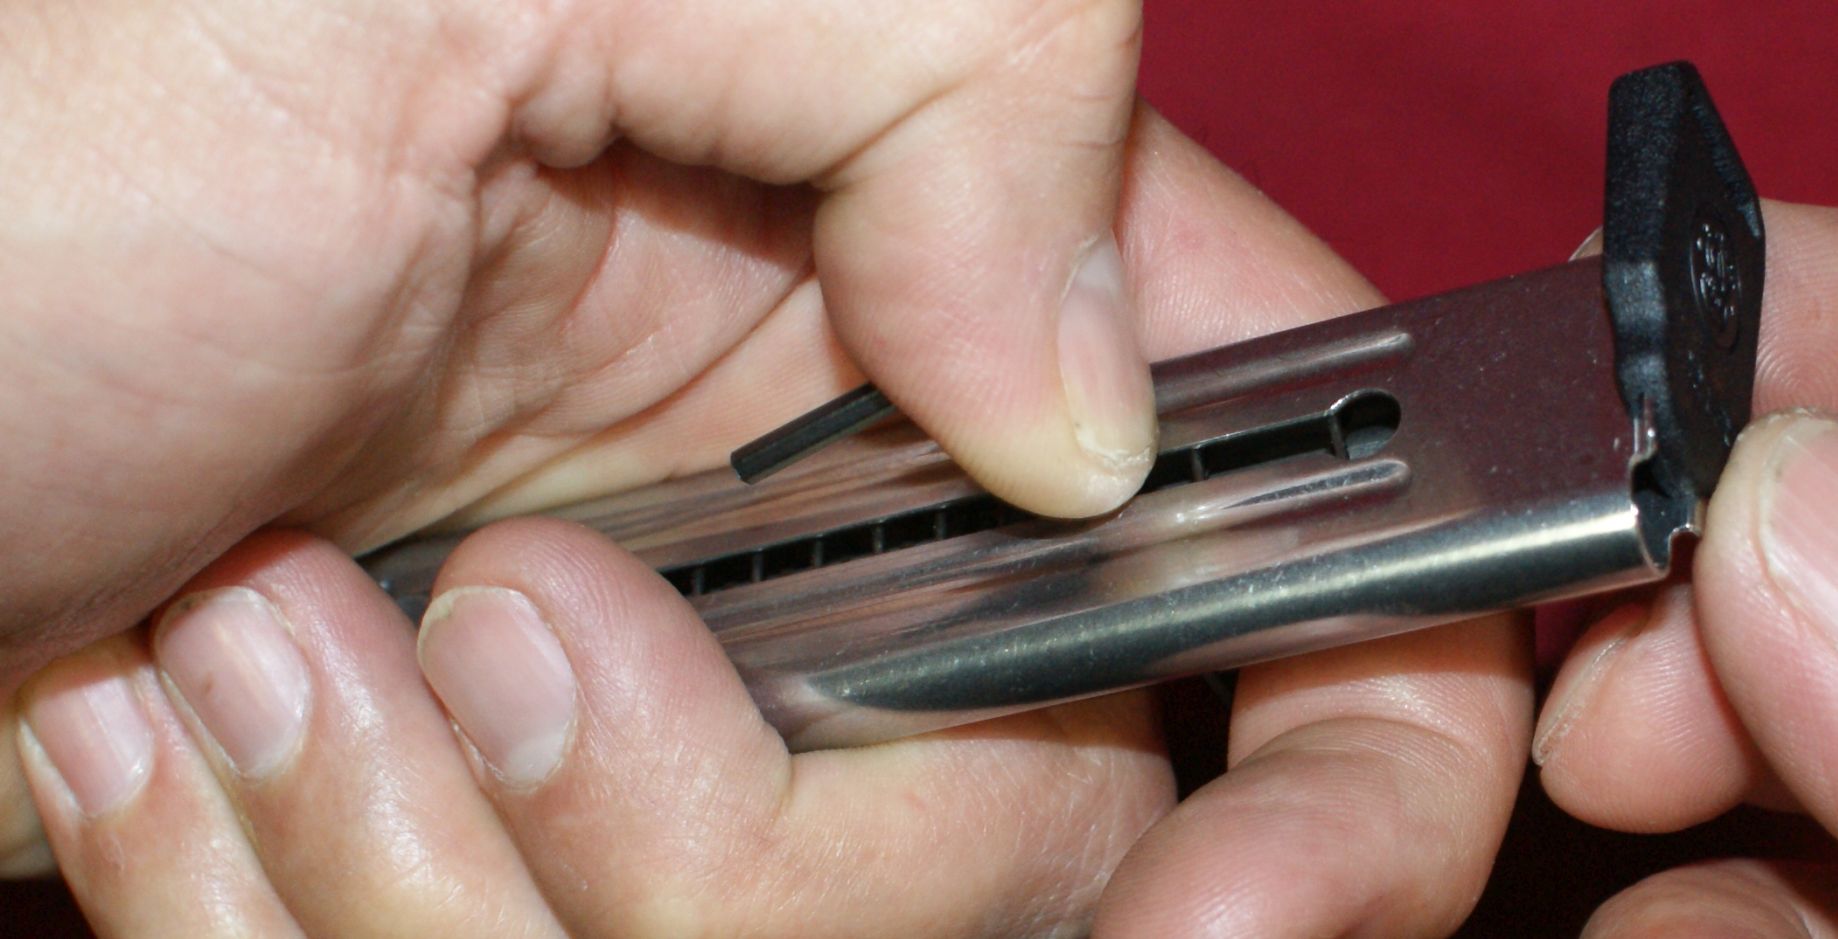
Magazine Disassembly
Disassembly of the magazine is also covered in the S&W Safety and Instruction Manual and is very simple. Using the same 1/8" Allen wrench, put it through the slot in the magazine and pull the spring away from the magazine base plate. With the spring not touching the base plate, you can slide the base plate rearward off the magazine body.
Figure 13
Once the base plate is removed, shift your thumb over the end of the magazine to prevent the spring from popping out of the magazine. You can then relieve the rest of the spring pressure.
Figure 14

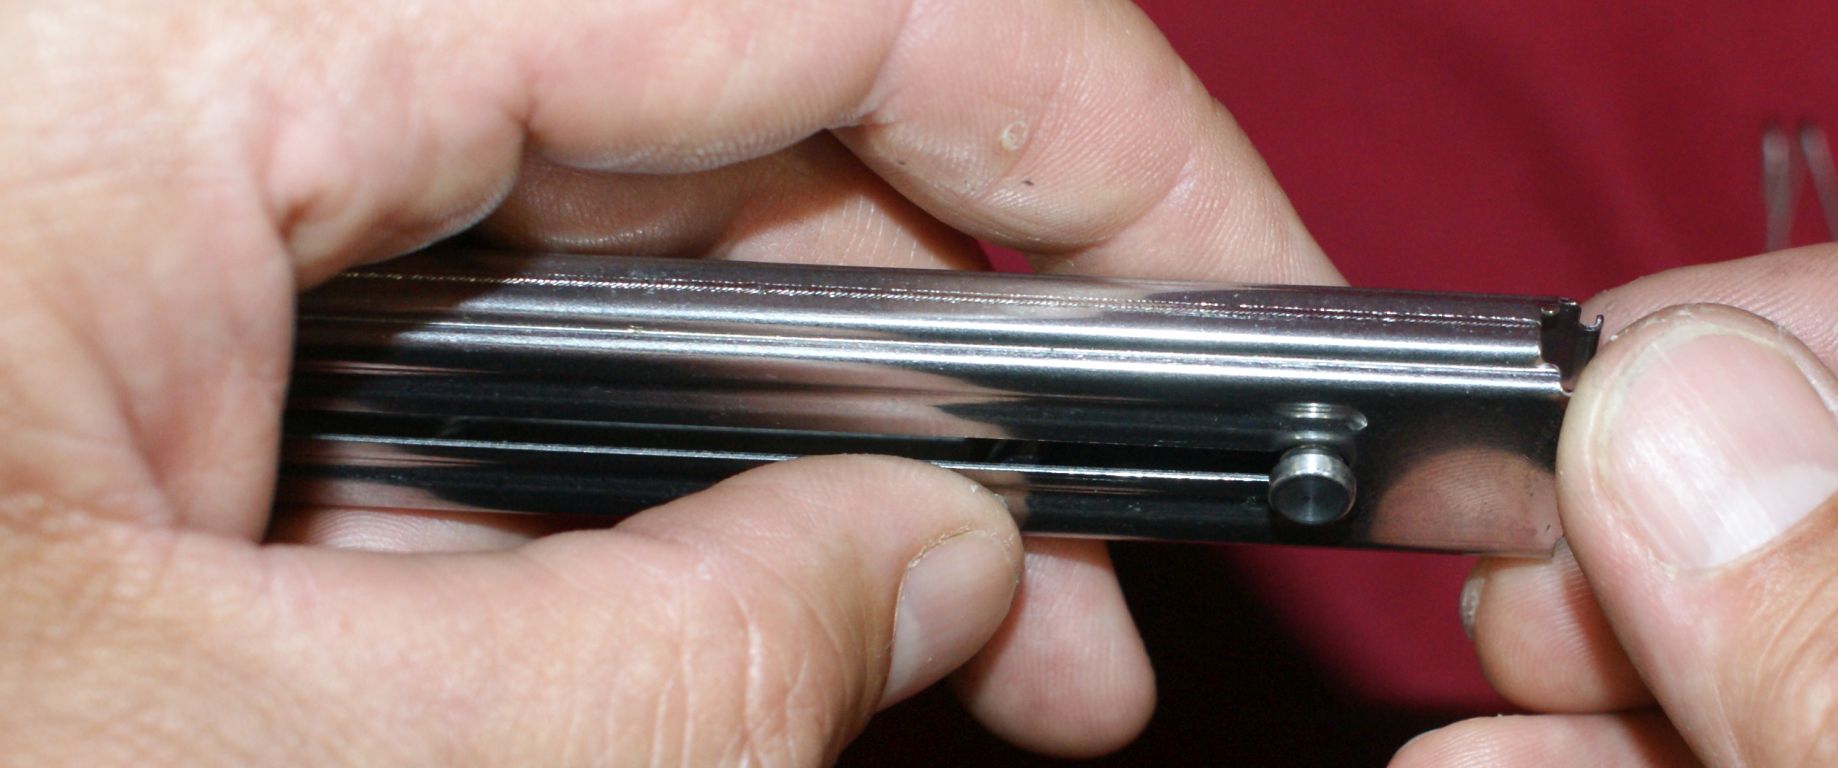
Slide the follower all the way to the bottom and line up the button with the hole at the base of the slot in the magazine. You can either tilt the magazine over and allow gravity to let the button fall out or you can pull it out with your fingers. The follower will then drop out of the bottom of the magazine.
Figure 15
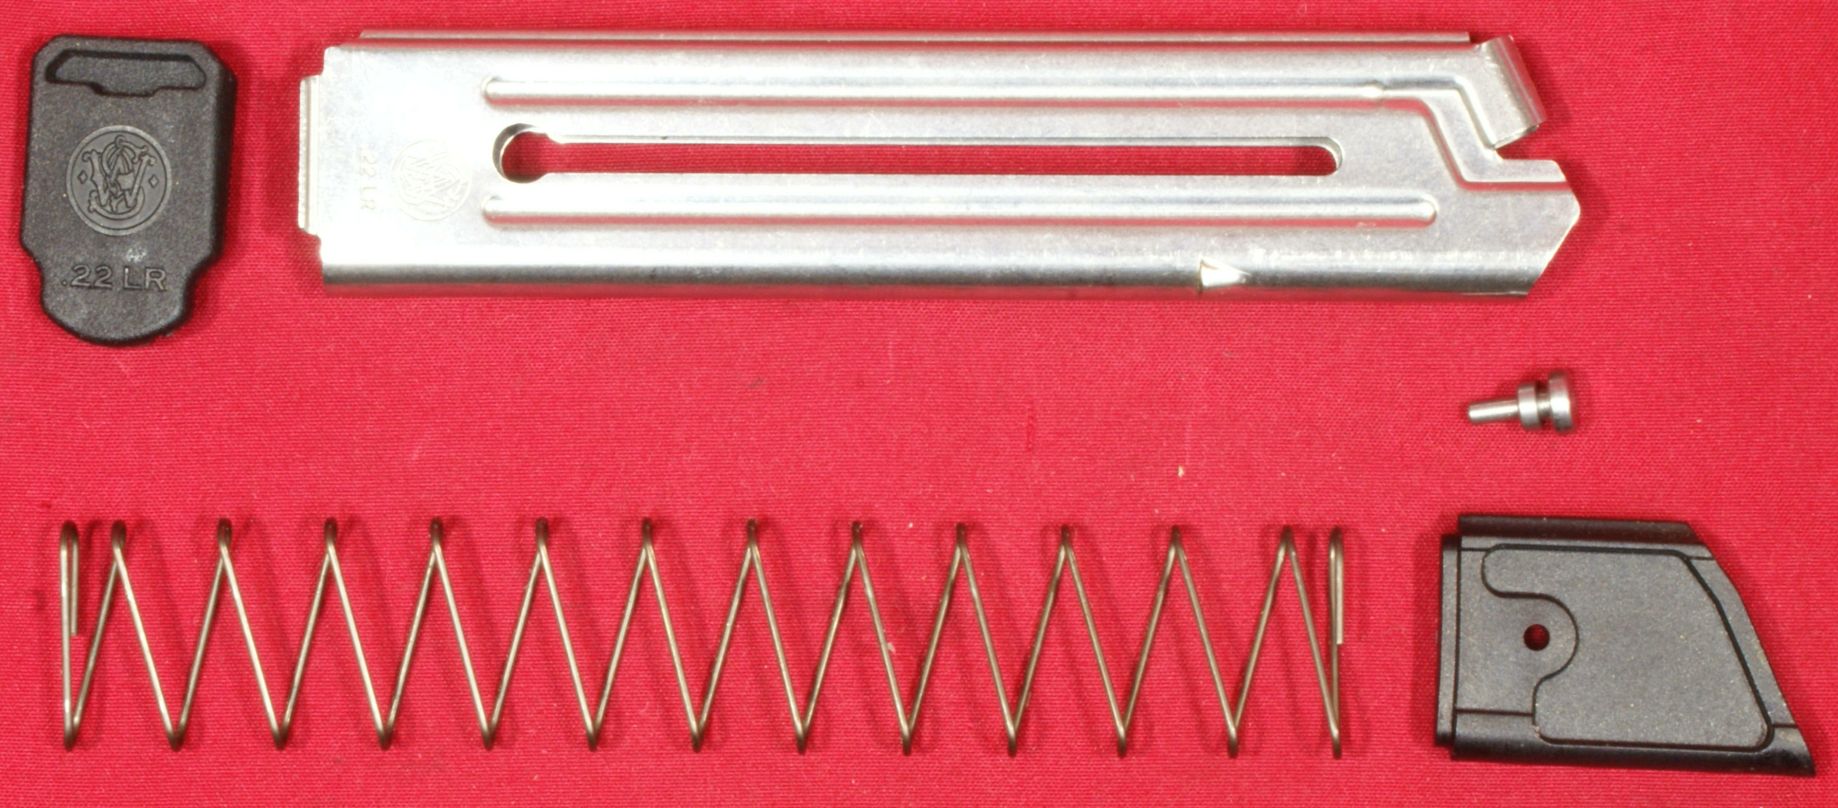
This next photo shows the magazine fully disassembled.
Figure 16
Grip Panel Removal
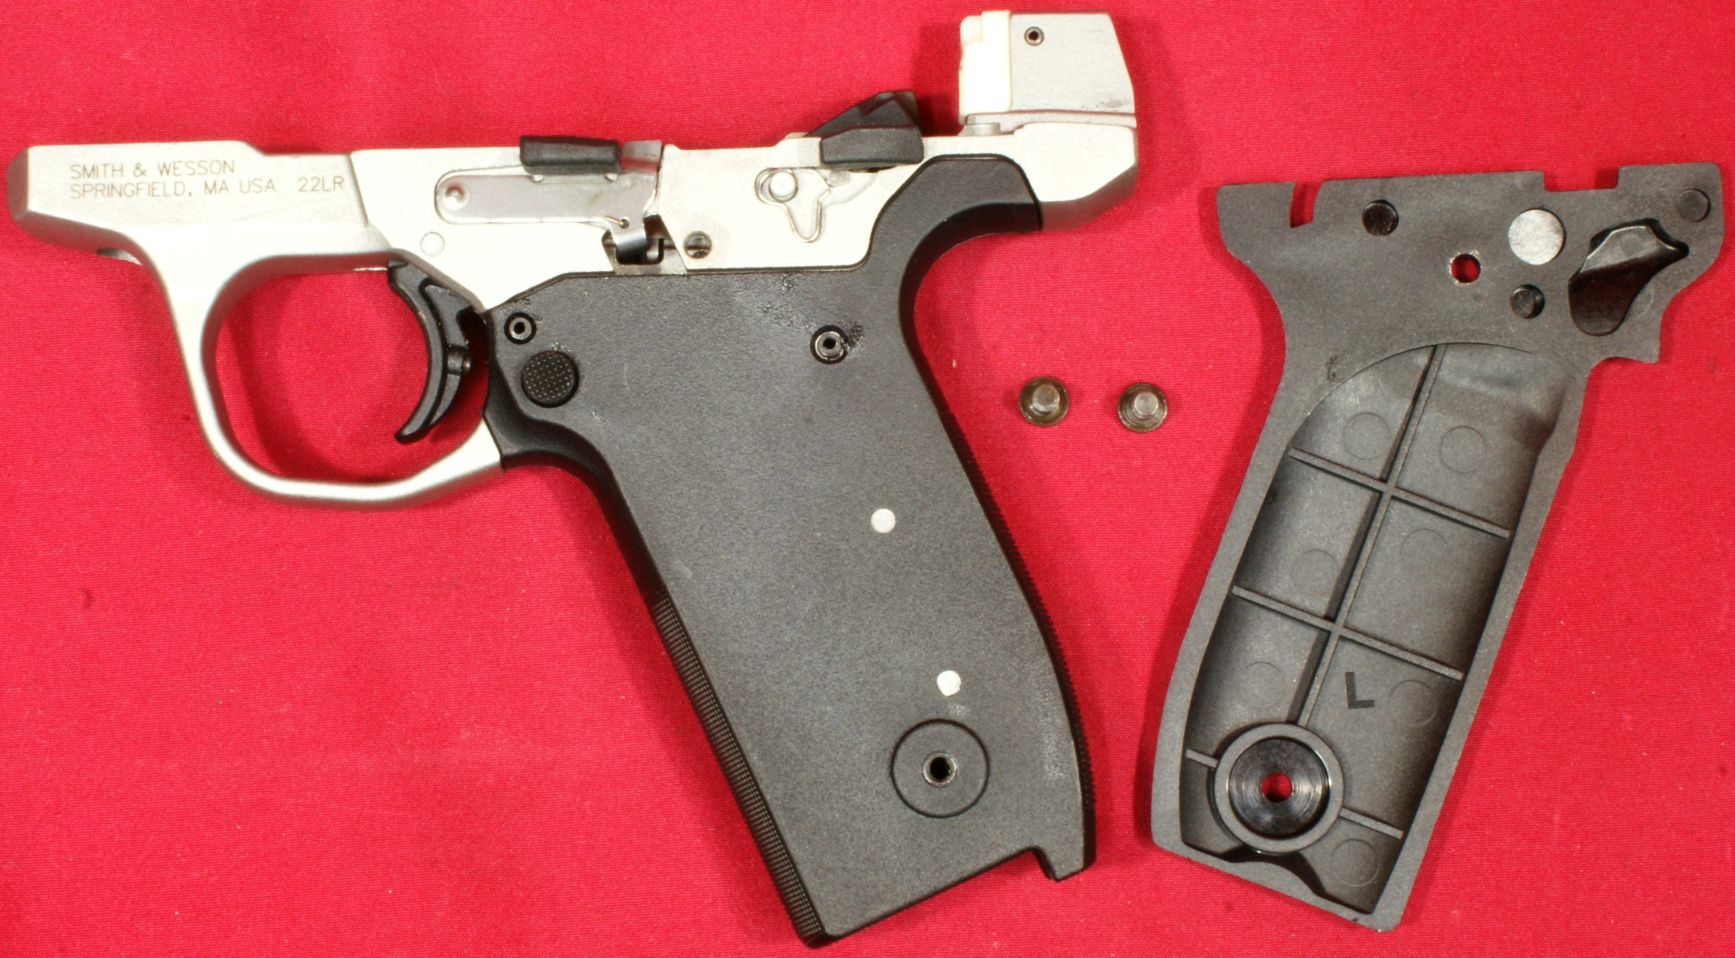
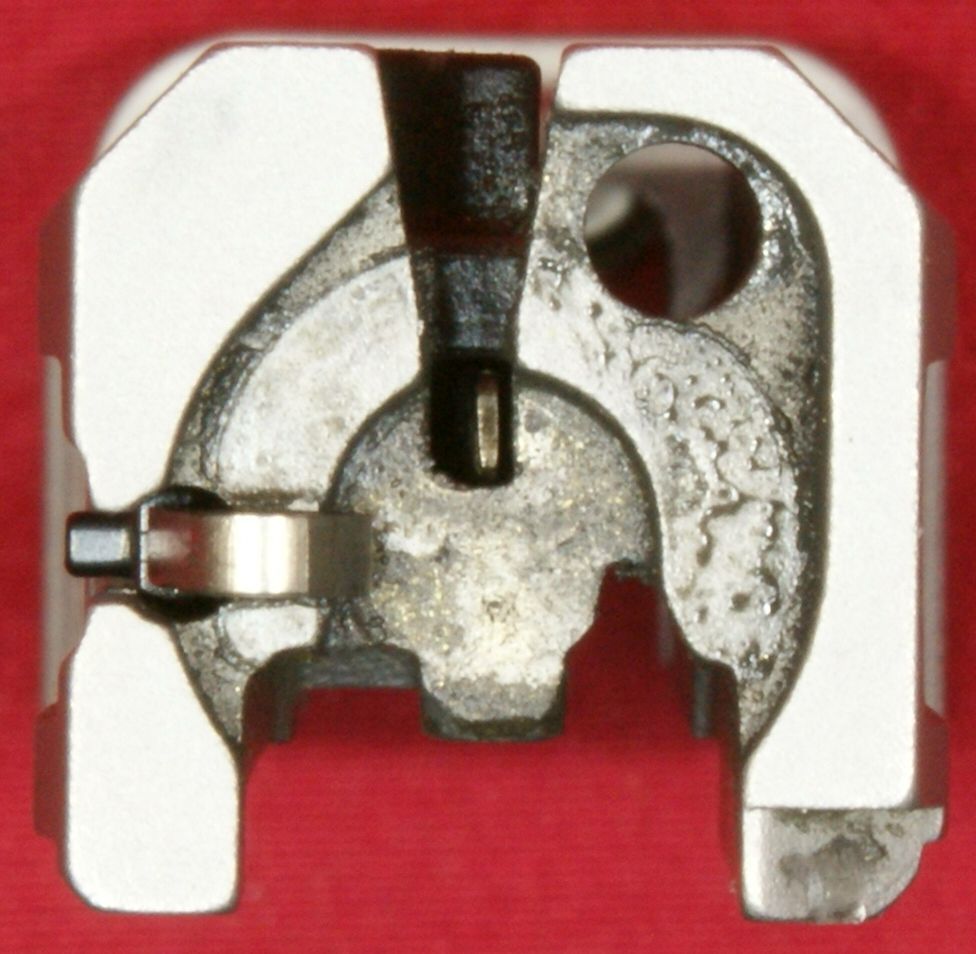
Since the grip panels are removable, I thought it would be good to take a look under these panels. This photo shows the left panel removed. Note that the grip panel is designed to keep the bolt stop in place. If you remove this grip panel, there is a good chance that the bolt stop lever will pop off. If so, don't worry because it is not a big issue. Make sure the tail of the spring is in the hole in the frame and push the lever back into place. You can see the grip body is a polymer piece attached to the stainless steel frame. It looks like the stainless steel frame extends down to approximately the bottom of the trigger guard.
Figure 17
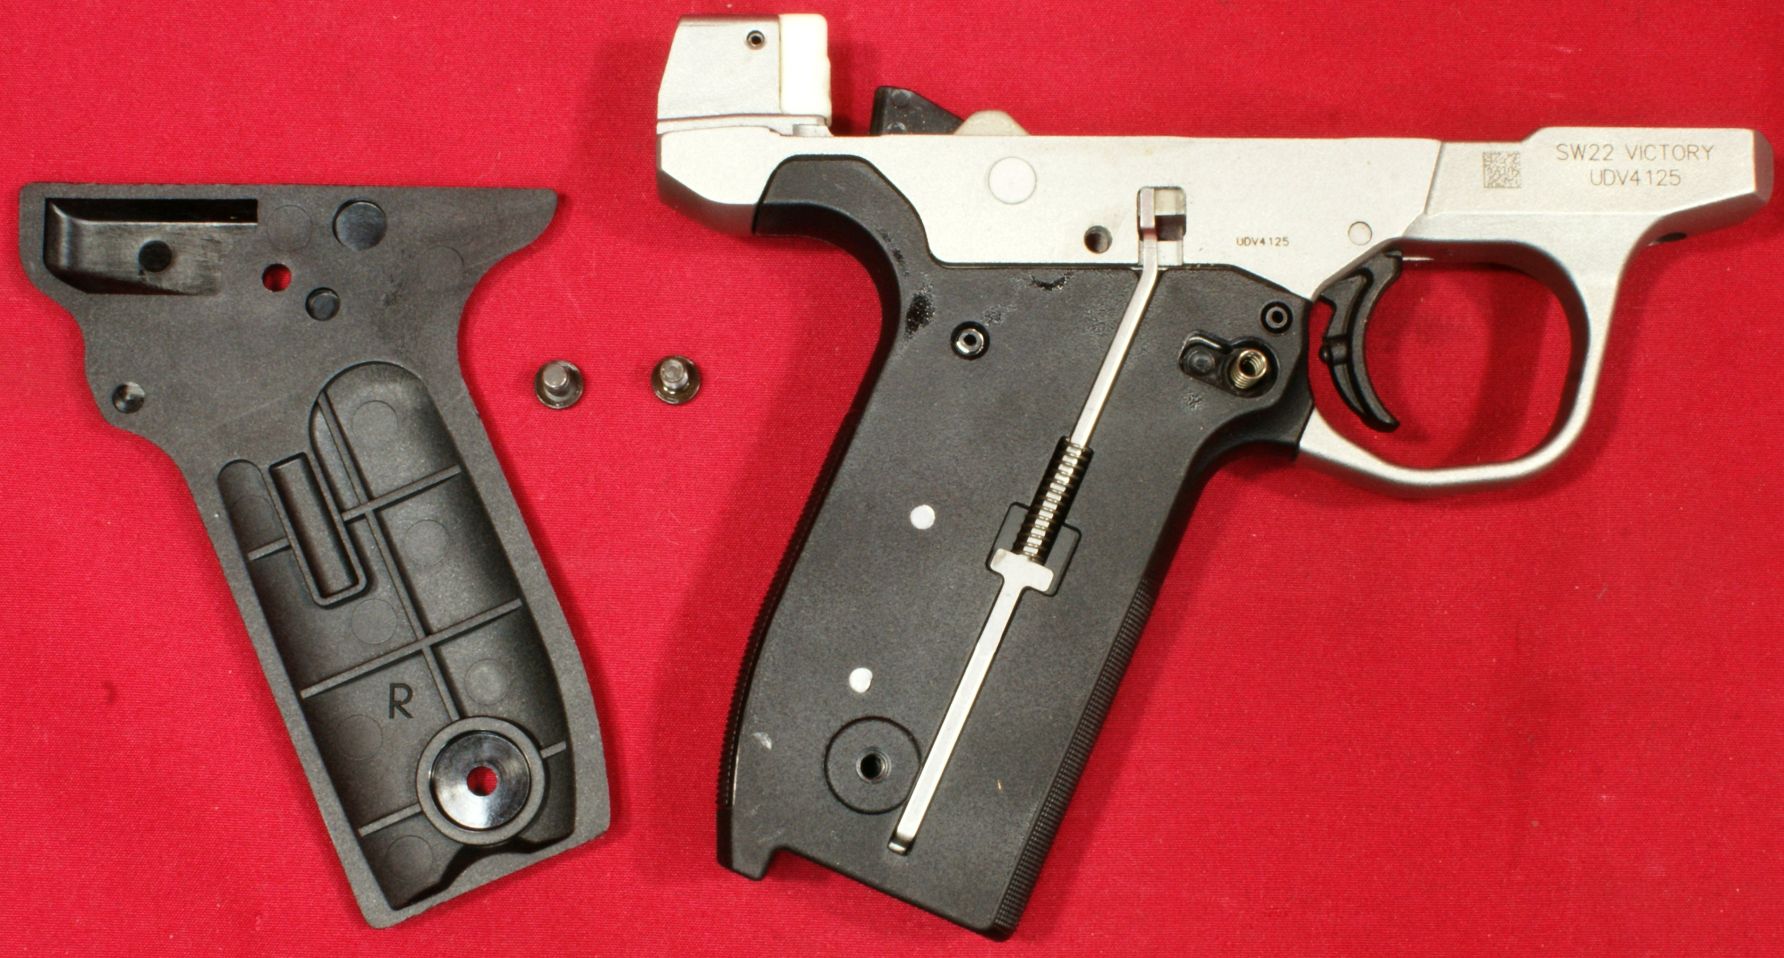
This photo shows the right grip panel removed which allows you to see the magazine disconnect mechanism spanning through the grip. Also note that the grip panel holds the magazine catch button spring in place.
Figure 18
Internal Features
In this section on internal features, I'm going to provide many photos for your own study and focus my comments on the features I feel are more significant.
Receiver Assembly
The stainless steel receiver is made from three components into a final welded assembly; main body, front socket and fixed ejector. The main body of the receiver is formed from sheet metal . This body then has a machined front socket added to the front and welded in place. This socket contains the barrel interface, barrel set screw threaded hole, rear sight threaded hole and feed ramp. It has welds on both the top and bottom surfaces which can be seen in these photos.
Figure 19 - Top
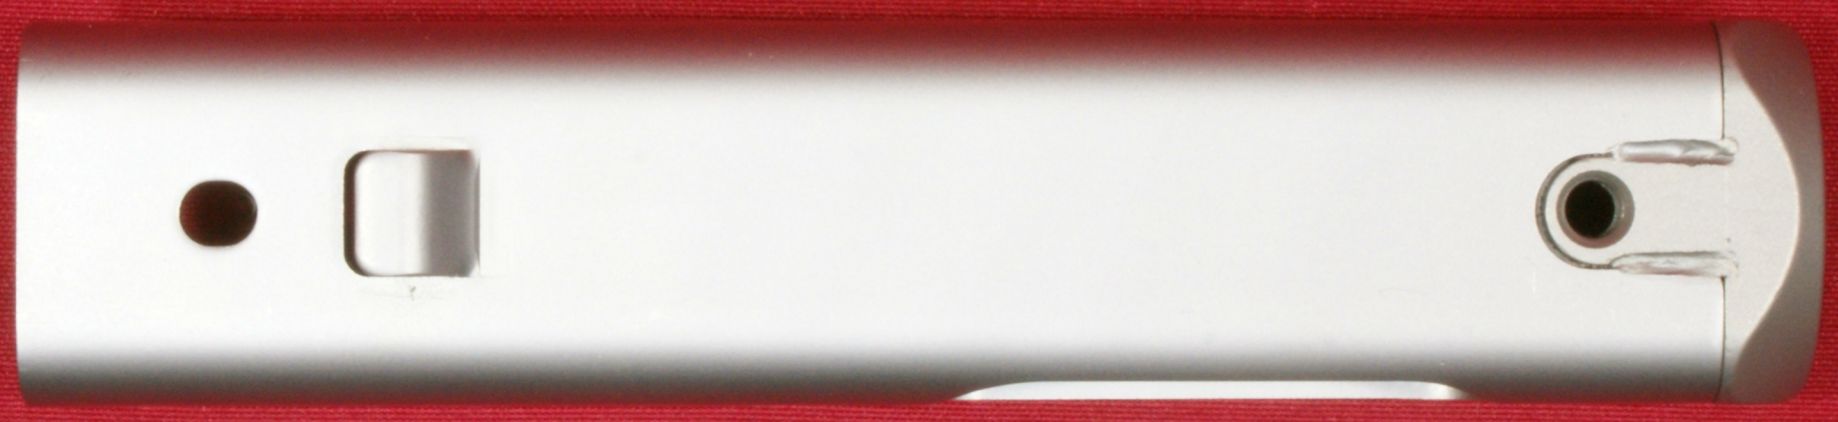
Figure 20 - Right
The fixed ejector is also spot welded to the bottom of the receiver body.
Figure 21 - Bottom
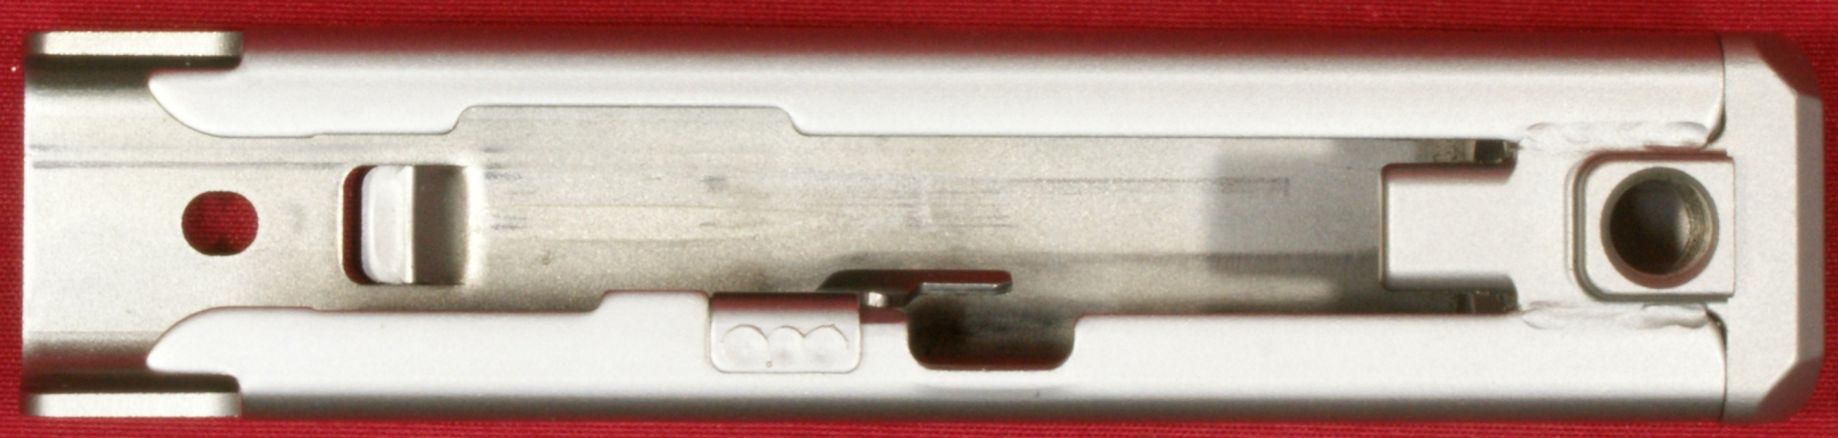
Figure 22 - Left
Clearly I missed a couple of spots when cleaning before I took these photos. The nice thing about disassembly of this pistol is that if you take your time and use some Q-Tips, areas like this can look spotless if you try. The front socket has a flat bottom to ensure the barrel is clocked properly when inserted. Although S&W states that the socket and barrel are a slip fit, I think they are more along the lines of a loose fit. I was a little surprised at how much looseness there was prior to tightening the barrel set screw. It might be worth the effort for you to do a basic test to see if the zero shifts after removing and replacing the barrel. Due to varying tolerances for each pistol, this shift (if any) would probably be different for each different pistol.
Figure 23
Figure 24
Barrel Assembly
The barrel assembly seems to be made of two parts; barrel and takedown lug. Since there was no thread locking compound holding the front sight screw in place, I decided to go ahead and remove the sight for these photos, so the hole shown in the top of the barrel is for the front sight screw.
Figure 25 - Top

Just like you would expect, the right rear of the barrel has a slot for the extractor to nest in when the bolt is closed.
Figure 26 - Right

The takedown lug appears to be threaded into the barrel. The lug has a set of three holes which probably accepts a special wrench for removing and installing. I like this approach because it basically provides a threaded bushing which can be replaced if for some reason you damage the internal thread.
Figure 27 - Bottom

Figure 28 - Left

At the rear of the barrel, you can see there is a small ramp area to improve feeding of rounds into the chamber. At the top of the chamber, you will see a small dent. This dent is from me dry-firing it a few times when checking out the trigger pull. S&W clearly states in their manual "WARNING: NEVER DRY-FIRE YOUR PISTOL, DAMAGE TO THE PISTOL WILL RESULT." If you do dry-fire your pistol, keep a watch on this area for potential issues. At the front of the barrel, the black stuff is the edges of the O-ring showing signs of fraying when installing the thread protector. This is not a big deal, but you might want to replace the O-ring in the future if you constantly change between the thread protector and some other threaded device.
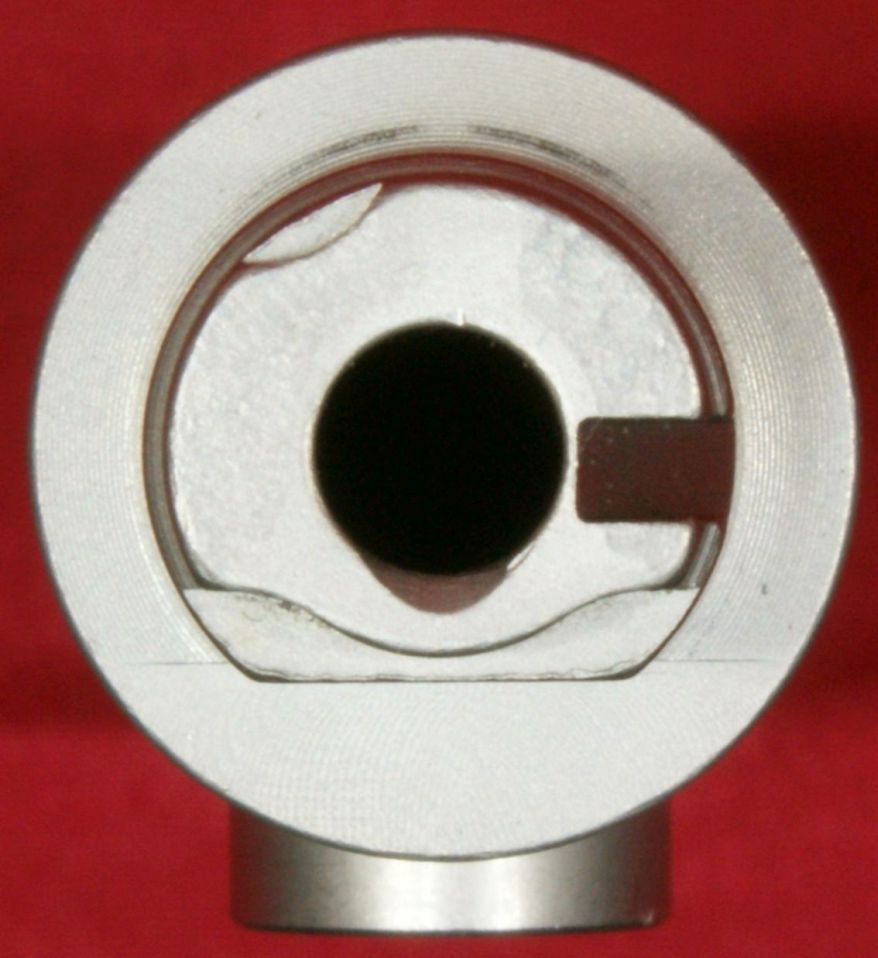
Figure 29 - Back
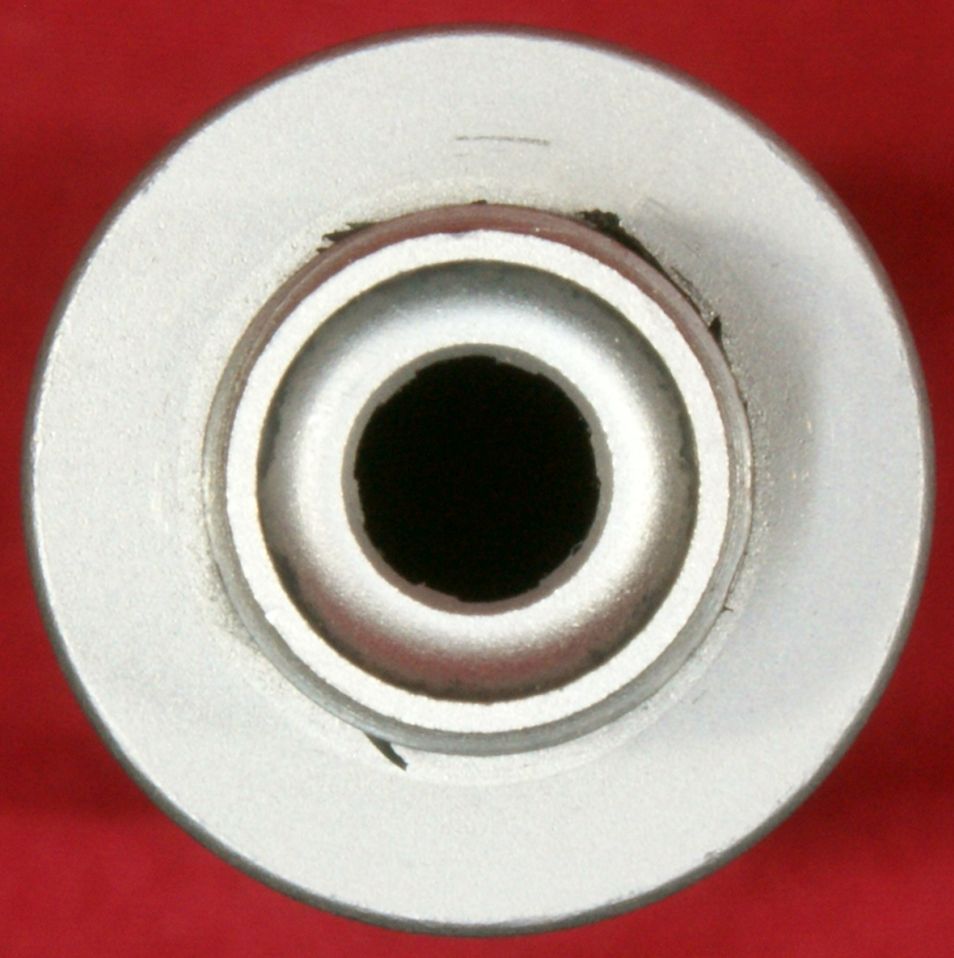
Figure 30 - Front
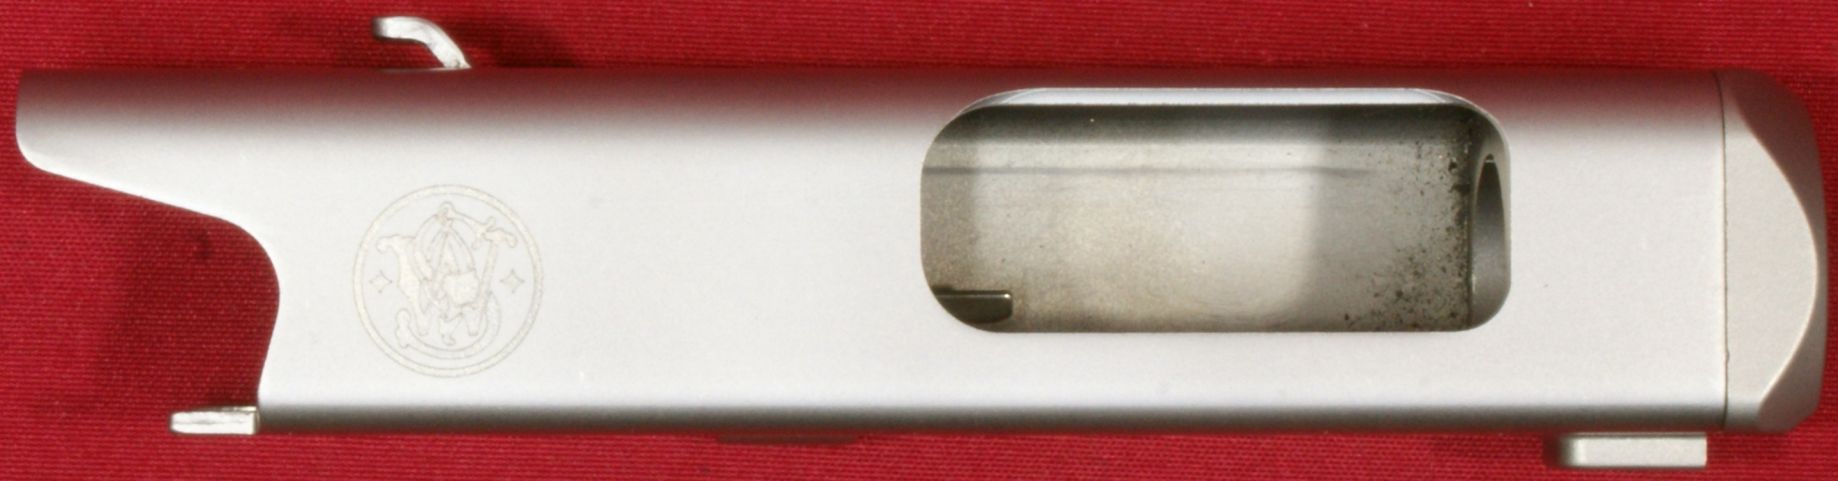
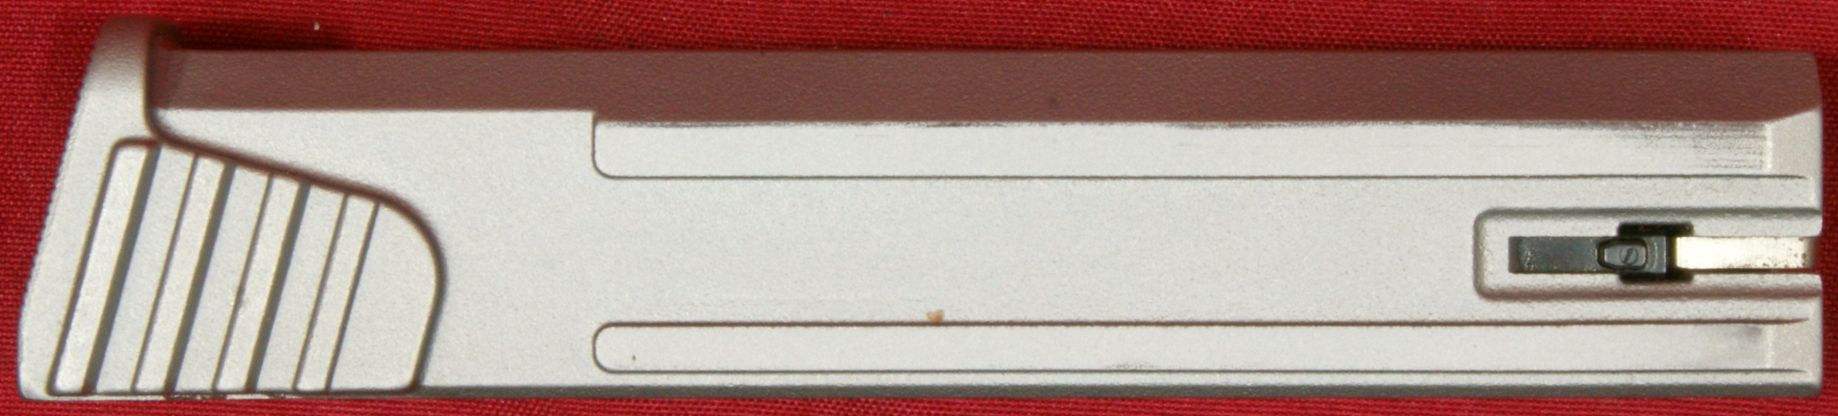
Bolt Assembly
There are several components that make up the bolt assembly such as the bolt body, firing pin components and ejector components. I didn't remove the firing pin or ejector components because I felt this was beyond the scope of this review. Each of these has metallic critical parts, springs and polymer secondary parts.
Figure 31 - Top
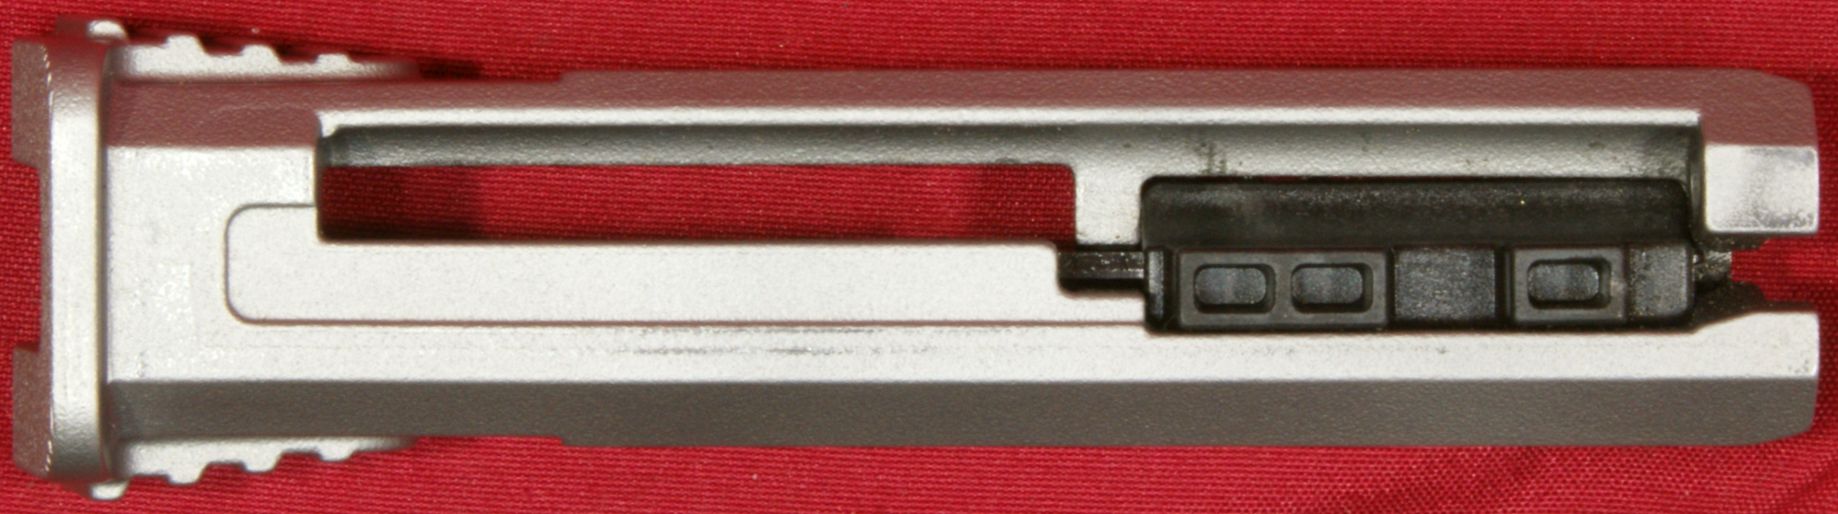
Figure 32 - Right
The extractor had a very sharp point which makes it very effective for grabbing shells during extraction.
Figure 33 - Bottom
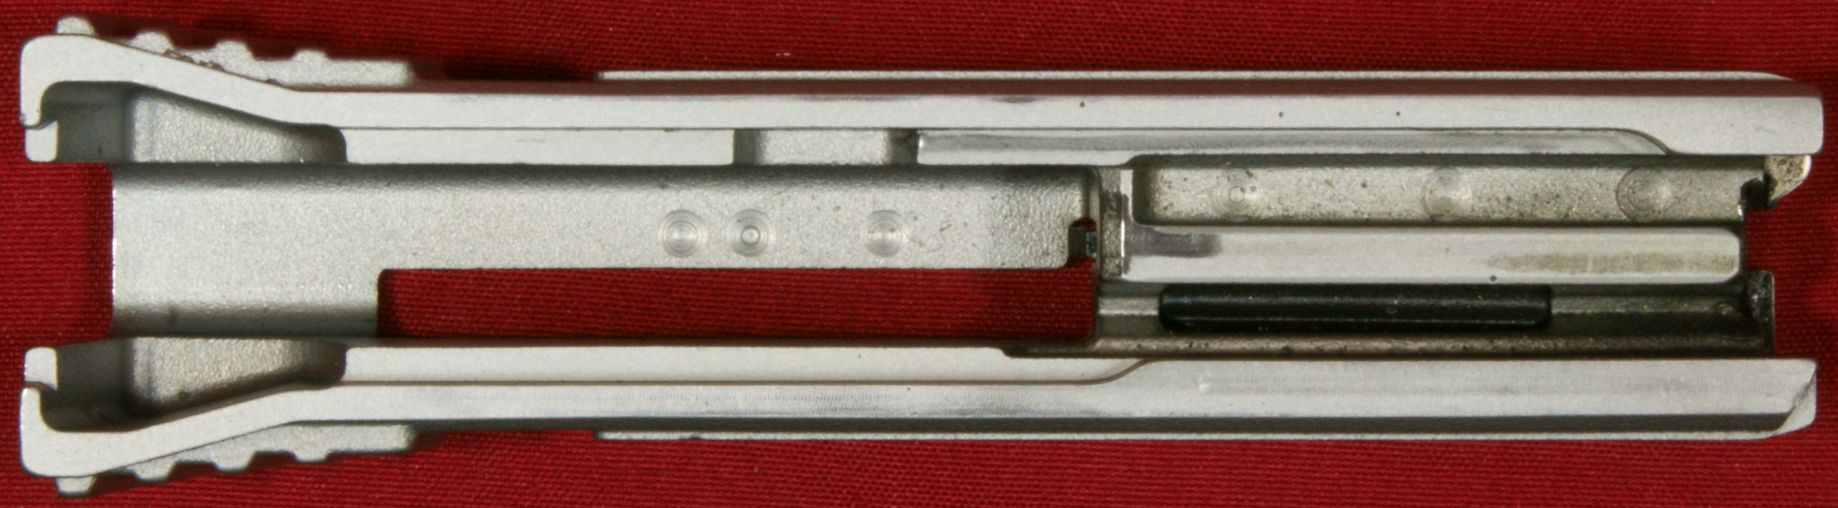
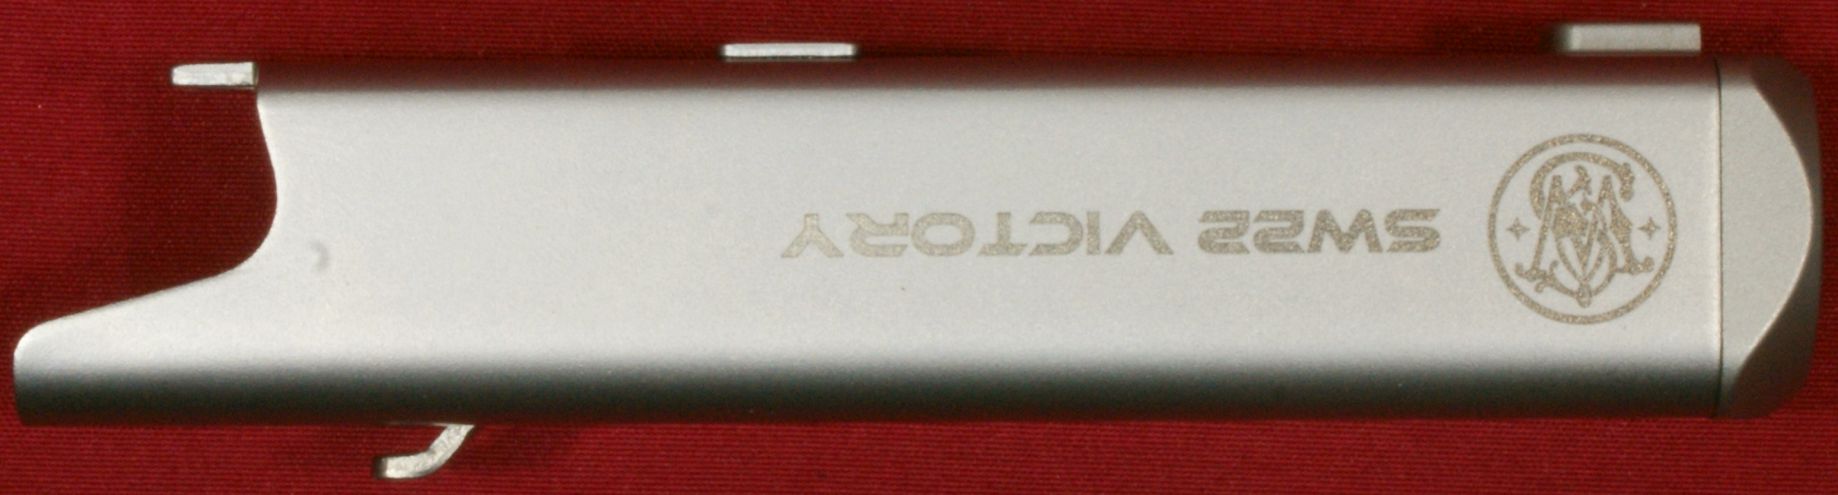
Figure 34 - Left
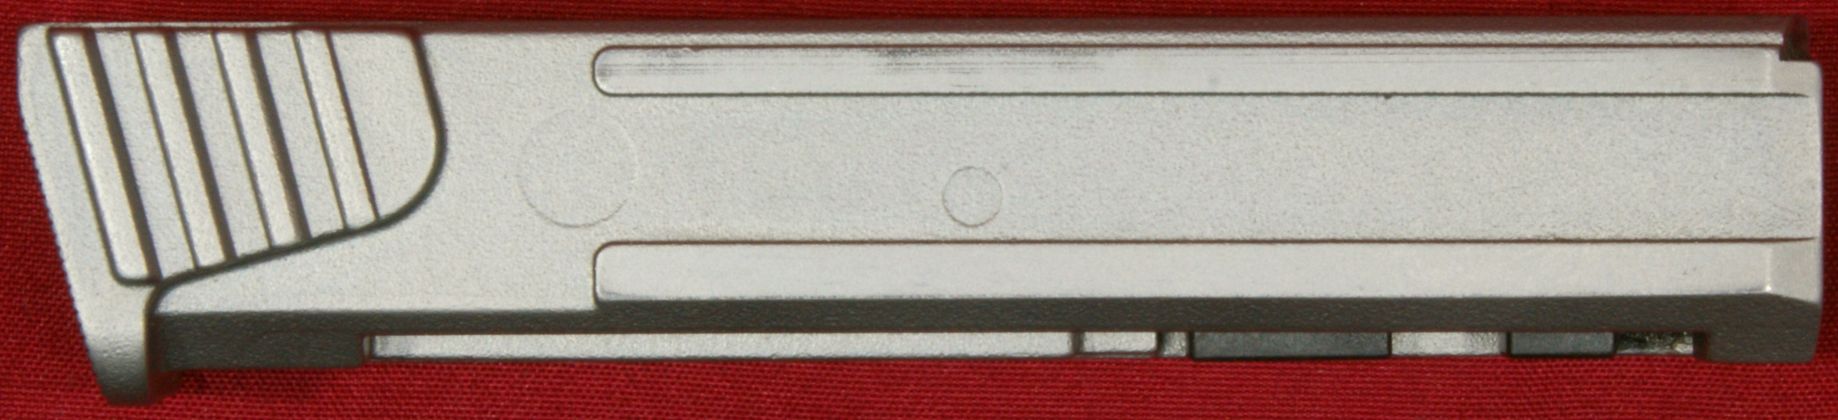
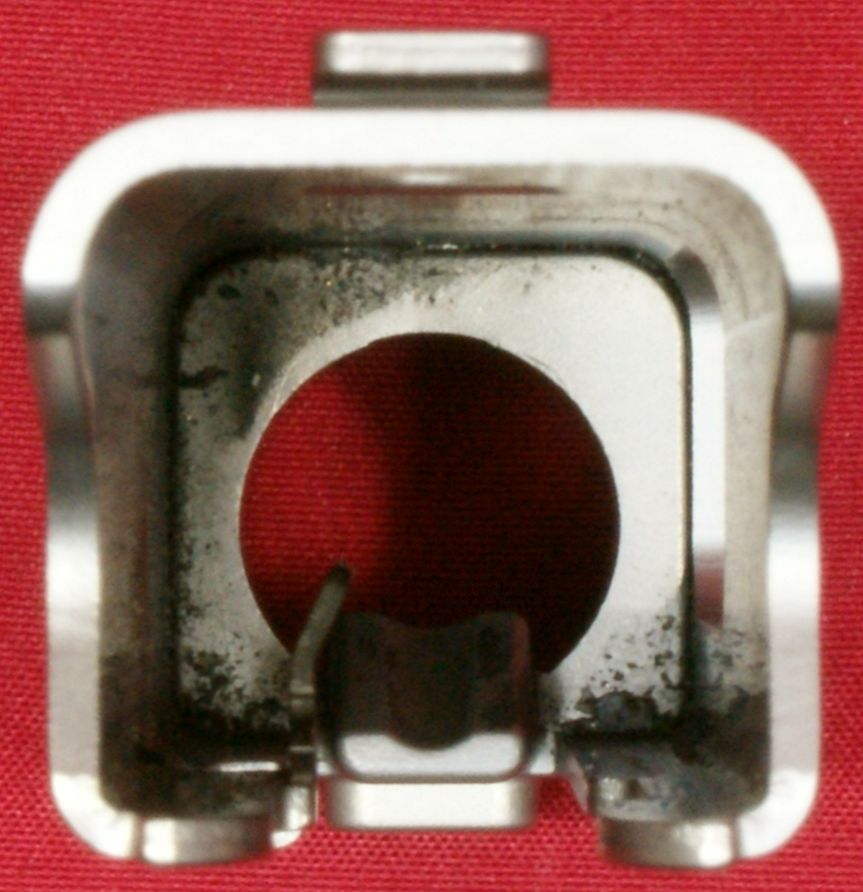
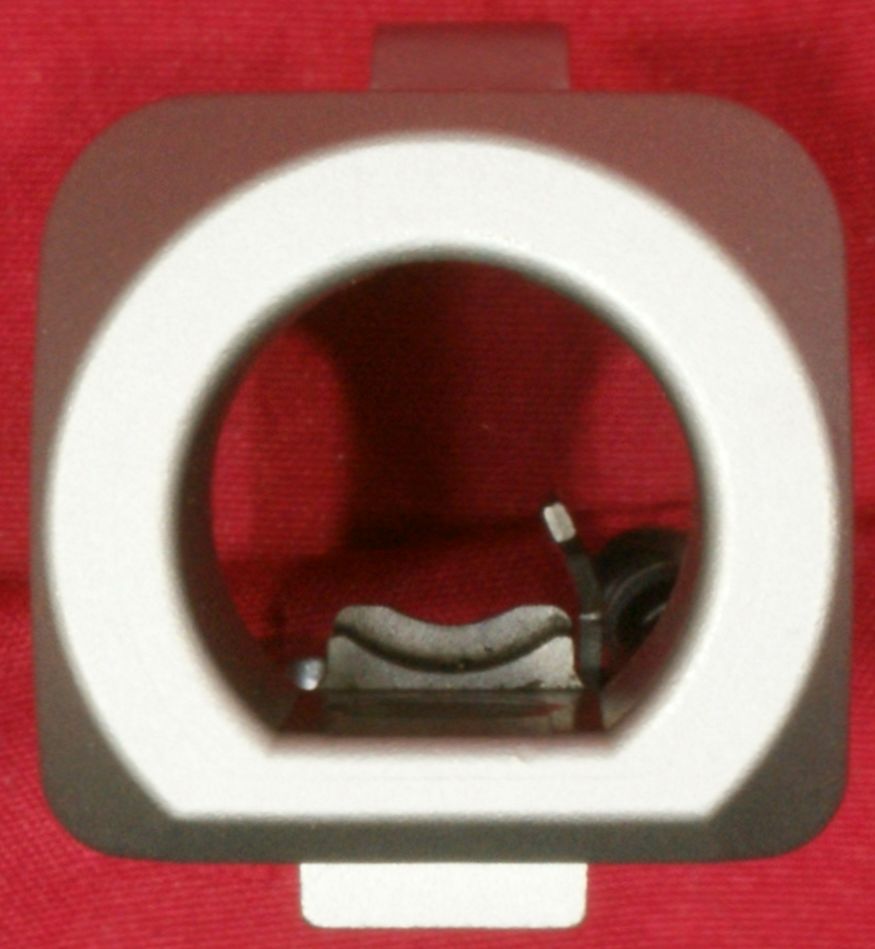
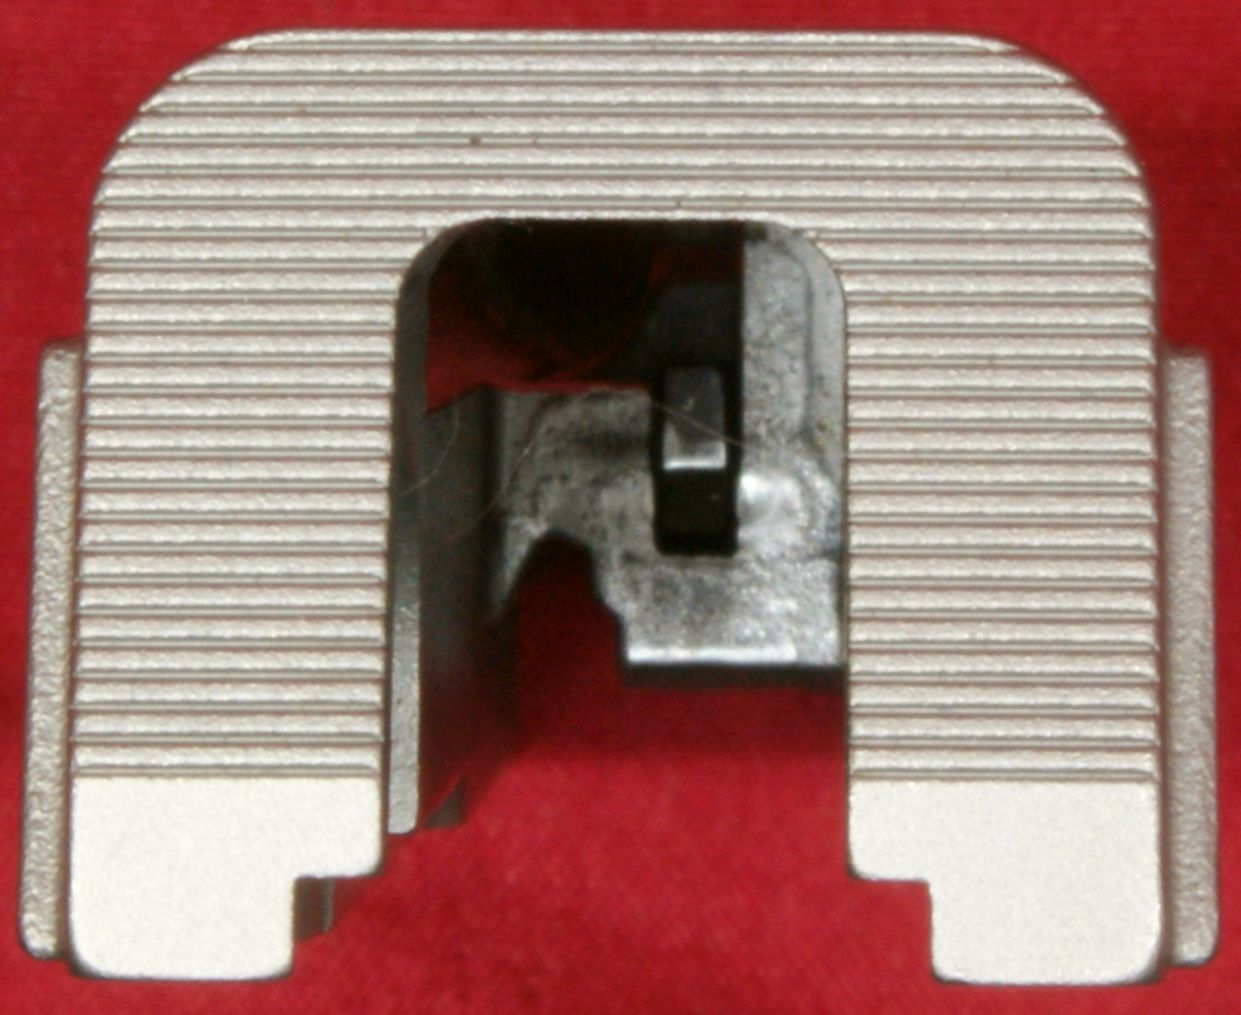
Figure 35 - Back
Figure 36 - Front
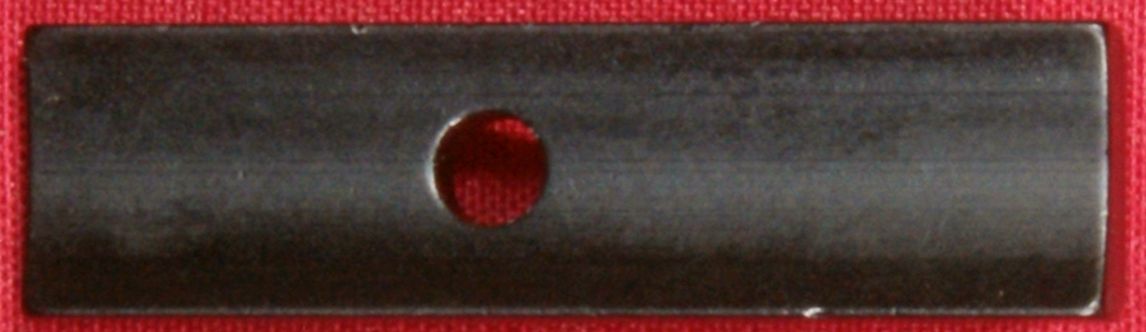
Guide Rod and Recoil Spring
Stainless steel guide rod.
Figure 37

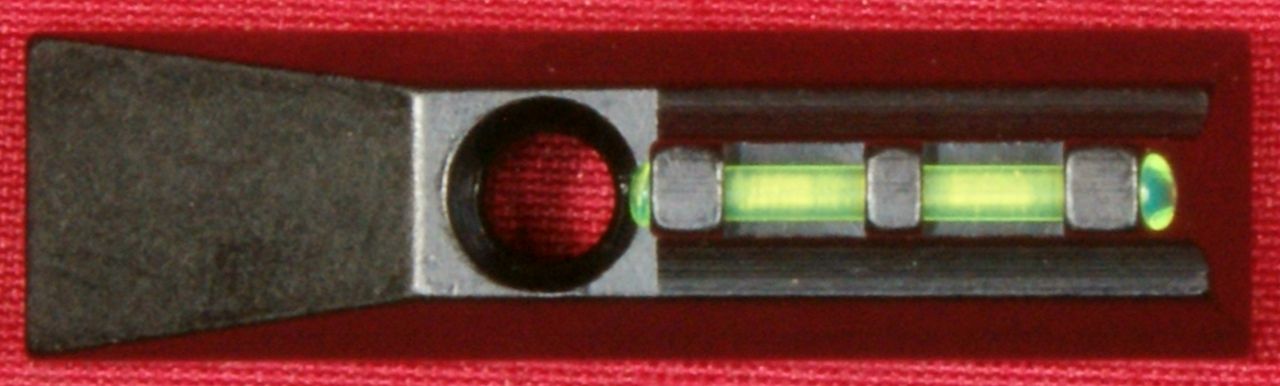
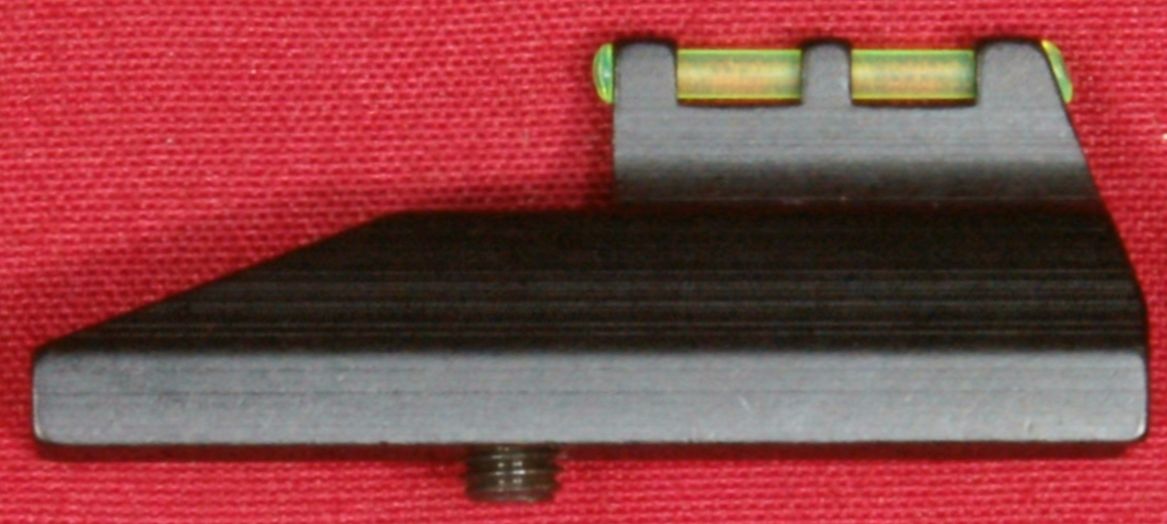
Front Sight
Figure 38
Figure 39
Figure 40
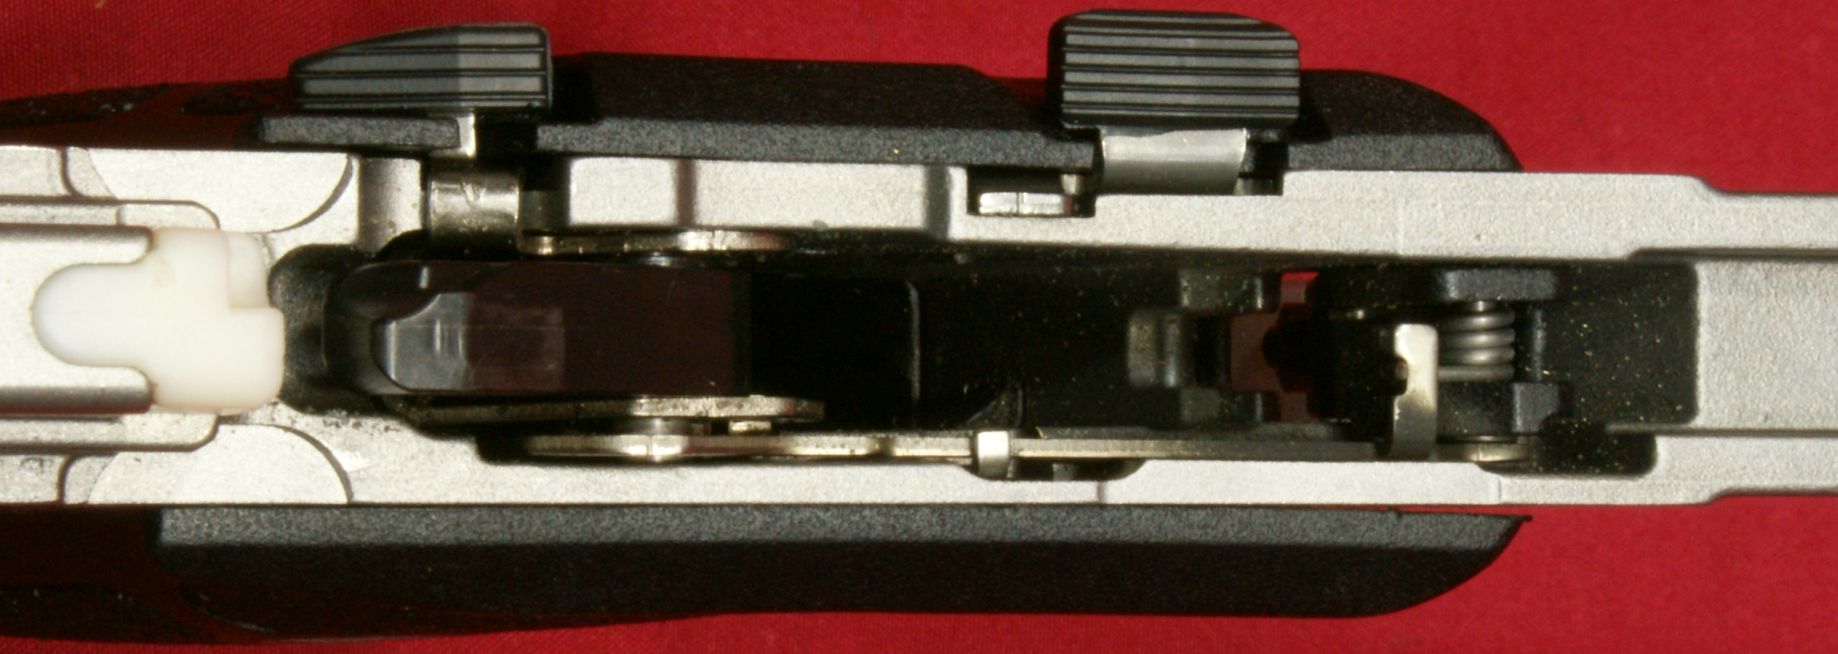
Fire Control Mechanisms
These next photos show the fire control mechanisms and are provided for your study. The only thing of note to me was the polymer buffer at the end of the frame to absorb some of the recoil of the bolt transitioning to the rear. I'm curious to see how this piece holds up over time. I feel it shouldn't be an issue because S&W stated in one of their videos that they had a pistol with over 250,000 rounds through it. If it were a problem, they would already know it.
Figure 41
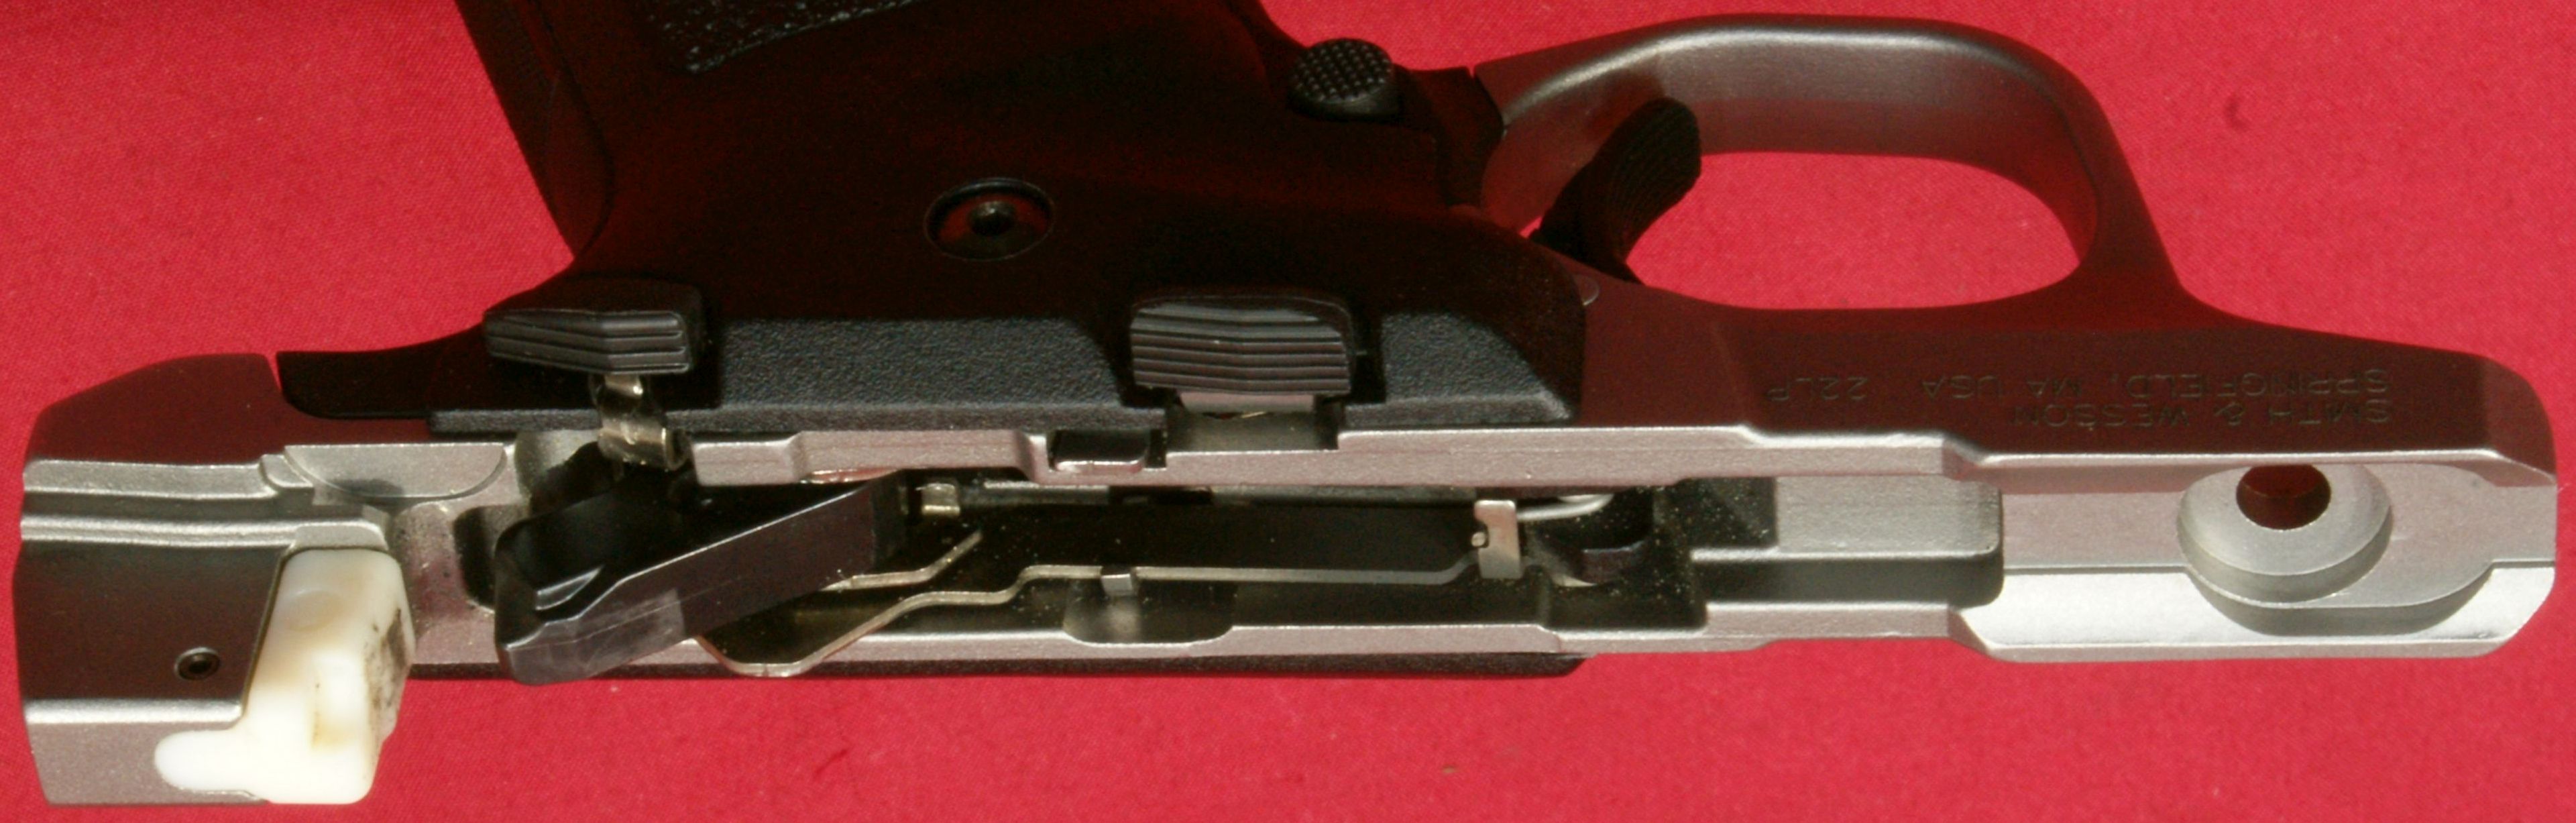
Figure 42

Figure 43
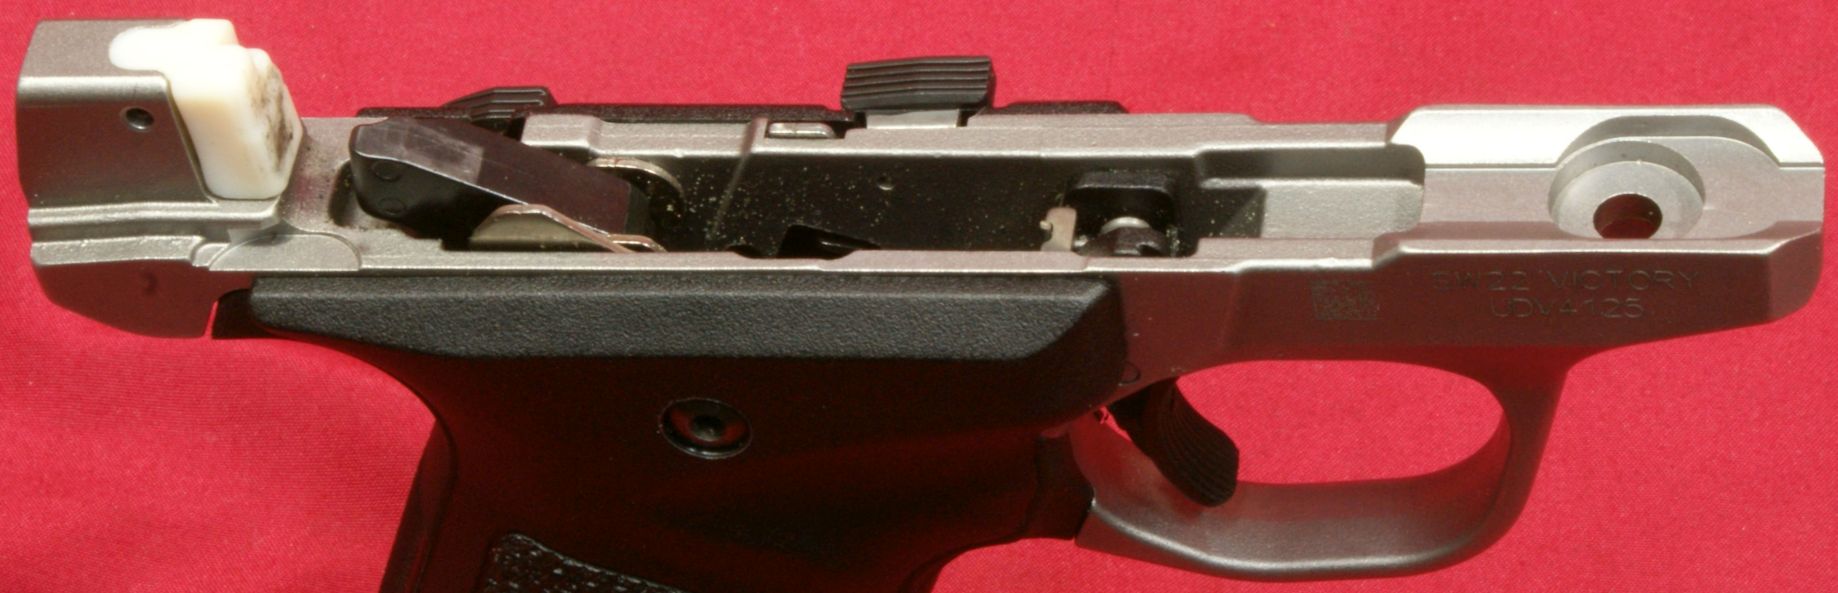
Figure 44
Thoughts
The S&W SW22 Victory Pistol is definitely an easy pistol to disassemble and reassemble. Although it requires one Allen wrench for disassembly, I think it was worth any hassle related to keeping up with the wrench. Disassembly and reassembly are both quick and easy and something than any shooter could master after taking a look at their instruction manual. The overall design of the pistol looks clever and cost effective with their use of polymer components where possible and their welded receiver assembly.
For more detailed photos and commentary, make sure you check out the other parts of this review and feel free to leave comments below. The following links are provided to help you see other parts of this review.
- Smith & Wesson SW22 Victory Pistol Review: Part 1 - Introduction, Specifications and Summary
- Smith & Wesson SW22 Victory Pistol Review: Part 2 - What's in the Box
- Smith & Wesson SW22 Victory Pistol Review: Part 3 - External & Operational Features
- Smith & Wesson SW22 Victory Pistol Review: Part 4 - Disassembly & Internal Features
- Smith & Wesson SW22 Victory Pistol Review: Part 5 - Range Test
Or
If you would like to be notified about future Gunsumer Reports reviews via Facebook, make sure "You Like This" by clicking the Facebook "Like" button at the bottom or top of this page. If it already says "You Like This" beside the button, clicking it again will uncheck the "Like" status and you will not be notified.
| Share on Facebook | |
© 2010, 2011, 2012, 2013, 2014, 2015, 2016, 2017, 2018, 2019, 2020, 2021, 2022, 2023 & 2024 Gunsumer Reports™, All rights reserved.
FTC Disclosure