|
|
Gunsumer Reports TM Providing Detailed Objective Reviews for Firearms and Firearm Accessories |
Ruger PC Carbine Review
Part 3 - External & Operational Features
February 4, 2018
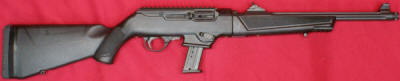
In this part of my Ruger PC Carbine review, I'm going to try to cover in detail the external and operational features of this new firearm from Ruger. In the previous part of my review I showed what you get when you purchase this firearm along with showing some overall photos. I have also included these photos below in this part of the review for my reference. Also keep in mind that clicking on any of these photos will typically bring up a high resolution photo showing the finer details.
Basically, the Ruger PC Carbine is a traditional looking blowback 9mm carbine in a takedown configuration that can utilize various style magazines (more later on this) and comes with black synthetic polymer furniture (glass filled nylon), aluminum anodized receiver and matte finished chrome moly steel hammer forged fluted threaded barrel. Other features covered in detail in this review are the ghost ring sights, integrated Picatinny rails, ambidextrous features and other details.
Figure 1

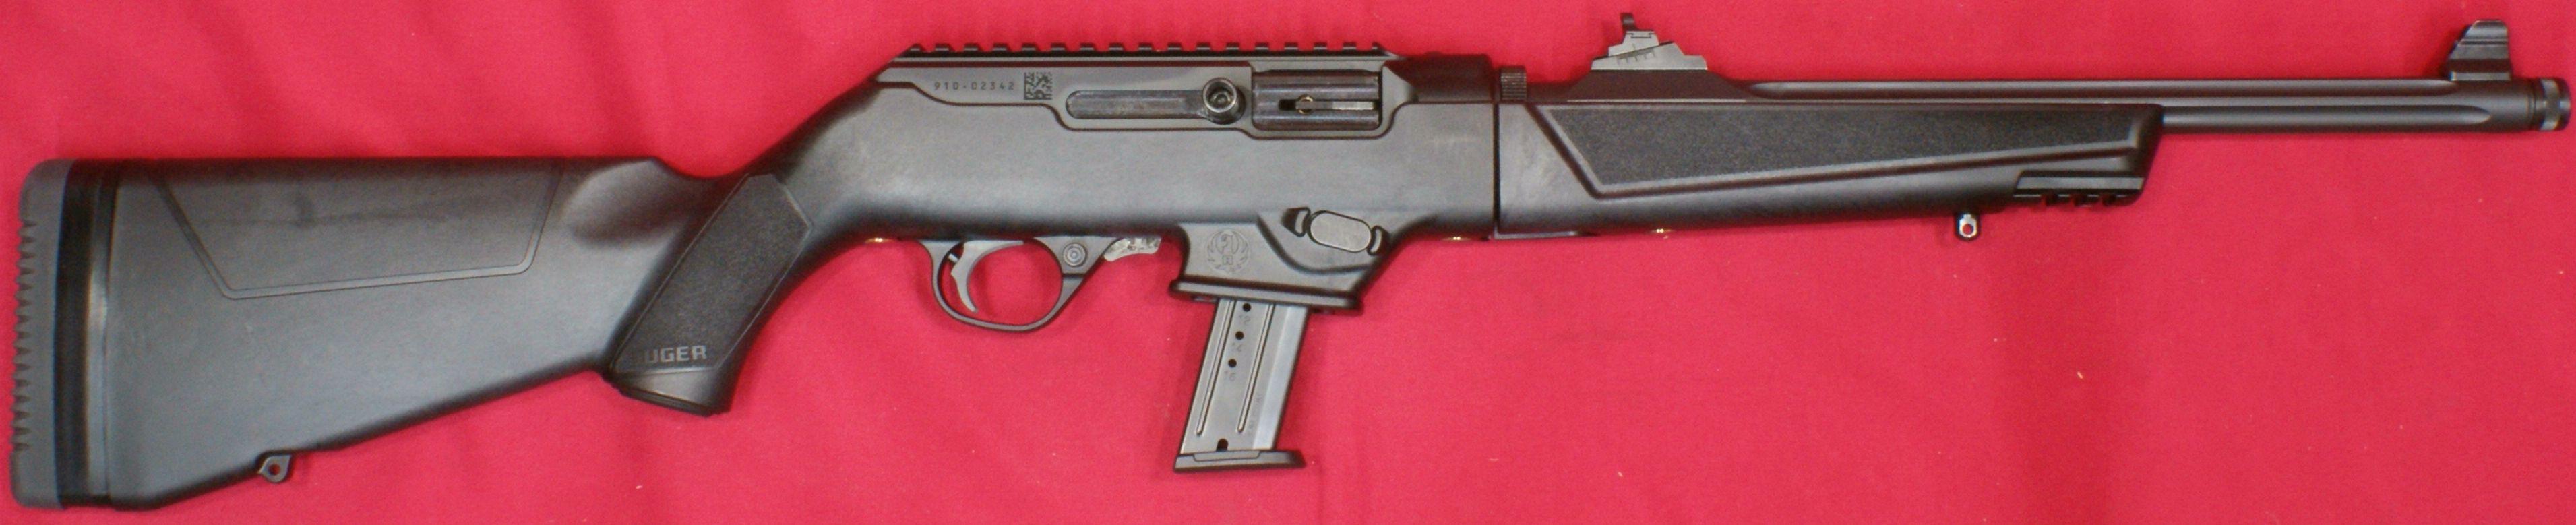
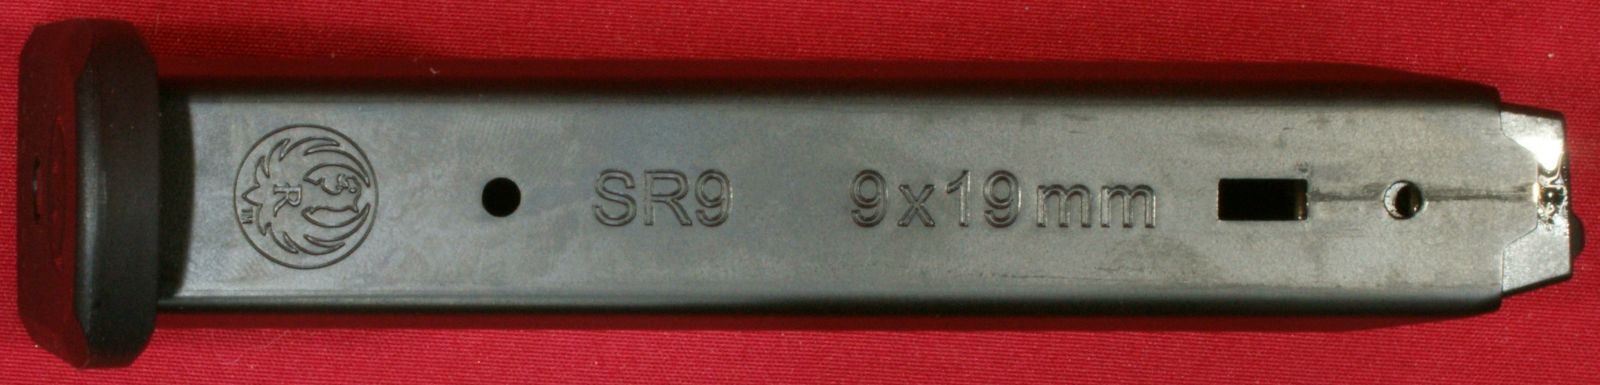
The firearm measured just barely under 35 inches as shipped with the single buttpad spacer included. The specs state an overall length of 34.37" which must be without any spacers installed. The photo below shows the single 17-round SR9 magazine installed. Capacity is limited only by the magazine used and switching to the Glock style magazines allows for higher capacities.
Figure 2
Ruger incorporated a takedown feature similar to that of their popular 10/22 takedown models. It is not exactly the same as the 10/22, but the same basic design features exist.
Figure 3
![]()
Overall, I feel the PC Carbine is an extremely attractive firearm in the way Ruger styled the components and also in the detail they put into the barrel and receiver (more later).
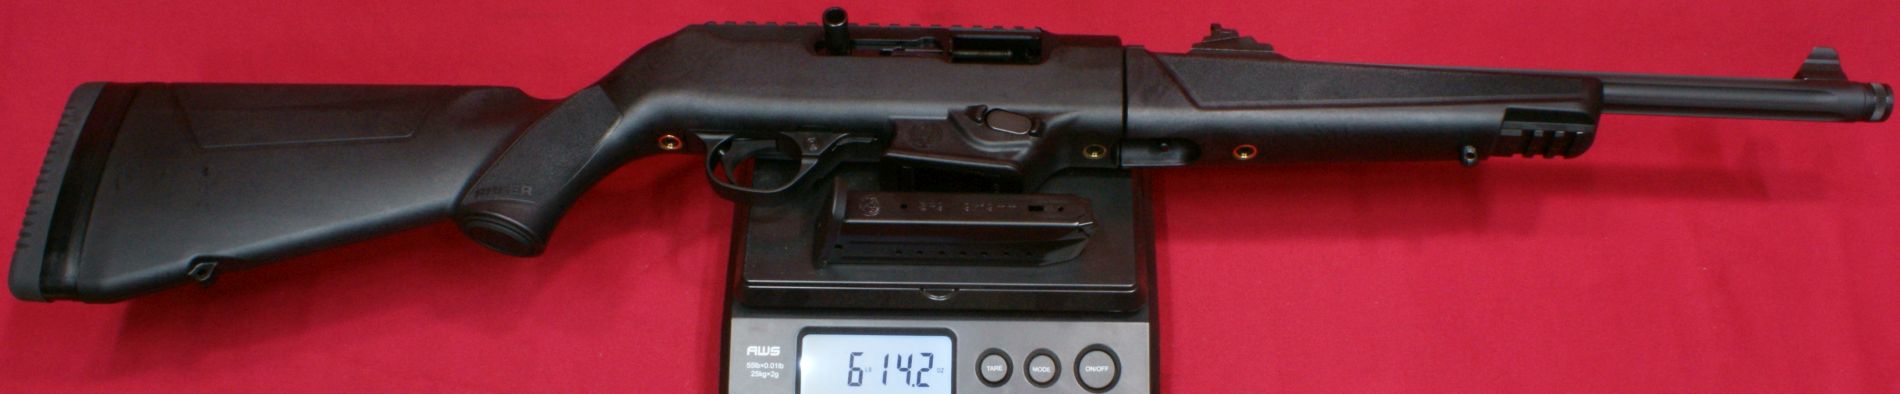
Figure 4

The PC Carbine weighed in at 6 pounds 14.2 ounces with an unloaded magazine. Overall I wouldn't say this is a heavy firearm, but it does have some heft to it and comes in on the high end when compared to other similar carbines. Some comparative data is shown below and I included the weight of the PC Carbine without the magazine since I'm not 100% sure what is included in the other manufacturer's weights.
- Ruger PC Carbine 6.89 lbs (6.69 lbs without magazine)
- Taurus CT9 6.6 lbs
- JR Carbine 6.5 lbs
- Hi-Point 9mm Carbine 6.25 lbs
- Berretta CX4 Storm 5.68 lbs
- Kel Tec Sub 2000 4.25 lbs
Figure 5
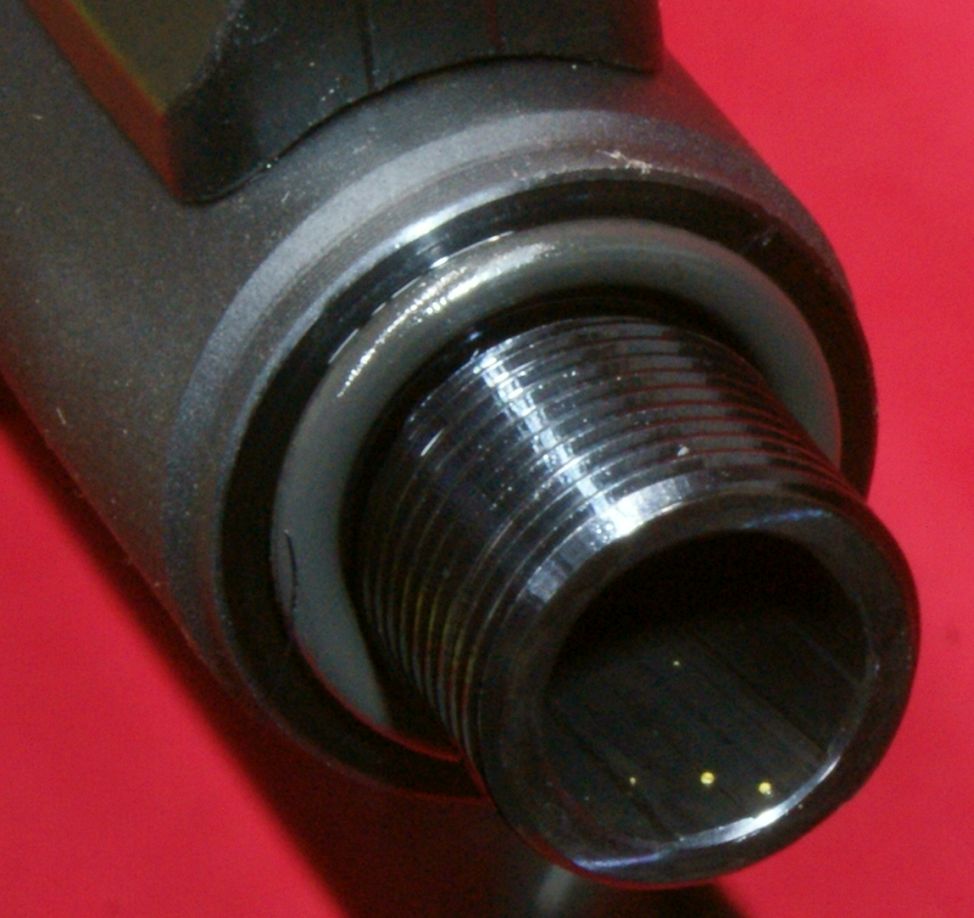
Starting at the front... the barrel comes threaded so you can add the muzzle device of your choice. In today's firearms climate, I feel a threaded barrel was a must and was really glad to see Ruger add this feature. Maybe 2018 will be the year that suppressors are deregulated, and if so, threaded barrels will become a standard on many firearm platforms. The barrel threads are the standard 1/2-28 which gives many options for 9mm suppressors without the need for any type of thread adapter. The thread protector is steel and has an O-ring installed to help prevent the protector from vibrating lose. If you intend to use a suppressor, the Ruger Instruction Manual states you should remove the O-ring so you get the maximum support for your suppressor.
Figure 6
Figure 7


It is a little hard to tell from the photo below, but the barrel has a 6 groove 1:10 right hand twist.
Figure 8
I removed the O-ring and installed my Griffin Optimus Suppressor and inserted my suppressor alignment rod and was pleased with the alignment. Basically I checked how well the threads were cut with regard to the centerline axis of the barrel. Good job Ruger.
Figure 9

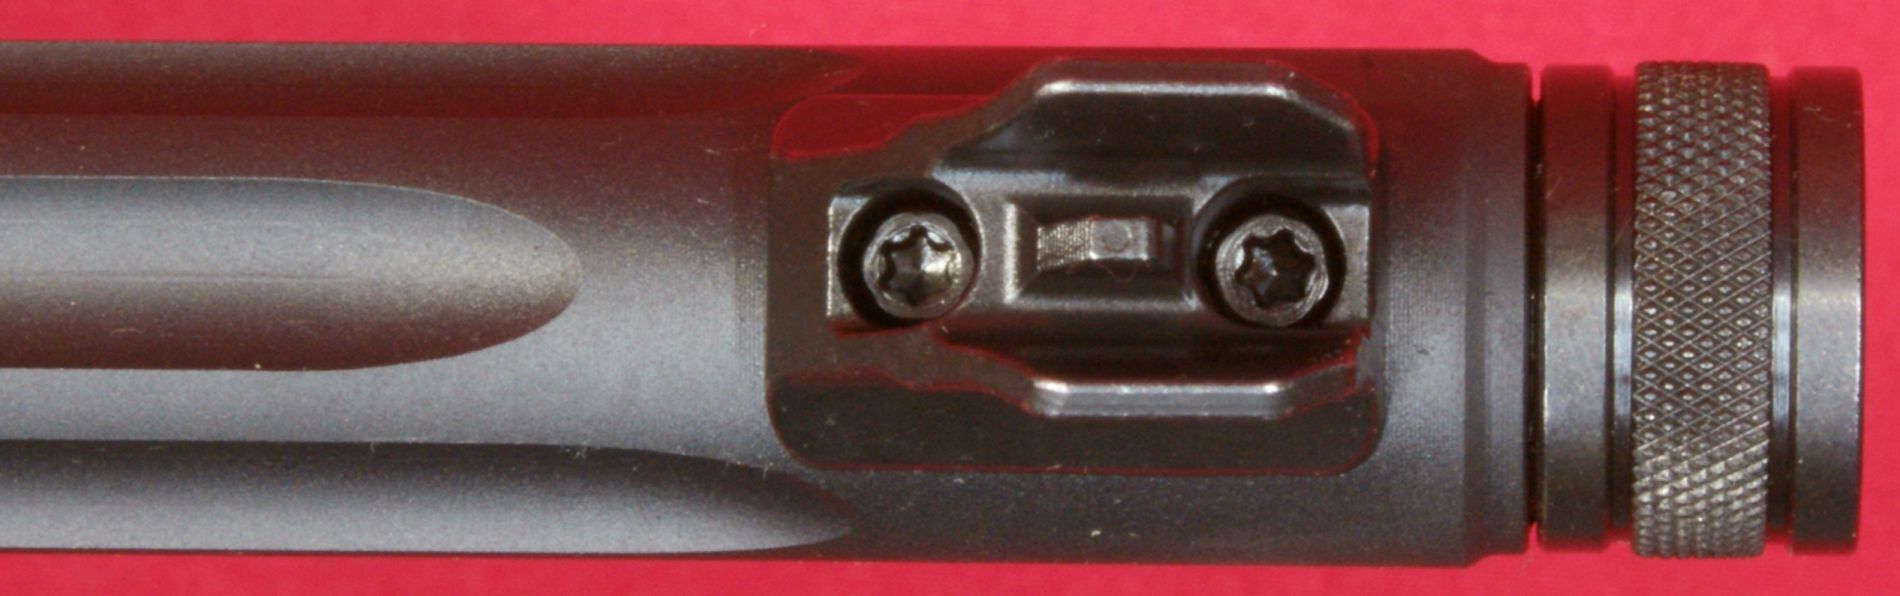
I was impressed with the sights Ruger provided on this firearm. The front sight is a simple fixed protected post that has an anti-glare surface.
Figure 10

The front sight is attached to the barrel via two Torx head screws. I checked the torque using a T-10 bit and my Wheeler FAT Wrench and they only had about 10 in-lbs of torque. I decided to pull one of the screws and it looks like a #6 screw and it did have some thread locking compound. Depending on screw material and thread pitch, torque can range from 10 to about 22 in-lbs. I reinstalled it to about 12 in-lbs and was satisfied that the front sight shouldn't work loose.
Figure 11
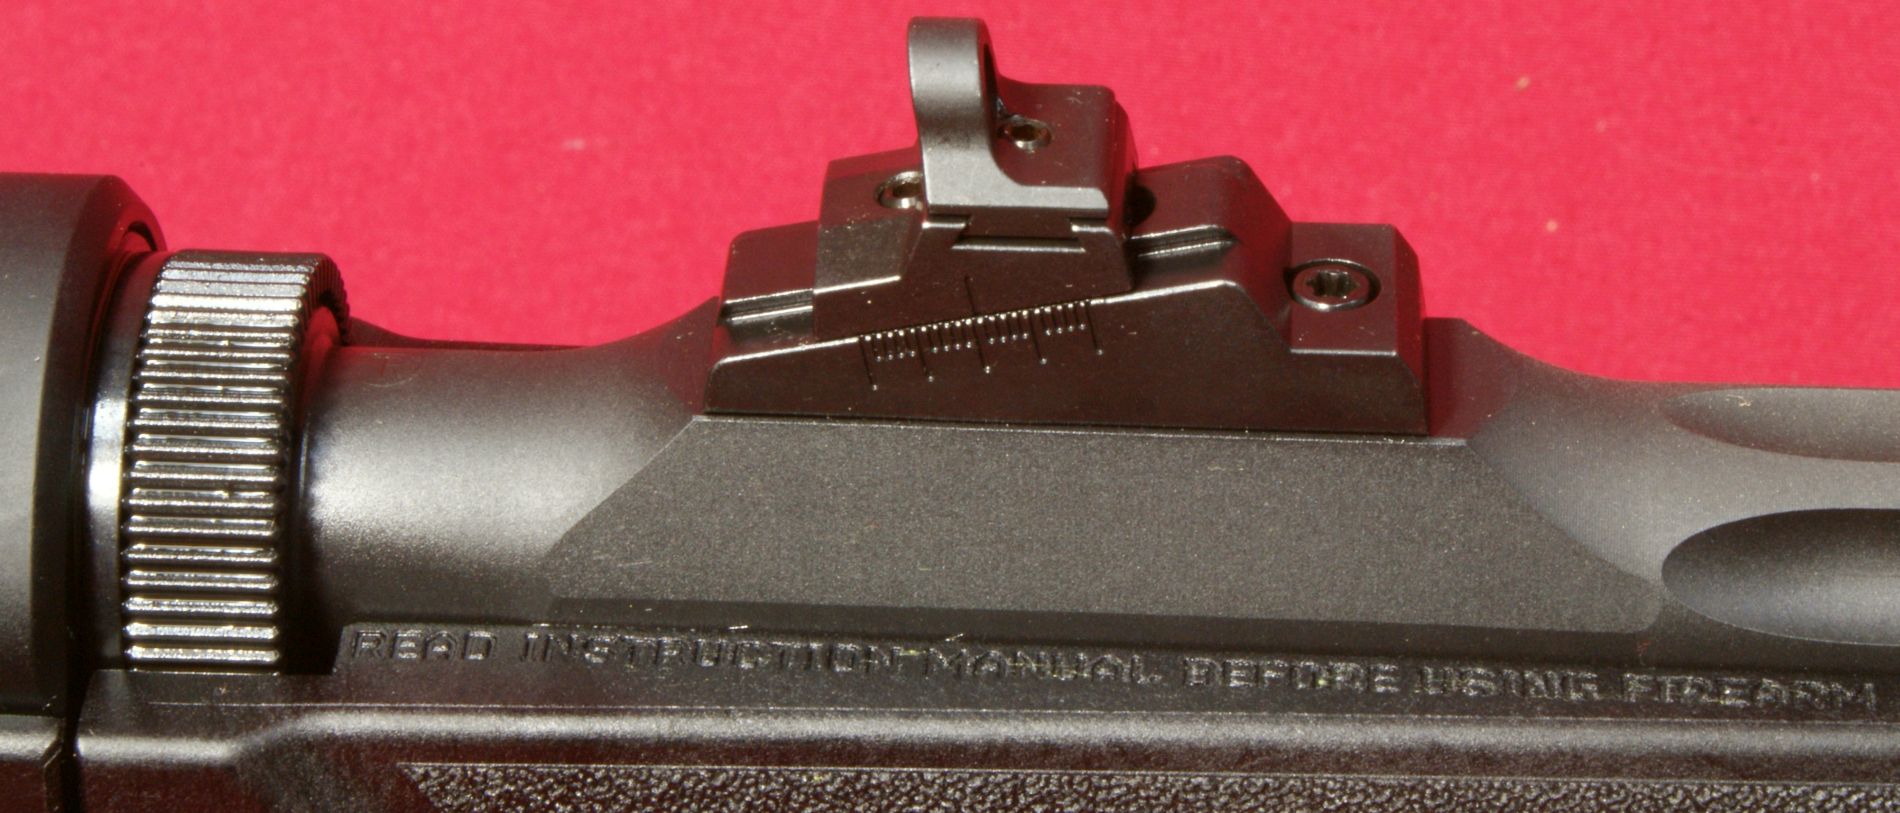
The rear sight is a Ghost Ring (aperture) sight that is adjustable in both windage and elevation. The small Allen wrench provided with the rifle is used for loosening the set screws to adjust this sight.
Figure 12

You can see the dove tail slots below provided for adjustment. Also, there are index marks on the ramp for the elevation adjustment. For the windage, you adjust the aperture in the direction you want to move the bullet. For elevation, move the sight in the direction you want the bullet to move, keeping in mind that each graduation on the side scale is equal to 0.85" at 50 yards according to the Instruction Manual. The position shown below is in the as-received position. I was very impressed at how Ruger chose to machine this raised flat area with tapered sides on the top of the barrel to support the sight base. This along with the fluting on the barrel seems very attractive. I wasn't able to take a photo that gives looking through the sight picture justice, but to describe it, the aperture is a nice size and the sides of the aperture are in the same view as the protected sides of the front sight so you don't get any obstruction of view. Because of this nice sight picture, my guess is that there may be many people who will choose to use this sight only on the firearm.
Figure 13
The carbine has a 16.12" cold hammer forged chrome moly steel barrel with a fluted heavy profile. The barrel diameter is 0.80" just behind the thread protector and seems to be a constant diameter throughout its length.
Figure 14

On the left side of the barrel below the rear sight is marked the caliber "9MM LUGER". Ruger states in their Instruction Manual that you should use "only factory loaded 9mm Luger (Parabellum) standard, high velocity, or +P ammunition, manufactured to U.S. industry standards."
Figure 15

Behind the rear sight and just forward of the takedown adjustment ring is a proof mark indicating this firearm had proof rounds fired through it. You can also see Ruger's standard note "READ INSTRUCTION MANUAL BEFORE USING FIREARM" molded into the top right side of the forend.
Figure 16

The barrel assembly includes both the front and rear sight so there should be no question about the iron sights zero changing like some people feel may happen when the optic is on the receiver and the barrel is removable. I don't think this will be an issue for the role of this type of firearm and repeatability details are covered in my range testing part of this review.
Figure 16

The forend is attached with a single screw similar to that used to attach the other portion of the stock to the receiver.
Figure 17

The synthetic forend has some rough stippling which seems to have a texture of about 100 grit sandpaper. Although, it doesn't have the same bite as sandpaper, it does provide a good slip-free surface.
Figure 18

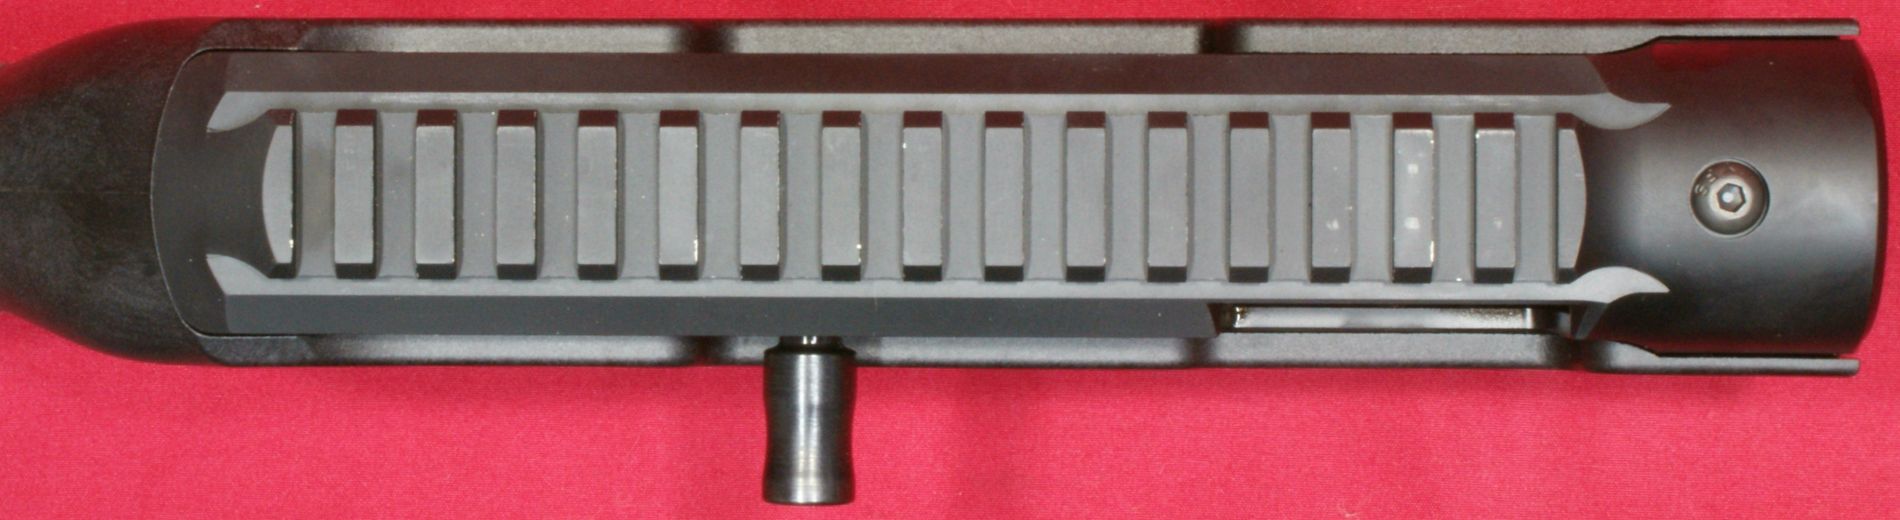
The forend includes an integrally molded section of Picatinny rail and a steel swivel stud. You can also see the slot for the takedown feature.
Figure 19

The rail section on the forend is sufficient for a rail mounted bipod, small laser or light. If you are planning on mounting a light, be aware of how short this section is and that the stock profile gets larger just behind the rail and then you have the sling stud. I found that my Streamlight TLR-1 series lights would not attach to this rail.
Figure 20

Removing the barrel assembly is extremely quick and easy. Basically you make sure the firearm is unloaded, lock the bolt to the rear, push the takedown locking lever forward, rotate the barrel assembly counterclockwise about 45 degrees and then pull the barrel assembly from the receiver. Doing so quickly put the carbine in this configuration below for packing or storage. The receiver/stock assembly is the longest piece measuring about 20.25" and the barrel assembly measured just under 16.5". Ruger sells an attractive takedown case at ShopRuger.com for $79.95, but according to the description for the case it will not fit in the case with an optic installed. This could potentially be mitigated by quick detach mounts on the optic.
Figure 21

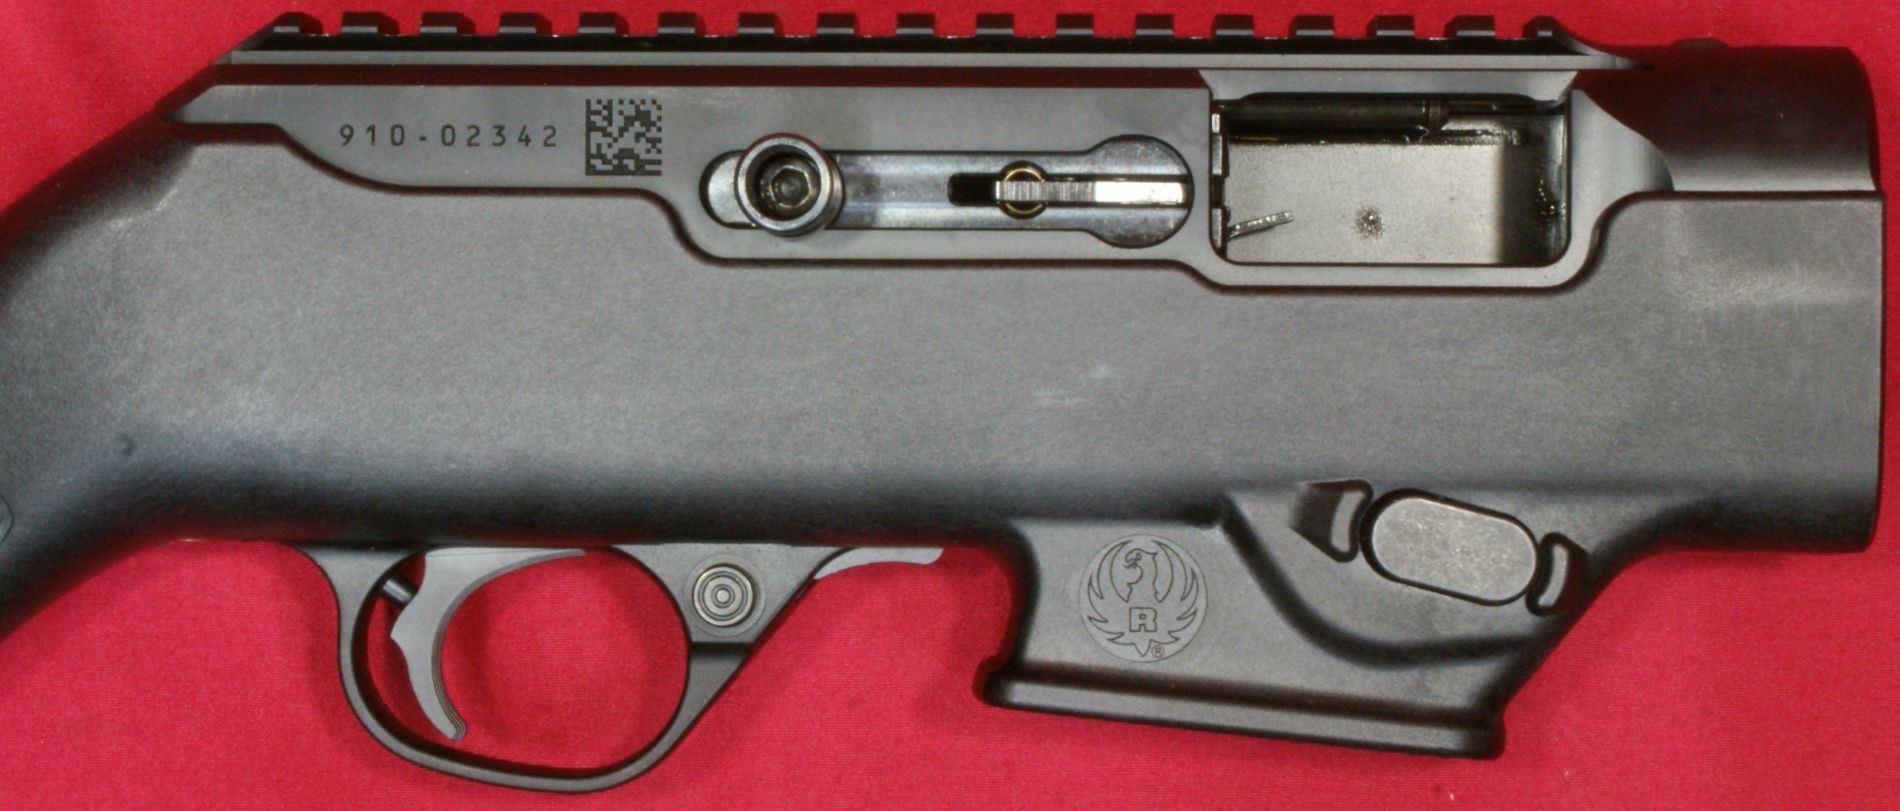
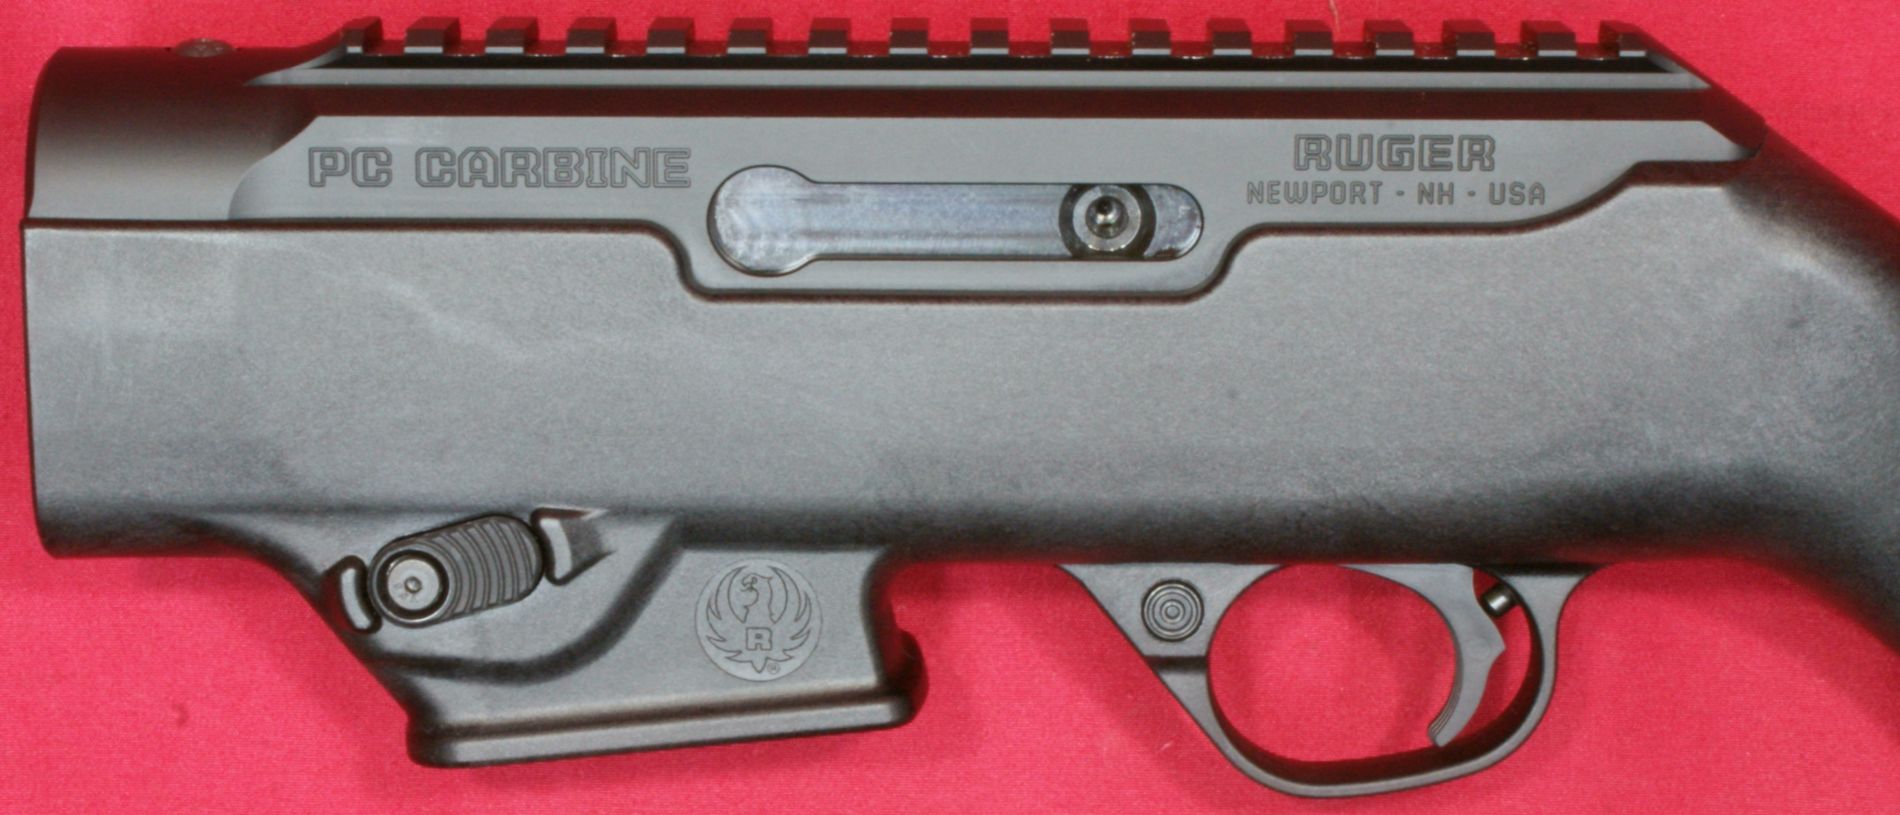
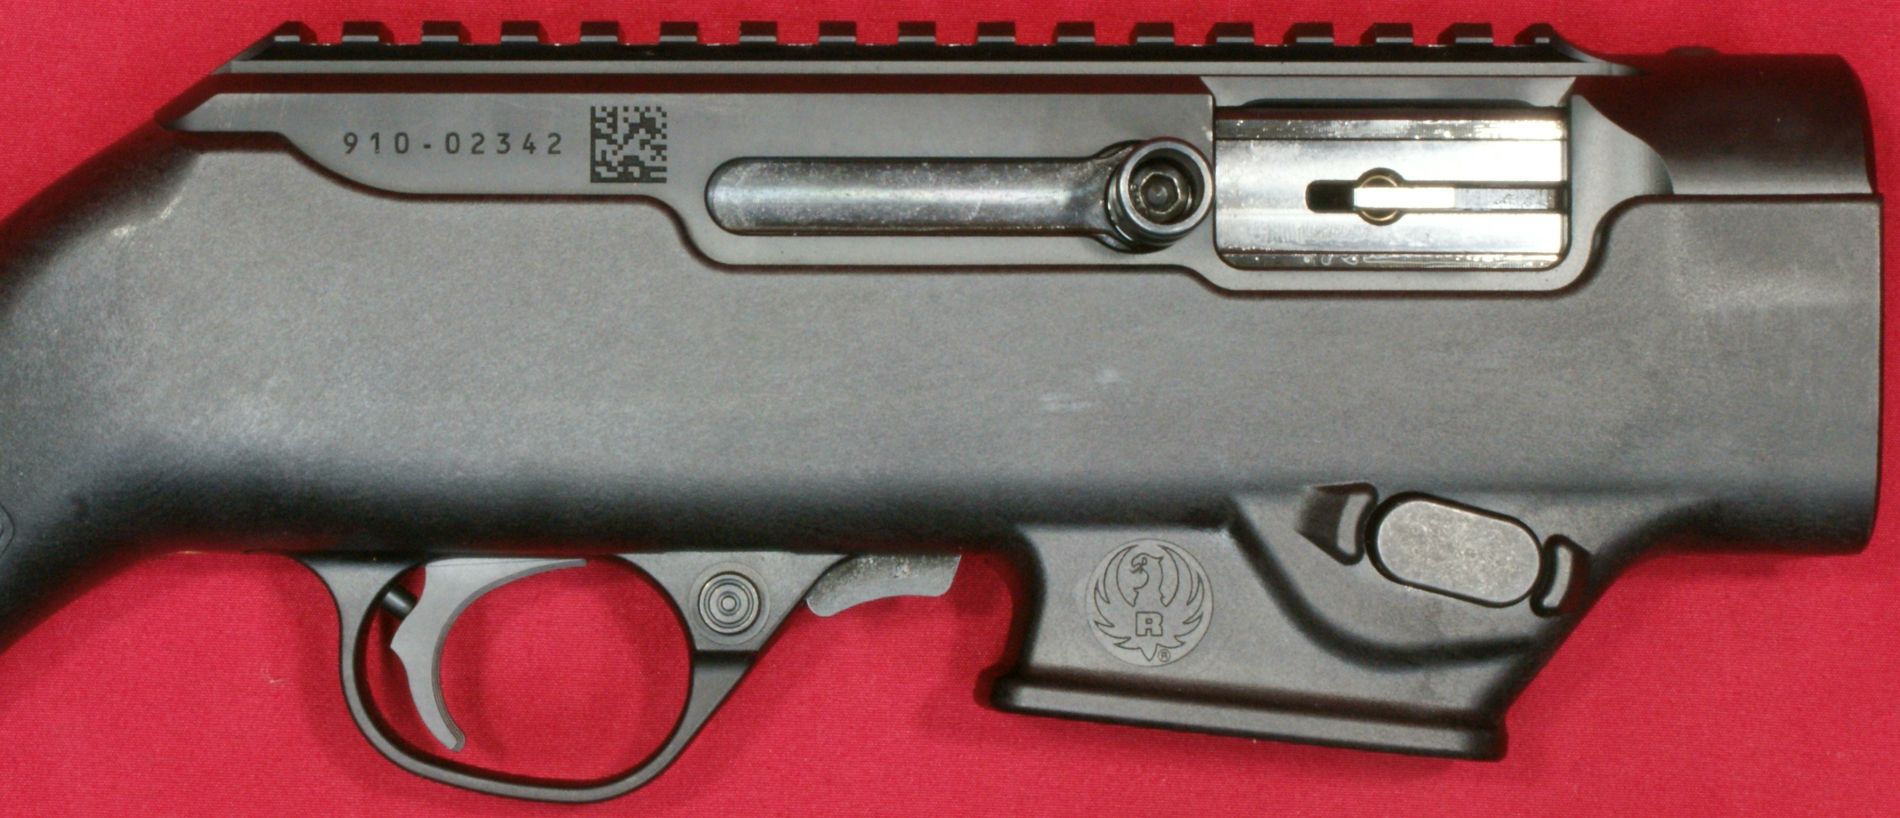
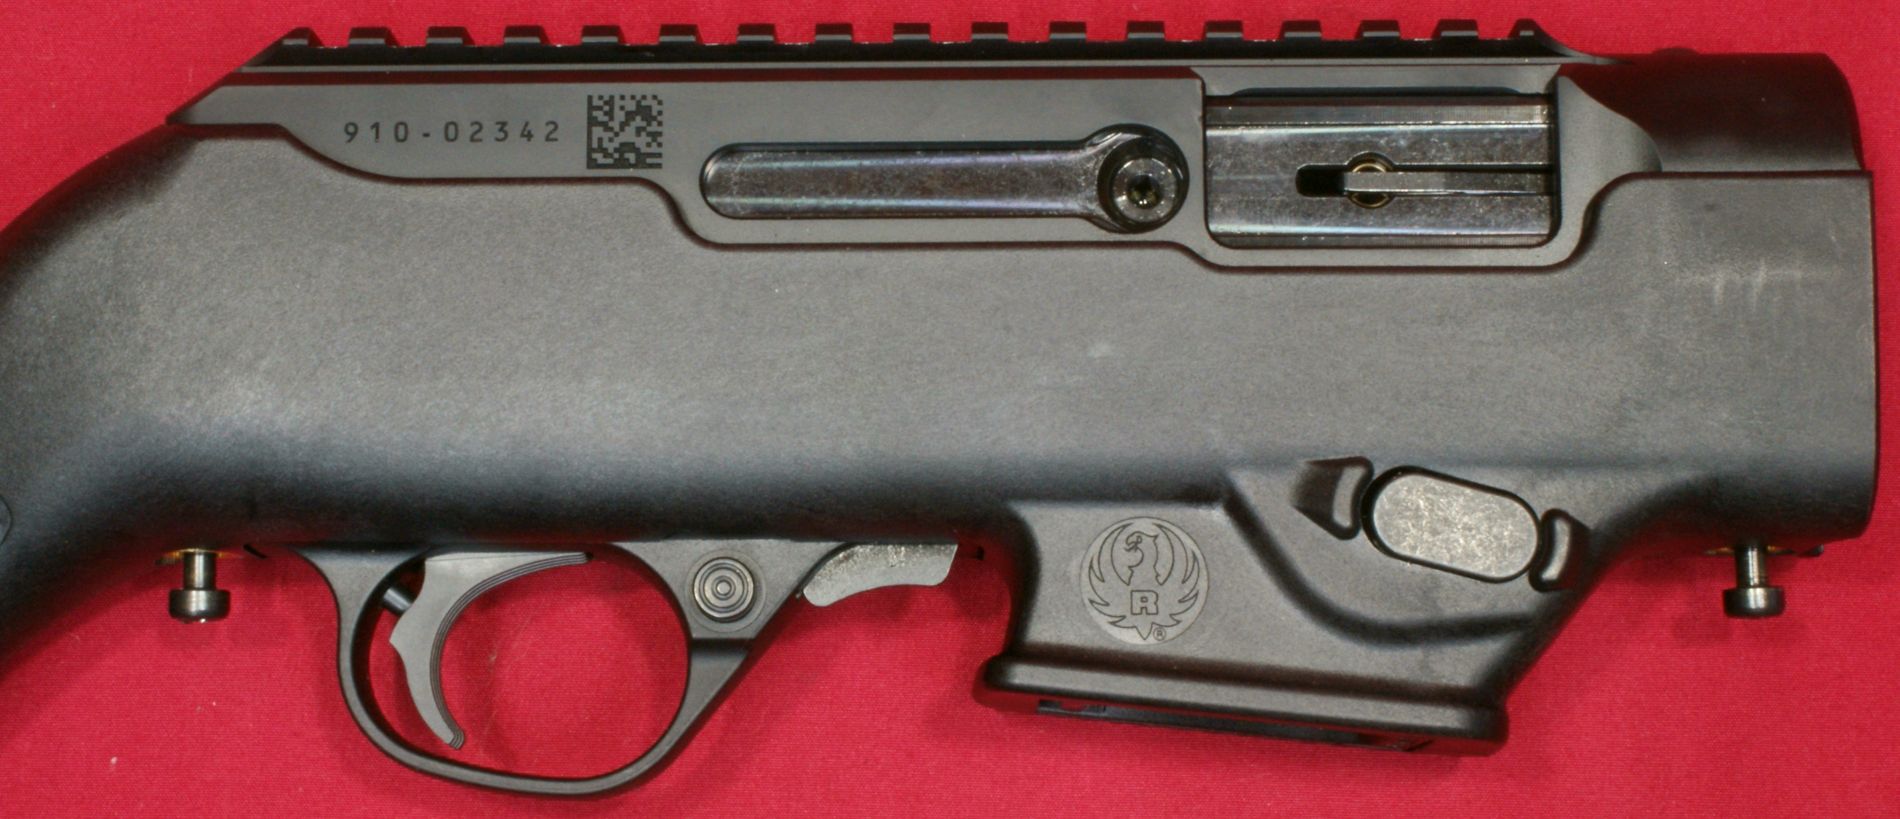
The receiver is machined from 7075-T6 aluminum which is about as good as it gets for an aluminum receiver. It comes coated in a Type III Hardcoat Anodized finish and has an integrated 16-slot Picatinny rail on the upper surface The forward screw shown is one of at least three that hold the steel takedown insert in place at the front of the receiver. Note: any scratches you see on the rail are due to me fitting various optics as I was getting geared up for eventual range testing.
Figure 22
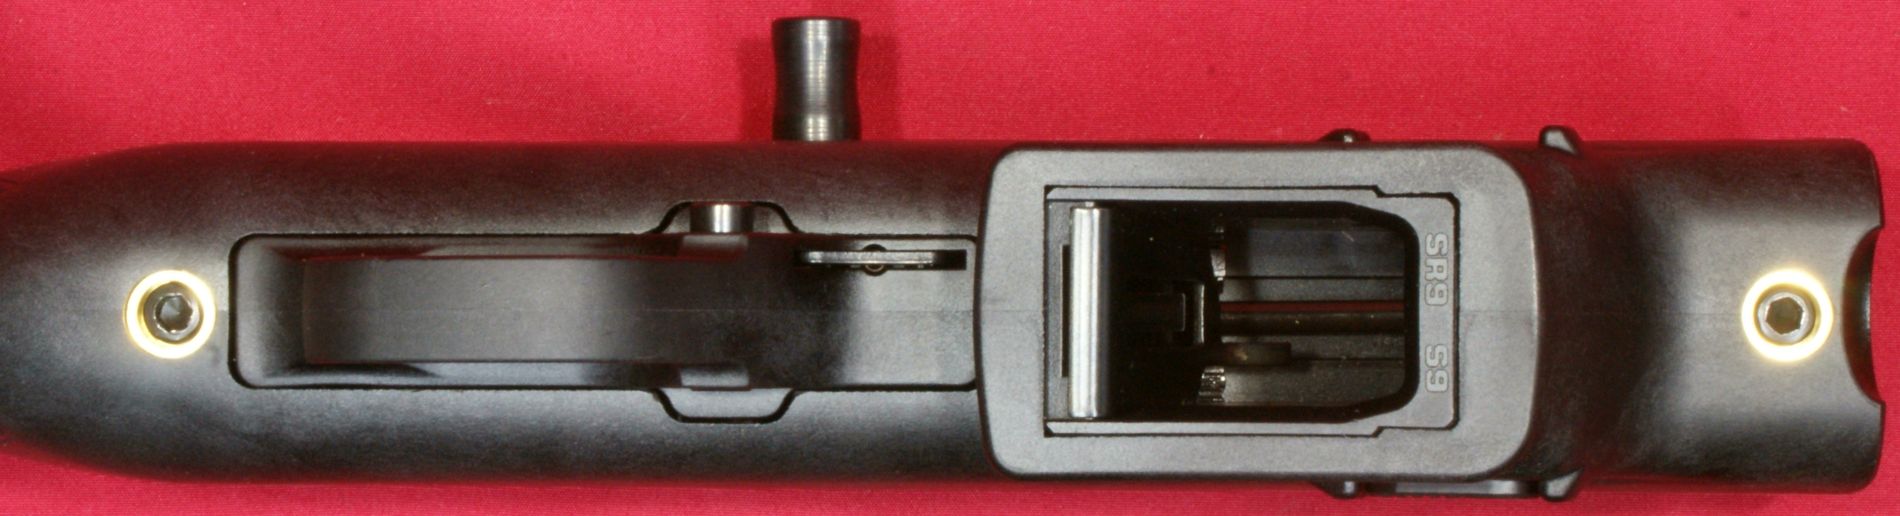
The right side of the receiver area includes serial number, 2D bar code, Ruger logo, ejection port and charging handle in this picture. Both the charging handle and magazine release button can be configured to their opposite sides giving the PC Carbine some ambidextrous features.
Figure 23
The Charging handle can be removed using the largest of the Allen wrenches provided. A single screw holds the charging handle in place and the handle itself has a conical end that nests in a conical recess in the bolt. This recess is on both sides of the bolt and the handle can be moved to the side of your preference. The screw should be torqued to 65 in-lbs on reinstallation. This was great thinking on Ruger's part to include this capability because a left side charging handle is preferred for many right handed shooters.
Figure 24

The bottom of the receiver area has two disassembly screws with brass bushings in the stock to ensure no issues with the screw heads bearing on polymer. You can also see the SR9 magazine insert is the one installed from the factory. I cover the trigger area further below.
Figure 25
The left side of the receiver area includes the model name "PC CARBINE", manufacturer and location "RUGER NEWPORT - NH - USA" and the Ruger logo on the magazine well. You can also see how the receiver is milled out and the hole in the bolt for a left handed configured charging handle. You can also see the end of the magazine release button. This button is ambidextrous, but comes configured on the left side. Pressing the button allows a magazine to drop freely from the firearm.
Figure 26
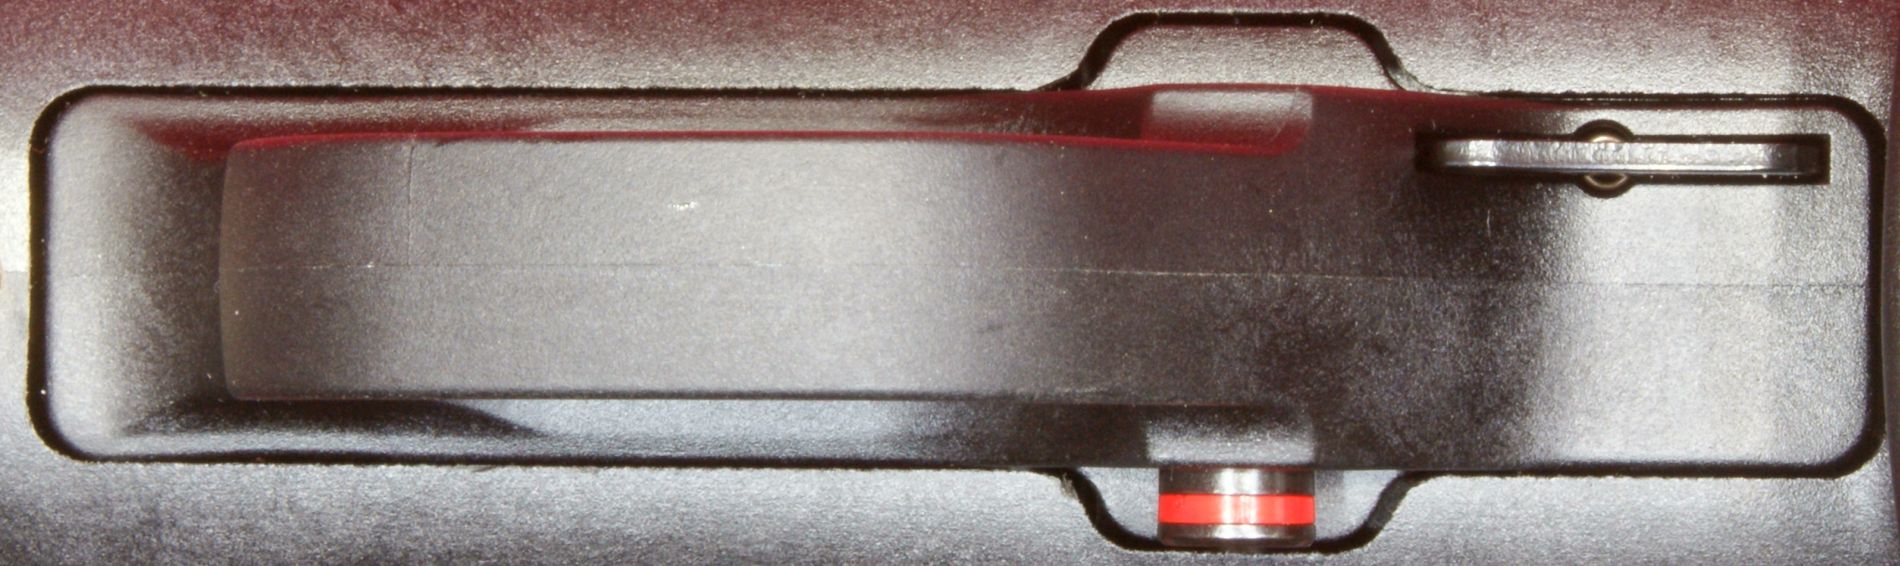
This next photo gives you a better look at the bolt in the closed position. The photo makes it look like this might be a stainless steel bolt, but it is not. It is a heat treated chrome moly steel bolt with a blued finish. The trigger guard, trigger and safety are very 10/22-ish. The guard itself is not the same as the 10/22, but I feel there are some common trigger assembly components. The trigger pull on this firearm came in at 4.3 lbs based on an average of 10 pulls from my Lyman Digital Trigger Pull Scale. The trigger had a little take-up, a very small amount of creep that sometimes was not noticeable, broke crisply and then had a little overtravel. For this style of firearm, I would give the trigger pull a solid A as a grade.
In front of the trigger guard is the bolt stop lever. This lever is shown in the down position and will remain there until you push it up to hold the bolt open manually. This firearm has a last round hold open feature that has no relation to the position of this lever.
Figure 27
These next two photos show the button safety in both the safe position and fire position. The button protruding on the right side is the Safe position and protruding on the left is Fire. The Fire side has a read band to visually indicate this state and there is also a very slight ridge so you can get a tactile indication of the Fire state.
Figure 28 - Safety in Safe Position
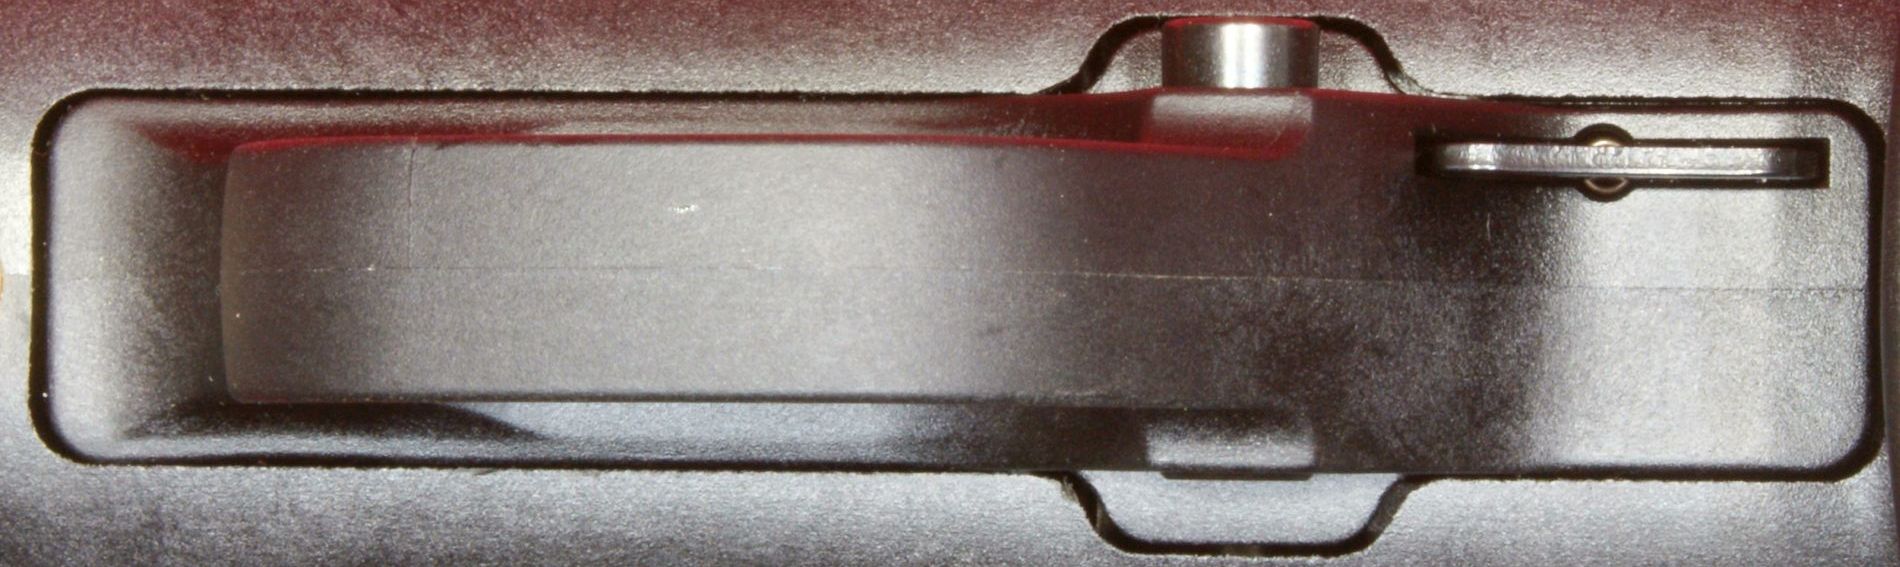
Figure 29 - Safety in Fire Position
Earlier I mentioned the Magazine Insert and in these next few photos I'm showing how to change inserts. The first step is to remove the barrel assembly via the takedown feature. After that, drop the bolt and then loosen the stock bolts below the receiver.
Figure 30
Once loose, you can pull the receiver assembly up and out of the stock. The first time I did this the receiver assembly seemed stuck in place, but I kept trying to wiggle it and then it finally came out.
Figure 32
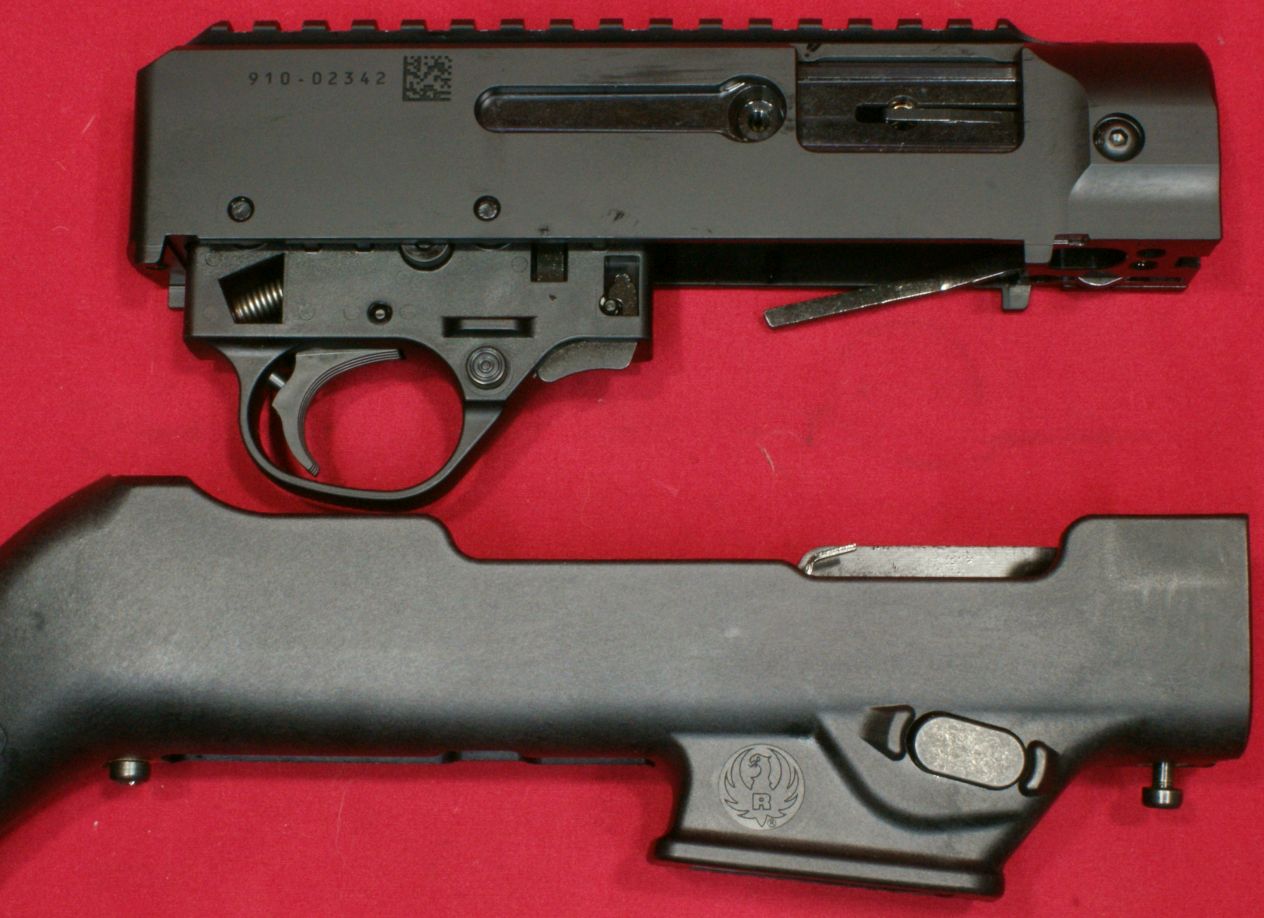
The Ruger instructions say press both the magazine release button and magazine latch (latch for SR9 insert block only) at the same time and the insert can be pulled up out of the stock. I found that pressing the magazine release button all the way in allowed the insert to come out without having to press the latch.
Figure 32

Figure 33
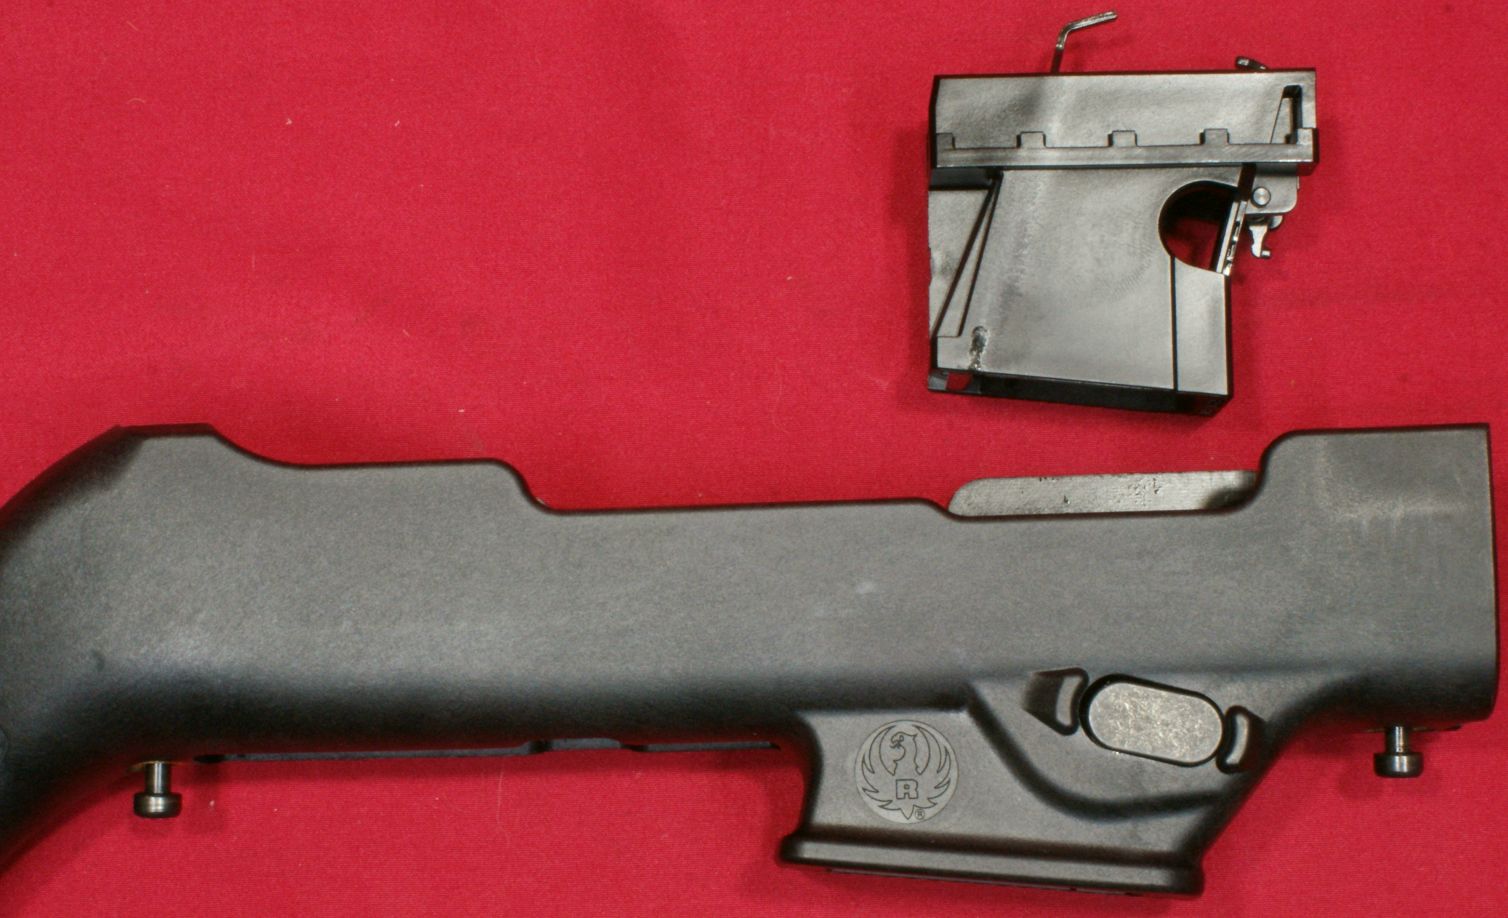
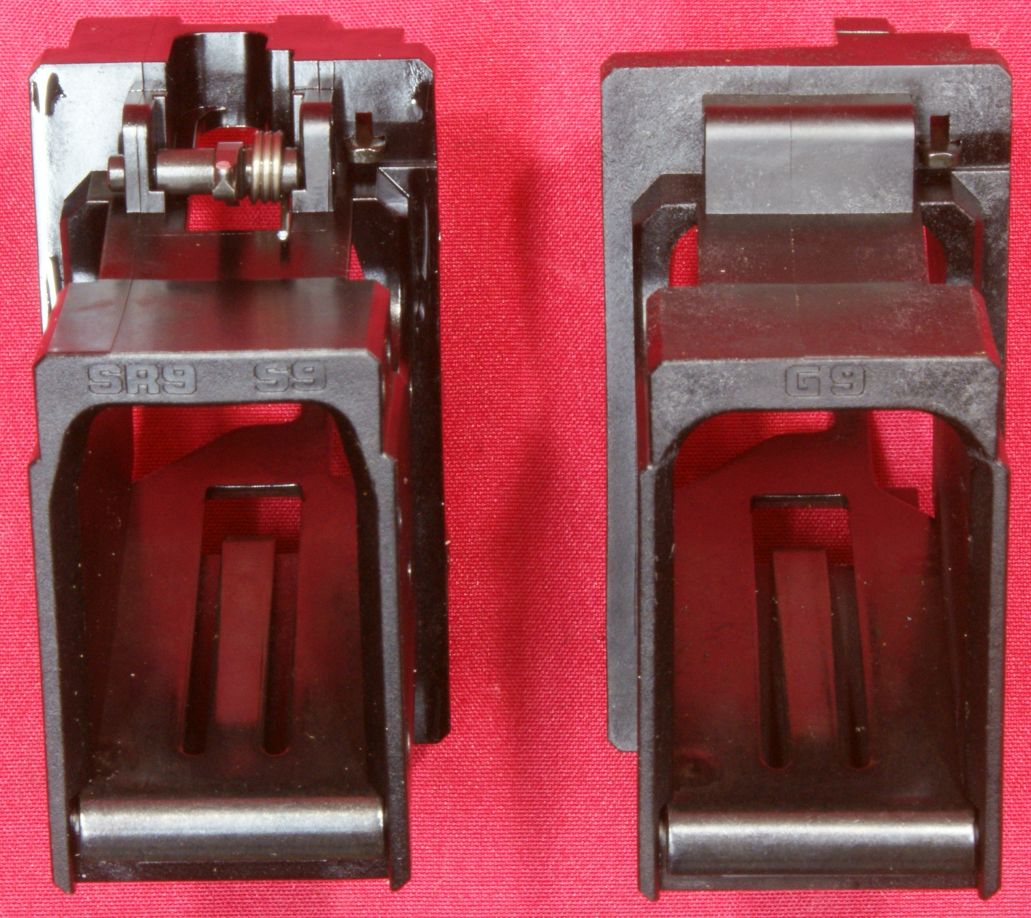
The PC Carbine comes with two magazine well inserts for SR9 and Glock style magazines. You can see them both below. The SR9 has the magazine latch on the front and the Glock does not. A third insert exists for the Ruger American Pistol, but does not come standard with this rifle. You can purchase it at ShopRuger.com for $29.95.
Figure 31 - Magazine Well Inserts
SR9
Glock

The inserts are marked with molded lettering into the bottom of the insert so you can quickly identify which one is in the firearm without having to pull the receiver.
Figure 32 - Magazine Well Inserts
SR9
Glock
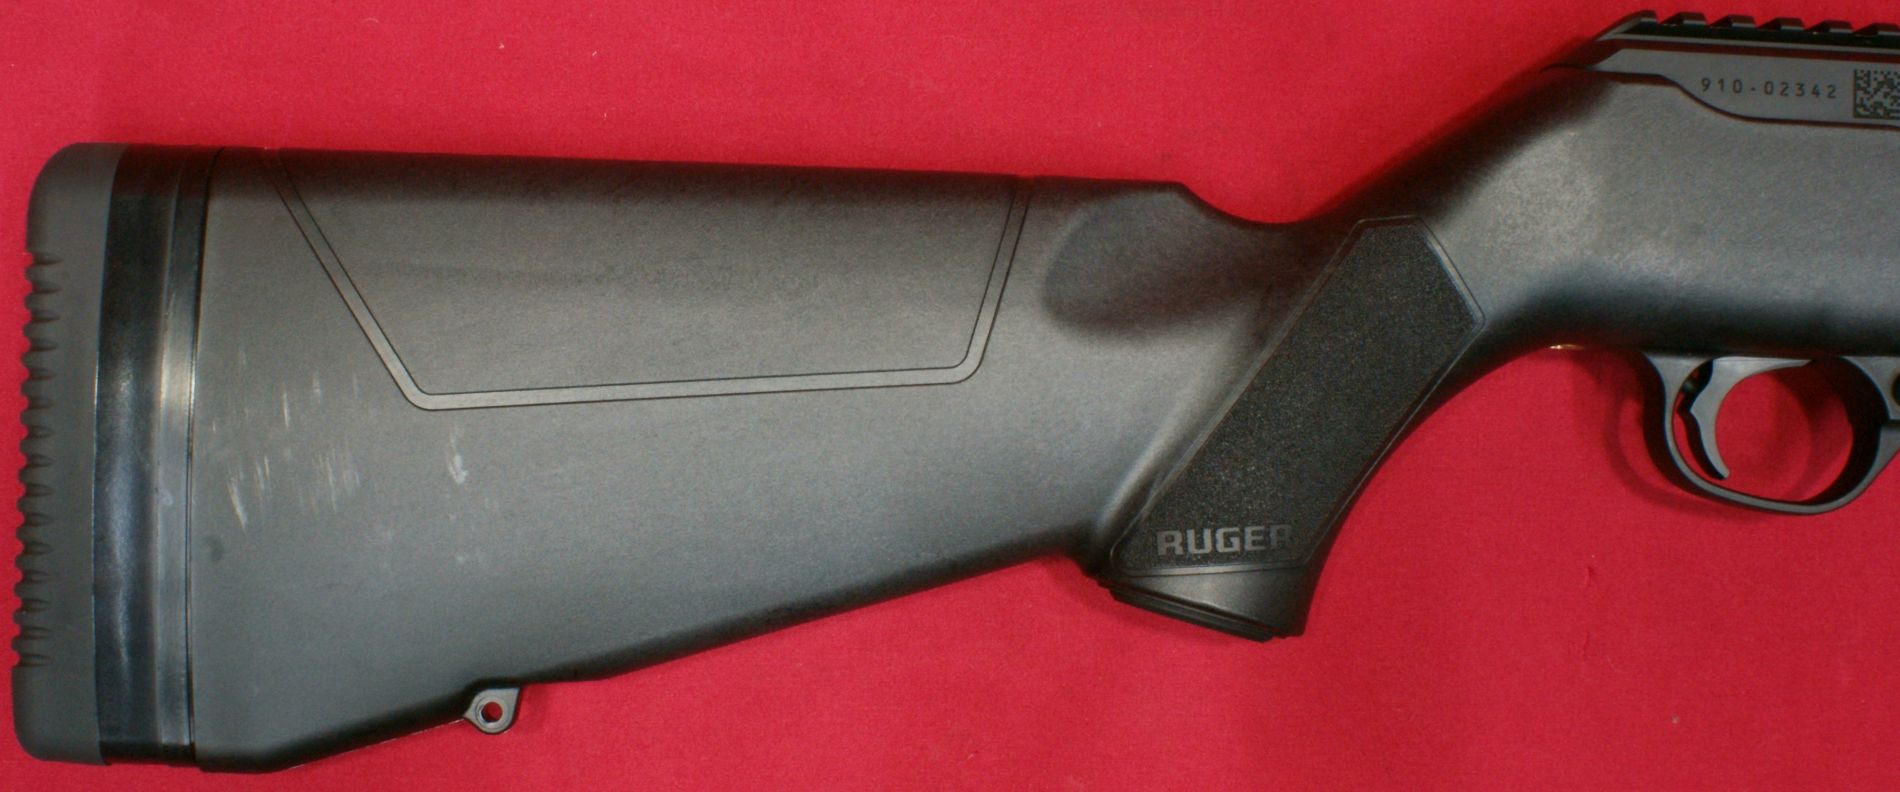
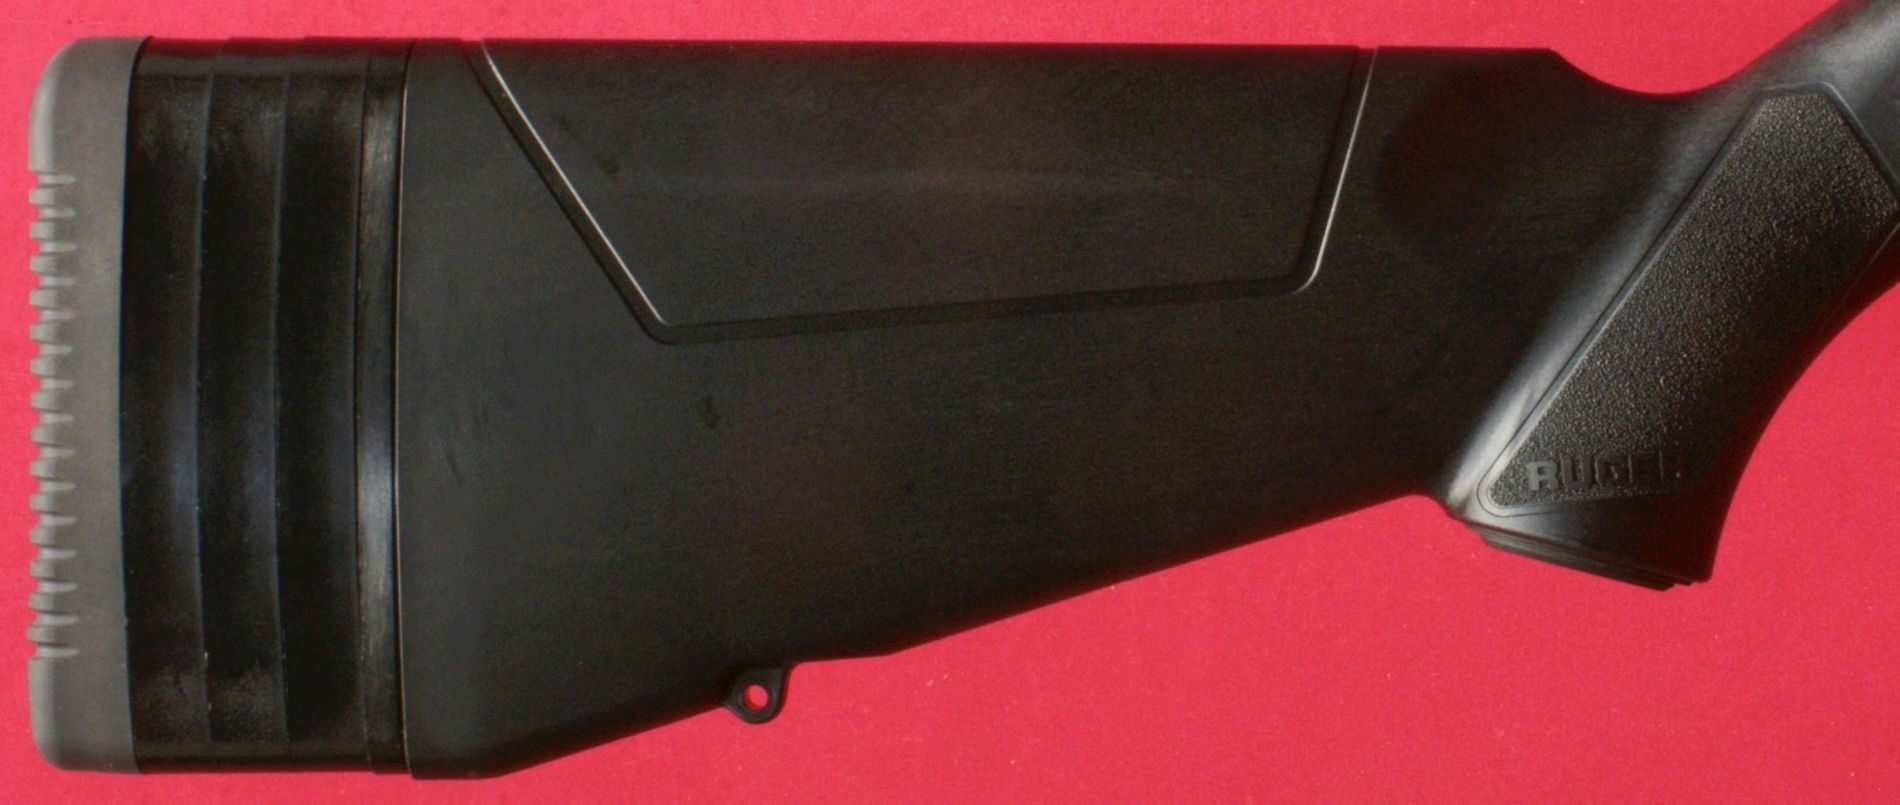
Overall, I would say the buttstock is pretty traditional in style. There is a faux accent that makes you think there is an adjustable comb, but it is not. The texturing on the grip area matches that of the forend and I like it. The grip has the "RUGER" name molded into it on each side. The length of pull out-of-the-box with the single buttpad space installed is about 13.15". It can be shortened 1/2" or lengthened 1" by removing or adding buttpad spacers.
Figure 33

Figure 34
The bottom of the grip area has a cap with the Ruger logo and a rear sling swivel attachment is molded into the stock.
Figure 35

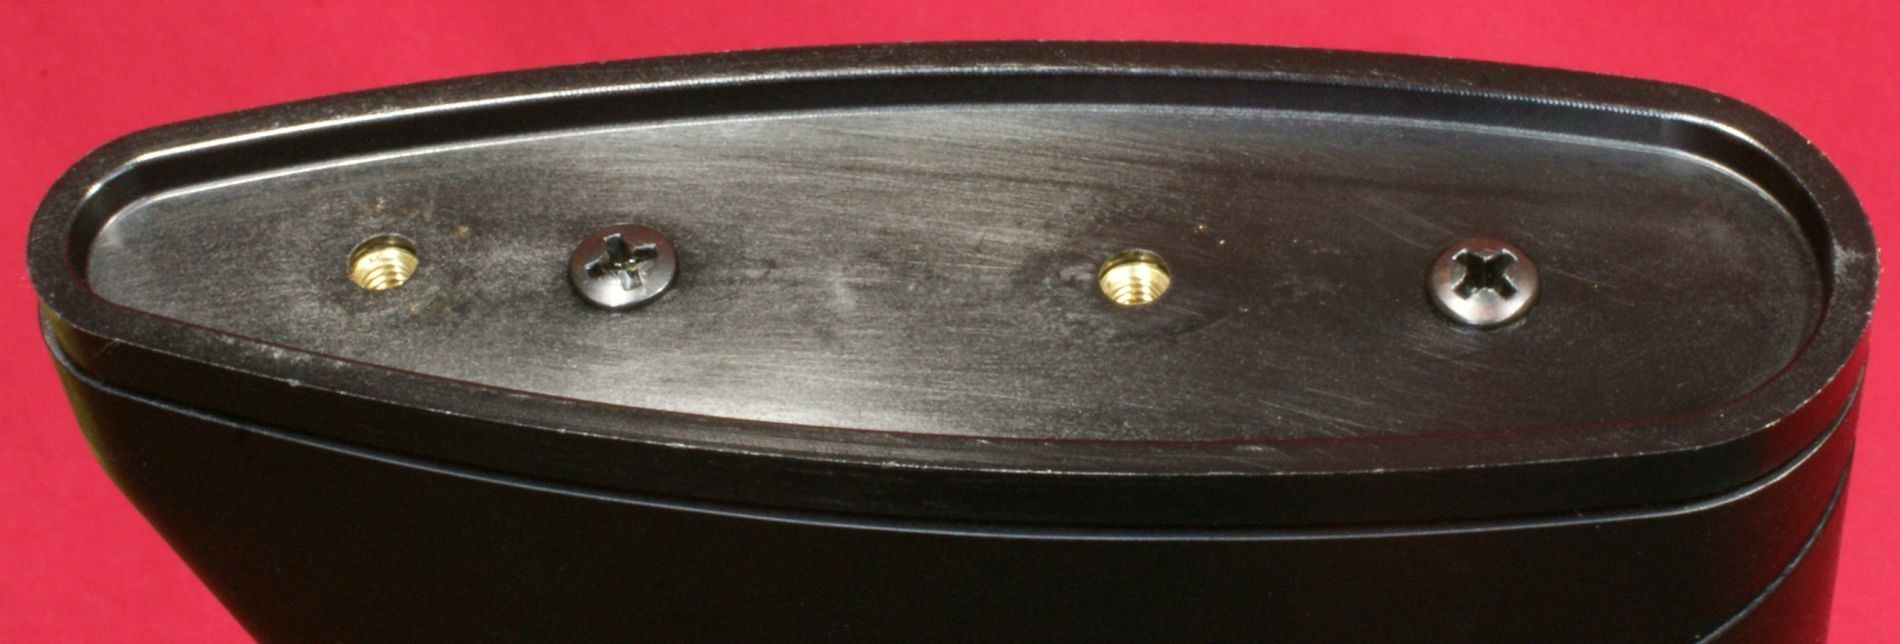
Ruger provided the middle size Allen wrench to use for removing the buttpad. I was glad to see that this was an Allen wrench instead of a Phillips screw head. To remove the buttpad, remove the two screws.
Figure 36

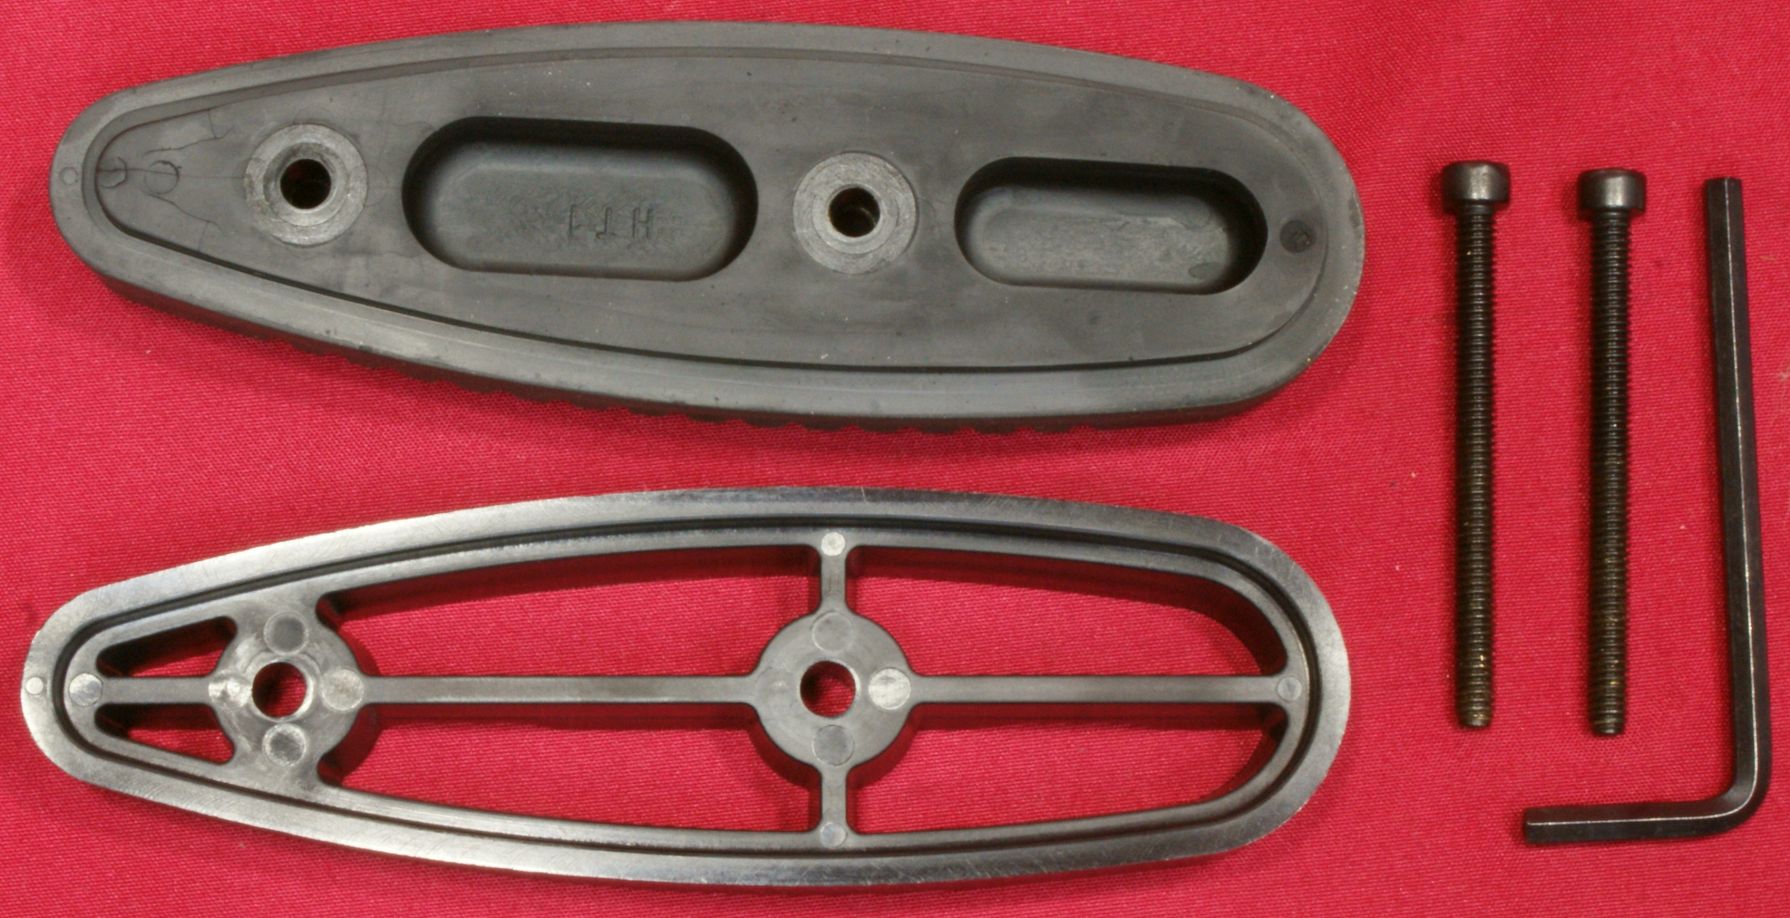
Ruger included what I'm going to call a transition plate attached with two Phillips head screws to the stock. This allowed them to put machine screw inserts in the plate to allow the use of the long machine type screws for adding or removing buttpad spacers.
Figure 37
The buttpad, single spacer and screws are shown below. I feel the greatest advantage of the buttpad is the rubbery texture which will help stick to your shoulder and keep the butt of the carbine in place. The stiffness of the rubber is so much that I don't think it will do much at absorbing recoil, but honesty a 9mm carbine doesn't have much recoil.
Figure 38
I pulled the single butt pad spacer to show this configuration and Ruger says this is a 12.62" length of pull.
Figure 39

I added all three spacers to show this configuration and the total length of pull is 14.12". I think the spacers are a great way to allow this carbine to fit a wide range of shooters, but I'm not a huge fan of the look of three spacers. I found that the single spacer installed has a good feel and will probably stick with that configuration even though I'm 6' 2" and could handle a longer length of pull.
Figure 40
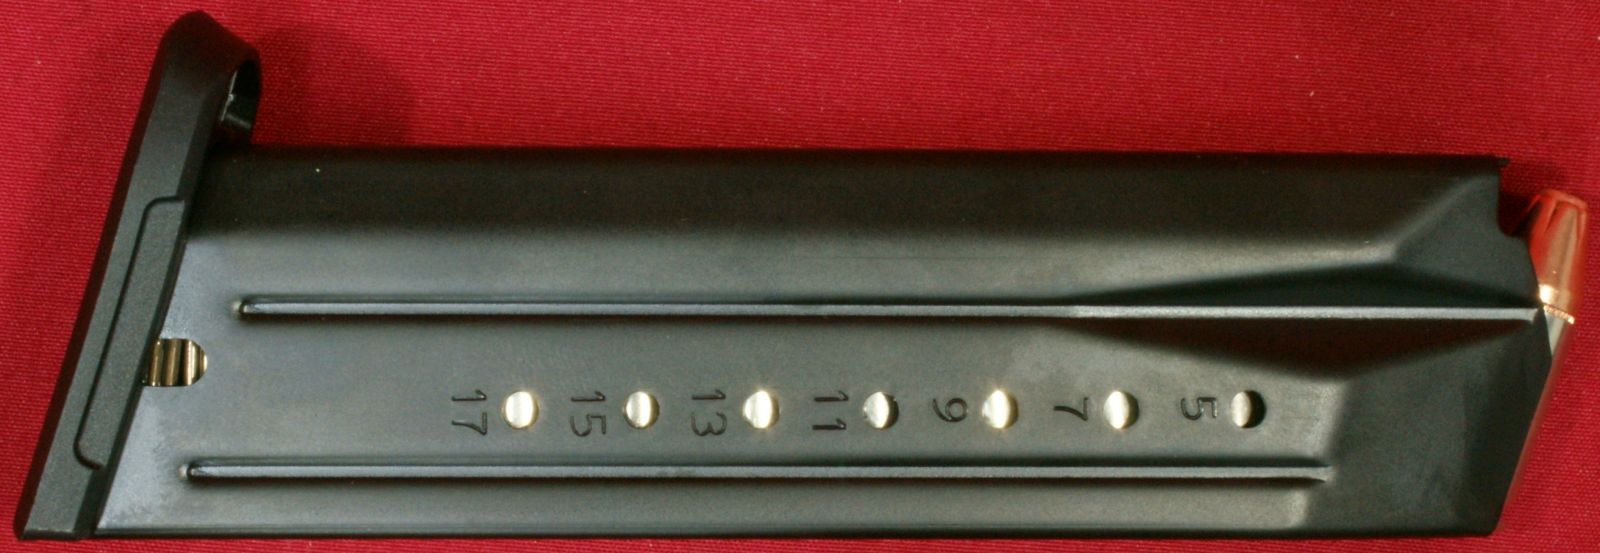
The PC Carbine comes with a single 17-round steel magazine. These magazines are manufactured in Italy by Mec-Gar who makes quality magazines for a wide range of firearms manufacturers. Ruger lists this carbine as a 17-round capacity, but in reality it is only limited in capacity to the largest Glock style magazine available. For me, that magazine size is currently a 33 round magazine but it can be up to a 50-round drum.
Figure 41
The magazines are drilled on each side to indicate the number of rounds loaded.
Figure 42
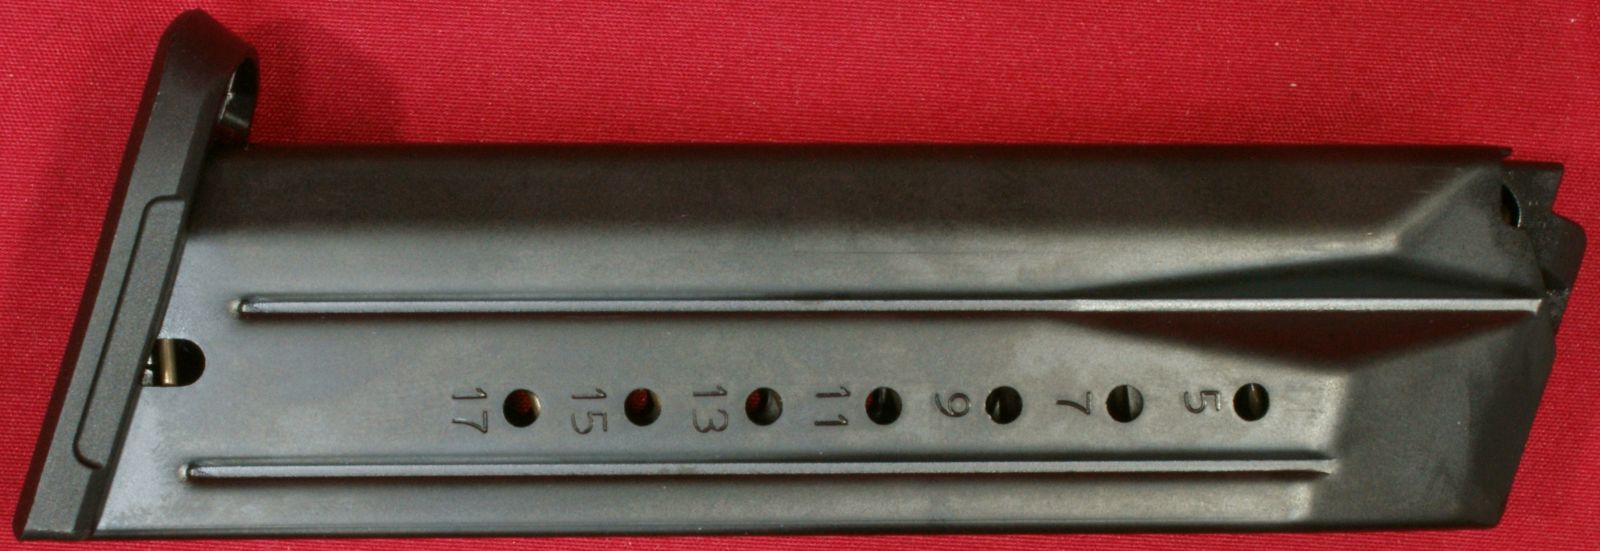
Figure 43
Figure 44
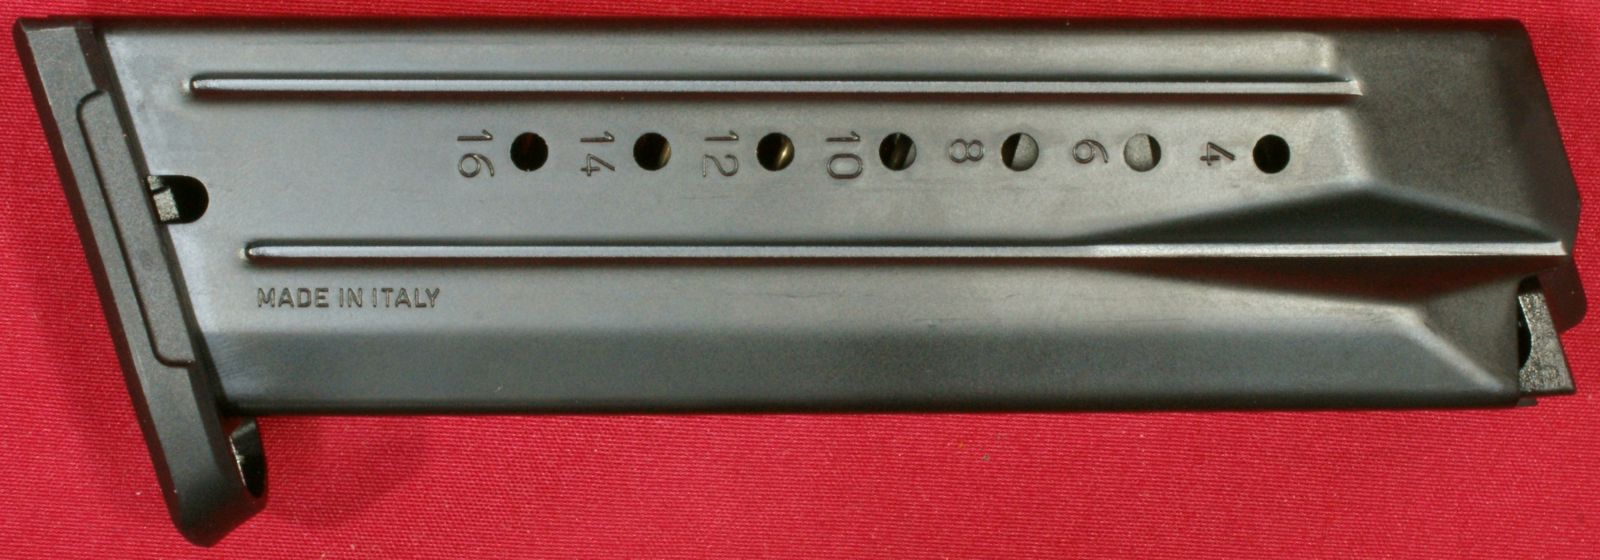
As you load rounds in the magazine, the rounds will cover holes drilled in the sides of the magazine. Below you can see that the 17 hole now looks shiny which means all 17 rounds are double stacked inside the magazine.
Figure 45
You can see a video version of the above details below.
Figure 46
Thoughts
I really like the Ruger PC Carbine and feel like it will be a huge hit for Ruger. It comes with ambidextrous features that will appeal to many shooters, accepts Glock magazines which opens it up to serious high capacity magazines if desired, seems to be a quality built firearm and it has a really good feel. Hopefully the photos and descriptions provided above give you a positive feel for this carbine because that is clearly my impression after doing this part of the reivew.
For more detailed photos and commentary, make sure you check out the other parts of this review and feel free to leave comments below. The following links are provided to help you see other parts of this review.
- Ruger PC Carbine Review: Part 1 - Introduction, Specifications and Summary
- Ruger PC Carbine Review: Part 2 - What's in the Box
- Ruger PC Carbine Review: Part 3 - External & Operational Features
- Ruger PC Carbine Review: Part 4 - Disassembly & Internal Features
- Ruger PC Carbine Review: Part 5 - Range Test
Or
If you would like to be notified about future Gunsumer Reports reviews via Facebook, make sure "You Like This" by clicking the Facebook "Like" button at the bottom or top of this page. If it already says "You Like This" beside the button, clicking it again will uncheck the "Like" status and you will not be notified.
| Share on Facebook | |
© 2010, 2011, 2012, 2013, 2014, 2015, 2016, 2017, 2018, 2019, 2020, 2021, 2022, 2023 & 2024 Gunsumer Reports™, All rights reserved.
FTC Disclosure